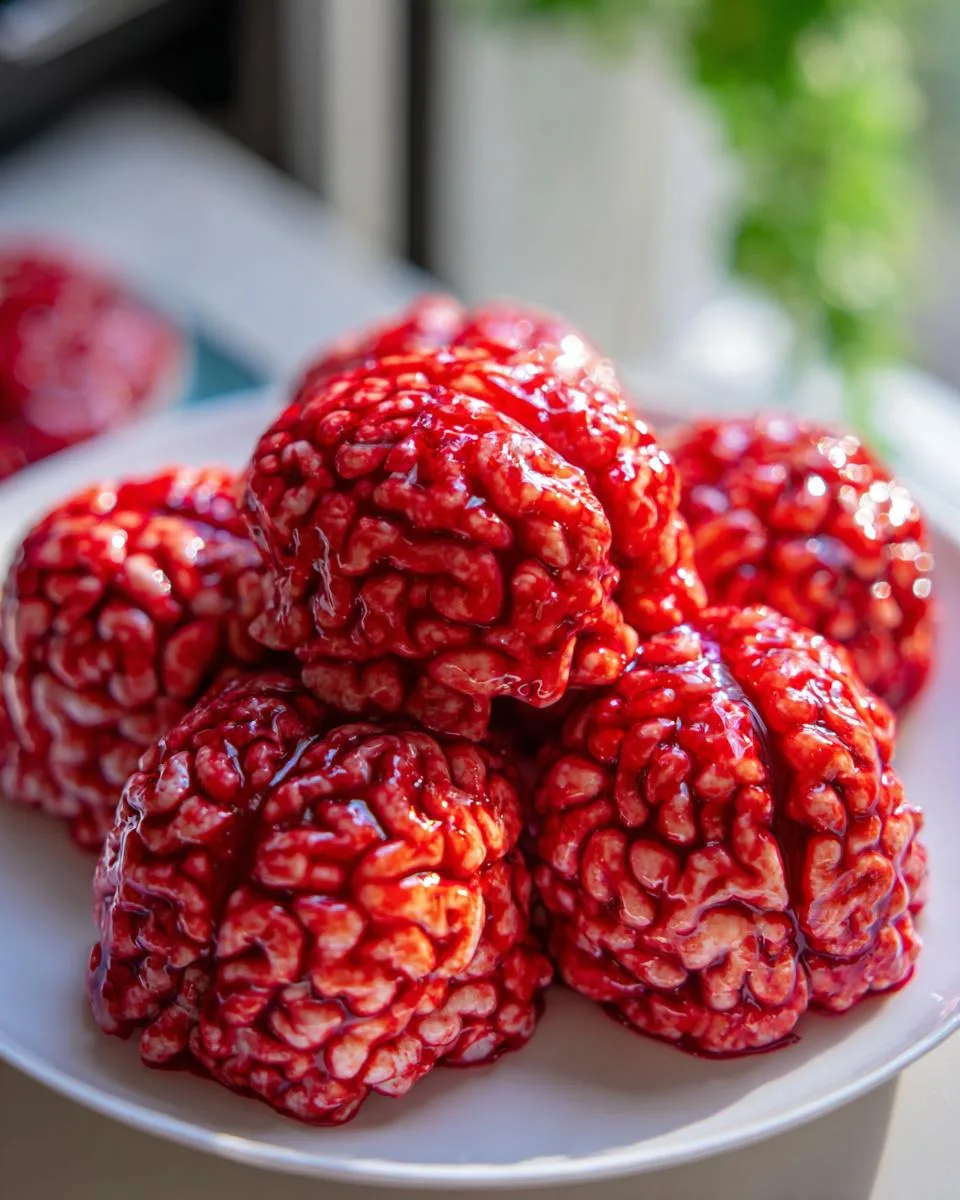
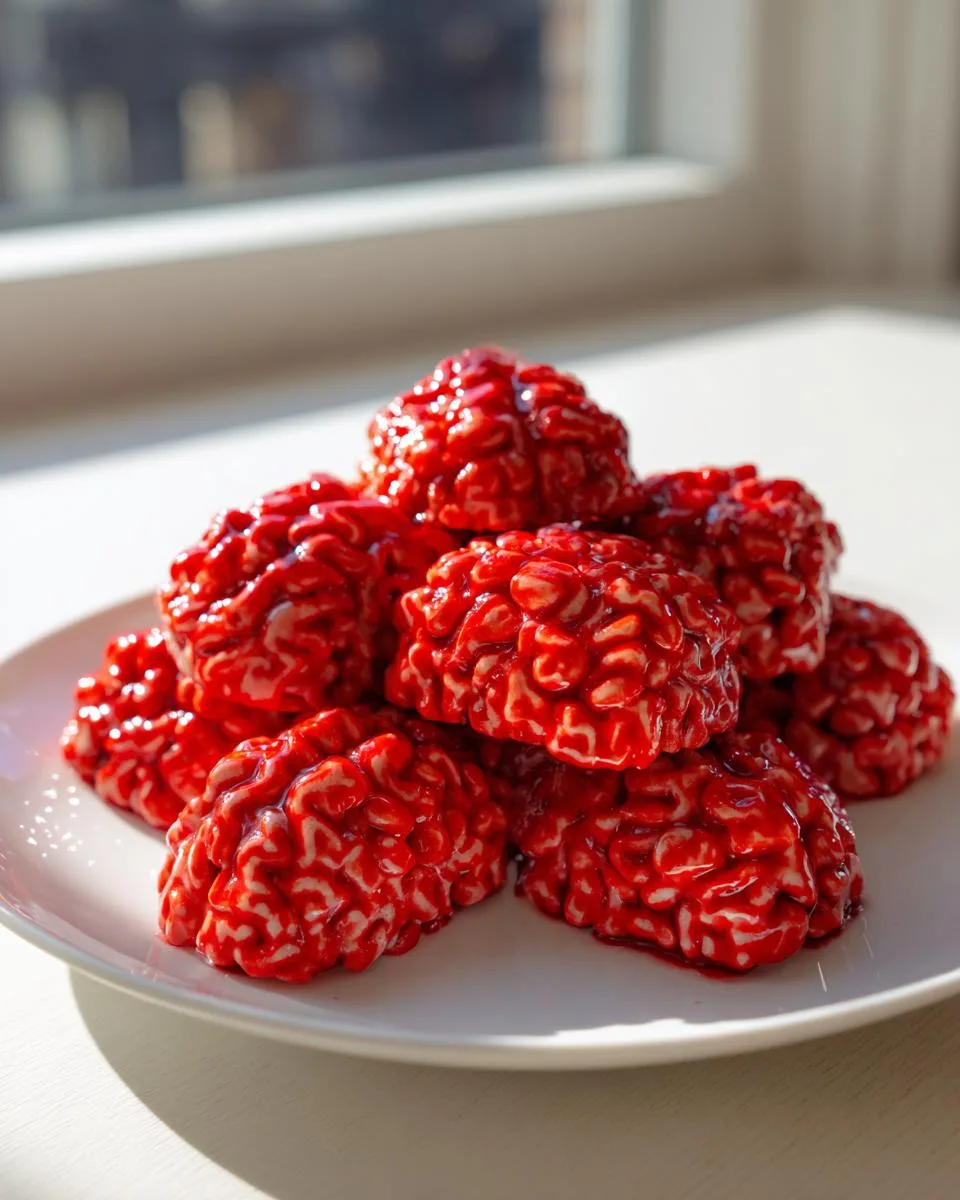
Oh my gosh, you have to try these Halloween marshmallow Rice Bubbles—they’re the easiest, creepiest party snack ever! I came up with this recipe when my six-year-old begged for “something gross but yummy” for her school Halloween bash. The look on her face when we shaped these into brainy blobs? Priceless. Just wait till you see how the red food coloring seeps into all the nooks and crannies, making them look properly gory (but still totally delicious). These no-bake treats come together in 15 minutes flat, and trust me, they disappear even faster at parties. Pro tip: double the batch—last year, my neighbor’s teenagers ate an entire tray before I could say “Boo!”
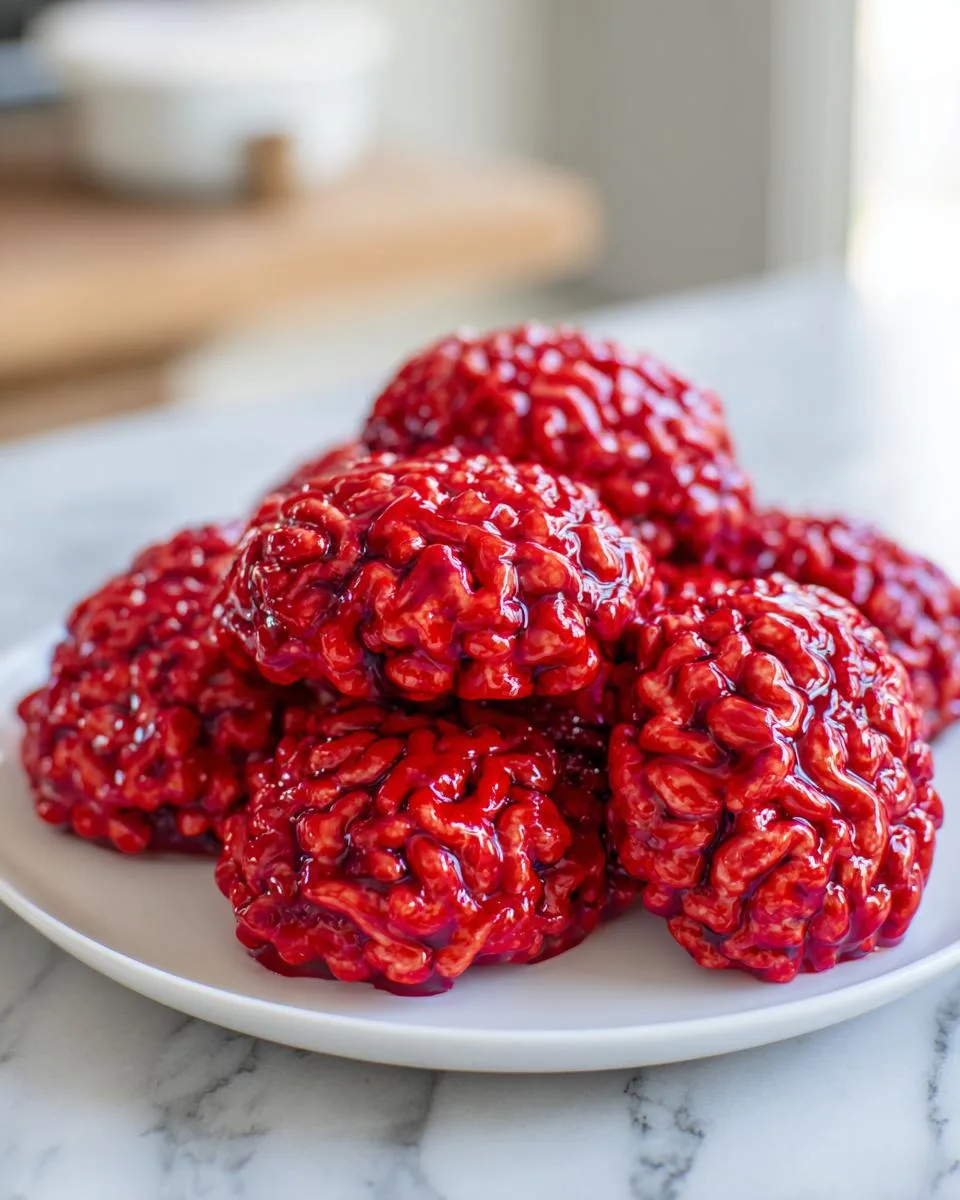
Table of Contents
Table of Contents
Why You’ll Love Halloween Marshmallow Rice Bubbles
Listen, these aren’t your average Rice Krispie treats—they’re a full-on Halloween party in every bite! Here’s why I’m obsessed:
- Instant spooky vibes – That deep red color and brain-like texture? Pure Halloween magic with zero carving skills needed
- Faster than a ghost saying “Boo!” – 15 minutes from pantry to party tray (perfect for last-minute “Mom, I need treats tomorrow!” emergencies)
- No oven required – Just melt, mix, and shape (no scary baking disasters here)
- Kid-approved grossness – Little monsters go wild for the creepy-crawly appearance (while secretly loving the sweet marshmallow taste)
- Customizable fright factor – Go blood-red for zombies or add edible eyeballs for extra screams
Seriously, these disappear faster than candy at trick-or-treating—last year’s batch was gone before I even put out the plastic spiders!
Print
15-Minute Halloween Marshmallow Rice Bubbles Kids Crave
- Prep Time: 10 minutes
- Cook Time: 5 minutes
- Total Time: 15 minutes
- Yield: 12 pieces 1x
- Category: Dessert
- Method: No-Bake
- Cuisine: American
- Diet: Vegetarian
Description
A fun and spooky Halloween treat made with marshmallows, Rice Bubbles, and red food coloring to resemble brains. Quick and easy to make, these are perfect for parties.
Ingredients
- 85 g unsalted butter
- 6 cups regular marshmallows
- 4 cups Rice Bubbles (Krispies)
- ½ tsp salt
- Red food coloring
Instructions
- Prepare a Bain-Marie by boiling 1/2 cup of water in a small pot. Place a large heatproof bowl over the pot.
- Add butter and marshmallows to the bowl. Whisk until smooth (2-4 minutes).
- Remove the bowl from heat. Add salt and food coloring, then whisk.
- In a separate bowl, mix Rice Bubbles with the marshmallow mixture until fully coated.
- Shape into ovals, make a dent in the middle, and draw veins with food coloring. Store in an airtight container for up to a week.
Notes
- Use oiled hands to prevent sticking when shaping.
- Adjust food coloring for a darker or lighter red.
- Best served fresh but can be stored for a week.
Nutrition
- Serving Size: 1 piece
- Calories: 120
- Sugar: 12 g
- Sodium: 50 mg
- Fat: 4 g
- Saturated Fat: 2.5 g
- Unsaturated Fat: 1 g
- Trans Fat: 0 g
- Carbohydrates: 20 g
- Fiber: 0 g
- Protein: 1 g
- Cholesterol: 10 mg
Ingredients for Halloween Marshmallow Rice Bubbles
Okay, here’s the deal – this recipe is so simple, but a few key ingredients make all the difference between “meh” marshmallow blobs and gloriously creepy brain treats. Here’s exactly what you’ll need (and why each one matters!):
- 85g unsalted butter – That’s about 6 tablespoons. Don’t use margarine unless you want sad, sticky brains that won’t hold shape. I learned that the hard way during my first Halloween party disaster!
- 6 cups regular marshmallows – The cheap supermarket kind work perfectly. Mini ones melt faster, but the big puffy ones give that perfect gooey stretch when you’re mixing.
- 4 cups Rice Bubbles (Krispies) – Must be name brand for that signature crunch! Off-brand cereals tend to get soggy faster – not the texture we want for our creepy creations.
- ½ tsp salt – Trust me, this tiny bit cuts the sweetness just enough so kids don’t bounce off the walls at your party. Learned this trick after my niece’s hyper sugar rush incident of 2020!
- Red food coloring – Gel works best for vibrant “bloody” color, but liquid food dye will do in a pinch. You’ll need about 10-15 drops for proper gore factor!
See? Nothing fancy – just pantry staples transformed into something awesomely spooky. Pro tip: measure everything before starting because once those marshmallows melt, you’ll be too busy creating Halloween magic to stop and measure!
Equipment You’ll Need
Alright, let’s talk tools—because nothing kills the Halloween fun faster than realizing halfway through that you’re missing something crucial! Here’s the shortlist of what you’ll need (and why each one matters):
- Heatproof bowl – This sits snugly over your pot for melting marshmallows. Glass or metal works best—plastic will warp (and nobody wants melted plastic mixed into their brains!).
- Small pot – Just big enough to hold about an inch of water for your Bain-Marie setup. A saucepan works too, but keep it small—we’re not cooking pasta here!
- Whisk – A sturdy one to beat that marshmallow-butter mixture into silky smoothness. Trust me, forks just don’t cut it when you’re fighting sticky marshmallow clumps.
- Spatula – For scraping every last bit of that glorious red goo into your Rice Bubbles. Silicone is my go-to—it doesn’t leave weird marks in your bowl like wooden spoons sometimes do.
- Airtight container – Unless you want your brain treats turning into stale cereal bricks overnight. I use a cake carrier because, let’s be honest, presentation matters even for edible organs!
That’s it! No fancy gadgets—just basic kitchen stuff you probably already own. Now let’s make some spooky magic!
How to Make Halloween Marshmallow Rice Bubbles
Alright, let’s get messy—this is where the magic happens! I’ll walk you through each step like I’m right there in the kitchen with you, because let’s be honest, melted marshmallow emergencies require moral support. Grab your tools and let’s make some gloriously gross edible brains!
Step 1: Melt the Marshmallows and Butter
First up—the Bain-Marie. Sounds fancy, but it’s just a fancy way of saying “bowl over simmering water.” Fill your small pot with about ½ inch of water and bring it to a gentle simmer. Now plop your heatproof bowl on top (make sure it’s not touching the water!) and add the butter and marshmallows. This is where patience is key—stir slowly with your whisk for 2-4 minutes until it turns into this silky, lava-like pool of deliciousness. You’ll know it’s ready when there are zero lumps and it pulls away from the sides of the bowl in glossy ribbons. Warning: That mixture is HOT—I may or may not have learned this by licking the whisk too soon. Oops!
Step 2: Mix in Color and Rice Bubbles
Off the heat it goes! Now for the fun part—stir in your salt and red food coloring. Start with 10 drops of gel color (or 15 if you’re using liquid) and whisk until it looks like something from a zombie movie. Next, dump in those Rice Bubbles—but here’s the trick: fold gently with your spatula like you’re tucking a baby ghost into bed. No aggressive stirring! We want every single bubble coated in that red goo, but still holding their crispy shape. I usually count to 30 strokes—any more and your “brains” will turn mushy. Pro tip: If the mixture starts setting too fast, pop the bowl back over the warm water for 20 seconds to loosen it up.
Step 3: Shape and Decorate
Time for the main event! Grease your hands with a bit of oil (butter or coconut oil works too) and scoop out golf ball-sized blobs. Roll them into ovals, then use your pinky to make a squiggly dent down the middle—instant brain vibes! For extra creep factor, grab a toothpick and drag it through the surface to make “veins.” Work quickly though—this stuff sets fast! If it starts sticking, just re-grease your hands. My kids love helping with this part (though half the marshmallow usually ends up on their faces instead of the tray). Let them cool completely before stacking in your airtight container—unless you want one giant brain monster instead of individual treats!
Tips for Perfect Halloween Marshmallow Rice Bubbles
Listen, I’ve made enough marshmallow brains to know the little tricks that take them from “cute” to “OMG that’s disgusting!” Here are my hard-earned secrets:
- Food coloring drama? Gel gives deeper reds, but if you only have liquid, add it drop by drop until you get that perfect bloody hue. Too light? A tiny pinch of cocoa powder deepens the color without changing the taste.
- Sticky situation? Grease EVERYTHING—hands, utensils, even the bowl before mixing. Pro tip: Keep a bowl of cold water nearby to dip your fingers in when shaping.
- Storage smarts: Layer them between parchment paper in an airtight container—they’ll stay fresh for a week (if they last that long!). Avoid the fridge unless you like rock-hard cereal bricks.
Trust me, these small tweaks make all the difference between Halloween hero and sticky-fingered disaster!
Variations for Halloween Marshmallow Rice Bubbles
Who says brains have to be red? Here’s how to mix up this recipe for different Halloween vibes—because sometimes you want Frankenstein over zombies!
- Monster Mash-Up – Swap red for green food coloring and press in candy eyeballs while the mixture is still warm. Instant swamp creature snacks!
- Witch’s Cauldron – Add black food gel and mini chocolate chips for a “bat wing” texture—spooky and chocolatey!
- Pumpkin Patch – Shape into small rounds, add orange coloring, and use pretzel sticks as stems. Cute enough for kindergarten parties!
The beauty? These still take 15 minutes—just with different colored fingers afterward!
Serving and Storing Halloween Marshmallow Rice Bubbles
Here’s the scoop—these creepy-crawly treats are best served the same day when they’re still gloriously gooey (just like fresh brains should be!). But if you must store them, here’s how to keep them from turning into cereal bricks:
- Airtight is right – Toss them in a container with a tight lid, separated by parchment paper. They’ll stay deliciously squishy for up to a week—if your little monsters don’t devour them first!
- Room temp wins – The fridge is a no-go—cold temperatures make them hard as a haunted house floorboard. Counter storage keeps that perfect chewy texture.
- Freezer? Forget it! Frozen marshmallow brains turn into weird, crumbly messes that even zombies wouldn’t touch. Trust me on this one—last year’s “experiment” ended in the trash!
Pro tip: If they do stiffen up, 5 seconds in the microwave brings back that fresh-from-the-lab squish!
Halloween Marshmallow Rice Bubbles FAQs
After seven Halloweens of making these creepy treats (and fielding panicked texts from friends mid-recipe), here are the answers to all your burning marshmallow brain questions:
How long do these stay fresh?
About a week in an airtight container at room temp—but good luck keeping them around that long! The salt in the recipe helps prevent staleness. If they do dry out, 5 seconds in the microwave brings back the ooey-gooey texture.
Why won’t my marshmallows melt properly?
Ah, the classic struggle! Either your heat’s too high (causing scorching) or too low (creating rubbery clumps). Medium-low is the sweet spot—and stir constantly! Also, mini marshmallows melt faster than jumbo ones if you’re in a hurry.
Can I use something besides Rice Bubbles?
Technically yes, but other cereals won’t give that perfect brain-like texture. Cornflakes get too hard, Cheerios stay too round—trust me, I’ve made all the mistakes so you don’t have to! If you must substitute, puffed rice cereal comes closest.
Help! My food coloring turned everything pink instead of red!
Classic rookie move! Gel coloring gives richer colors than liquid. If you only have liquid, start with 15 drops and add cocoa powder pinch by pinch until it deepens. And remember—real brains aren’t neon red anyway, so embrace the creepy pink!
Can I make these ahead for a party?
Absolutely! Shape them 1-2 days before and store layered with parchment paper. The “veins” might soften slightly, but a quick toothpick touch-up right before serving fixes that. Just don’t refrigerate—cold turns them into cement!
Nutritional Information
Okay, let’s be real—these Halloween marshmallow Rice Bubbles aren’t exactly health food (unless “brain fuel” counts as a dietary requirement!). But since I know some of you like to keep track, here’s the general scoop:
- Each brain-shaped treat packs about 120 calories—mostly from that magical marshmallow-butter combo
- They’ve got a bit of fat (thanks, butter!) and a good dose of sugar (obviously!)
- No protein to speak of, unless you count the “muscle” in your arms from stirring all that sticky goodness
Remember: Nutritional values are estimates and vary based on ingredients used. Want to feel less guilty? Call them “energy bites for trick-or-treating stamina”—that’s what I tell myself when I eat three in a row!
For more fun Halloween recipes, check out our recipes section!
If you enjoyed these Halloween Marshmallow Rice Bubbles, you might also like our Halloween Stuffed Peppers or our Spooky Mozzarella Skulls.
Follow us on Facebook for more delicious recipes and cooking tips!


