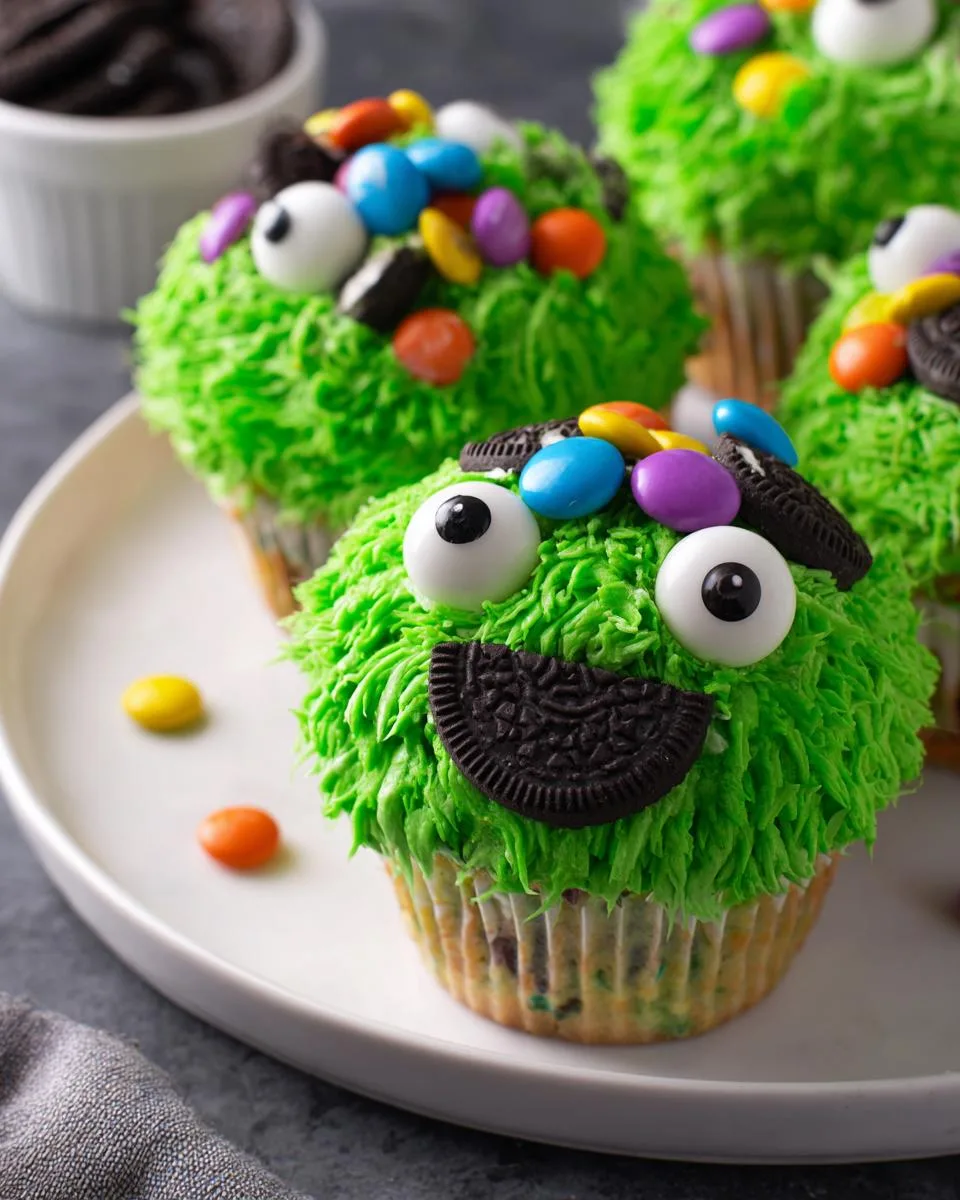
Let me tell you about my absolute favorite Halloween baking project – these hilarious, slightly terrifying, but oh-so-delicious Halloween Monster Cupcakes! Every October, my kitchen turns into a mad scientist’s lab, with bowls of neon frosting, candy eyeballs rolling everywhere, and OREO crumbs mysteriously appearing in places they shouldn’t. The best part? These little monsters are ridiculously easy to make, even if your usual decorating skills max out at “kind of messy swirl.” Last year, my 5-year-old nephew helped decorate a batch, and his wonky-eyed creations were the hit of the school party – proof that perfection is totally optional with these spooky treats!
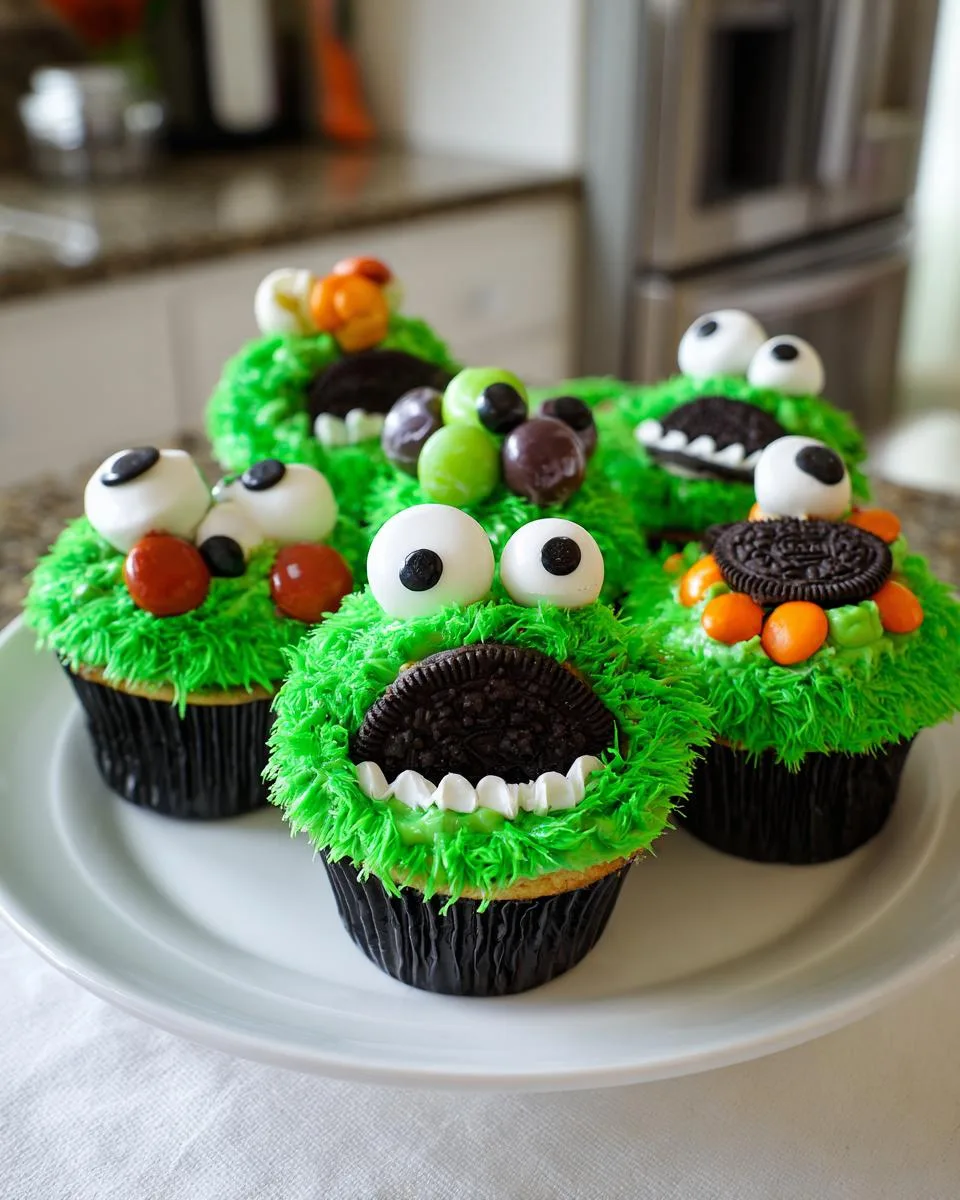
Table of Contents
Table of Contents
Ingredients for Halloween Monster Cupcakes
Gather your mad scientist supplies – here’s what you’ll need to create these adorably creepy treats. Trust me, I’ve made enough monster cupcakes to know these are the essentials that give you the best results every time.
- 1 grass icing tip (the small star-shaped one – Wilton #233 is my go-to)
- 24 pre-baked cupcakes, completely cooled (use your favorite recipe or even store-bought in a pinch)
- 1 cup buttercream frosting, divided into portions for coloring (homemade or store-bought both work)
- Gel food coloring in your monster hues of choice (the gels give the most vibrant colors – I always have neon green, purple and electric blue on hand)
- Candy eyeballs in assorted sizes (the more mismatched, the better for that perfect monster look)
- 1 package OREOs (use mini ones whole or halve the regular size for different mouth effects)
Little pro tip from my messy experiments – keep some extra OREOs on hand because someone (probably you) will definitely snack on a few while decorating!
How to Make Halloween Monster Cupcakes
Alright, let’s turn those ordinary cupcakes into screamingly adorable monsters! I promise it’s easier than it looks – just follow these steps and you’ll have a whole army of cupcake monsters ready to party.
Coloring the Frosting
First up – monster makeovers start with wild colors! Here’s my foolproof method:
Divide your buttercream into separate bowls (how many colors you want is up to you – I usually do 3-4 crazy shades). Now grab your gel food coloring – trust me, gels work WAY better than liquid for vibrant hues that won’t water down your frosting.
Start with just a toothpick dab of color and mix it in. You can always add more, but you can’t take it out! Warning: Overmixing can make your frosting greasy, so stop when you’ve got those perfect monster colors. If your frosting gets too soft from all the mixing? No worries – just pop it in the fridge for 10 minutes to firm up.
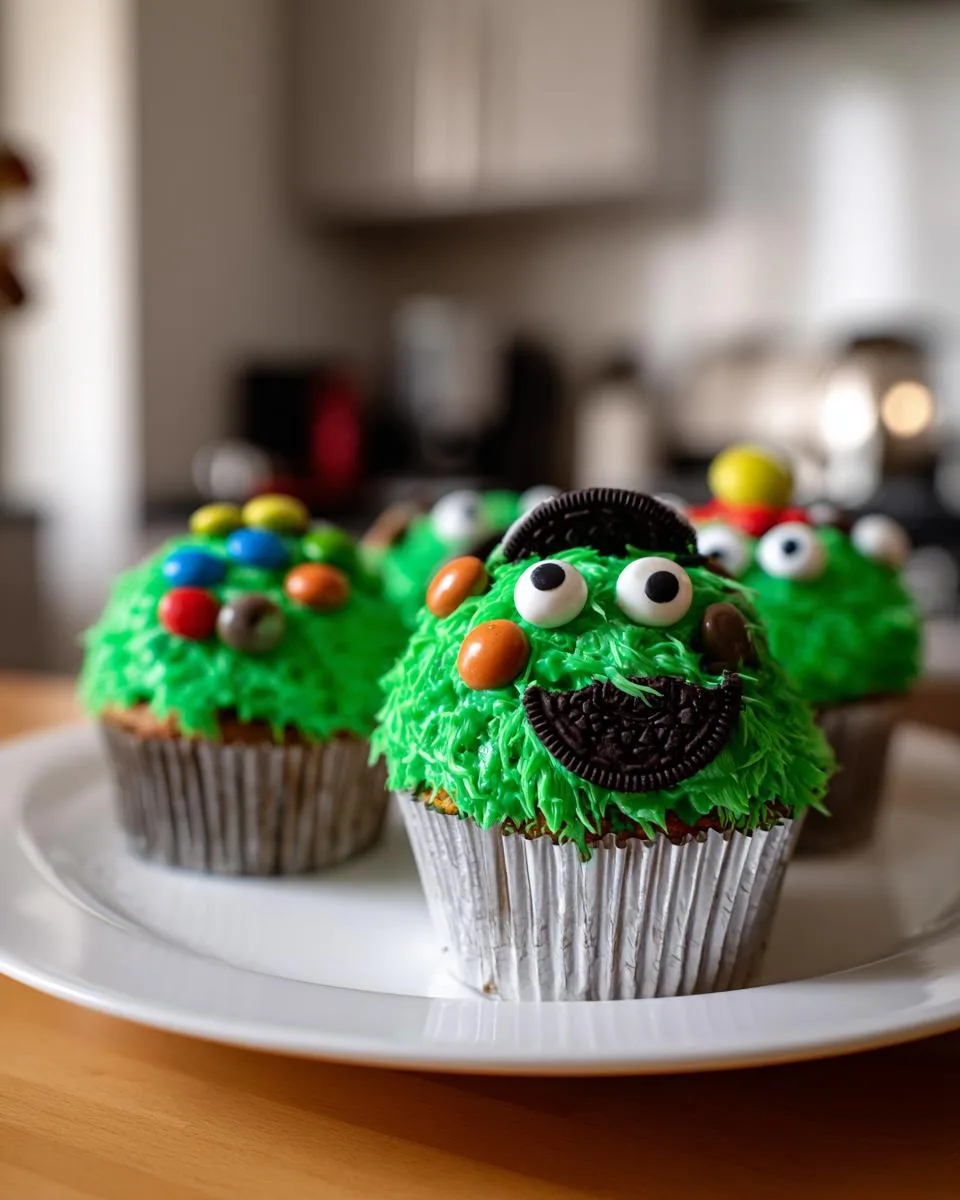
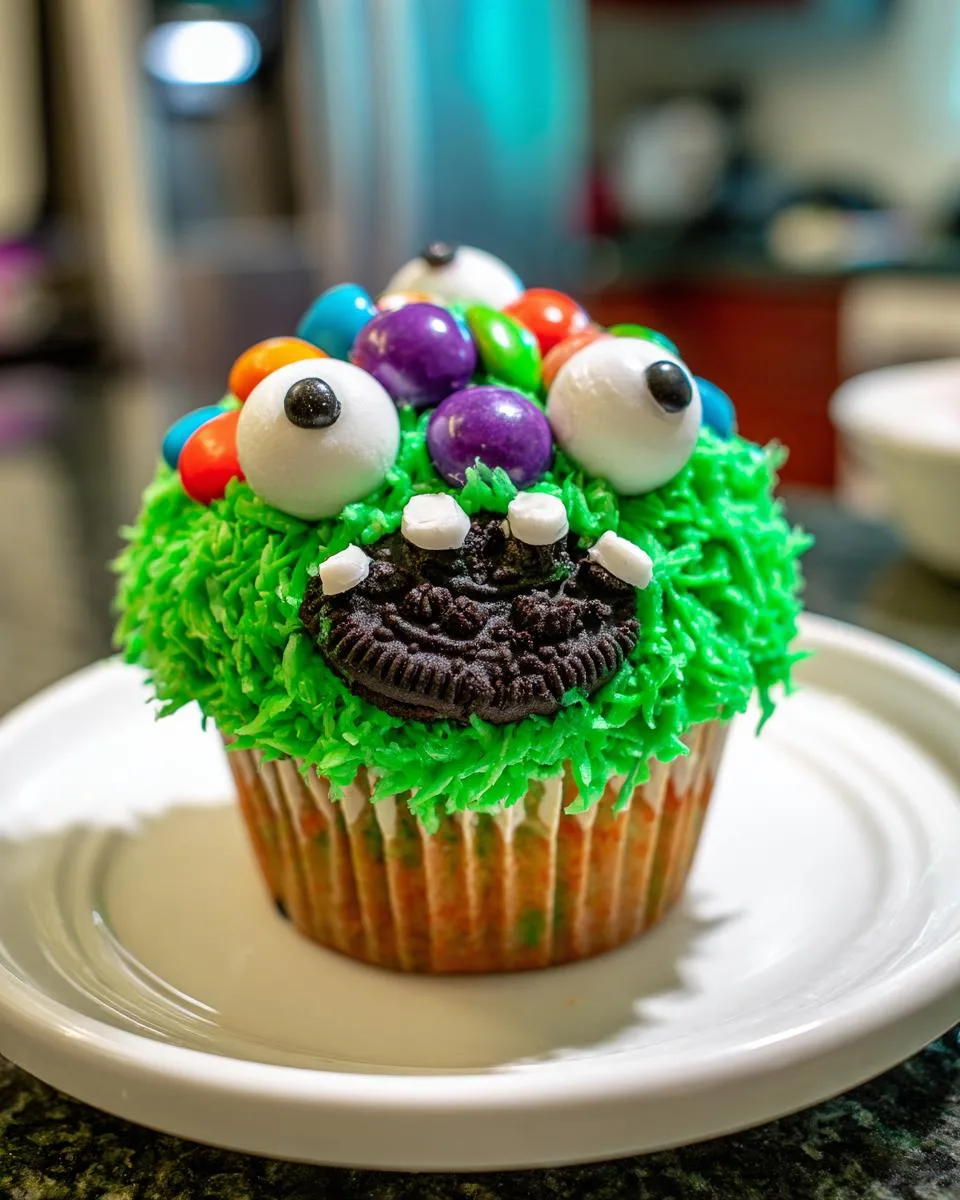
Piping the Monster Fur
Time for the fun part – creating that wild monster fur! Fit your piping bag with the grass tip (that’s the small star-shaped one). Fill it with your colored frosting – I find filling about halfway gives me the best control.
Hold the bag straight up over your cupcake, about 1/4 inch above the surface. Starting from the outside edge, pipe short bursts while pulling straight up – you want little “hairs” of frosting. Work your way inward in circles until the whole top is covered.
Pro tip: If your fur looks sparse at first, don’t panic! Just go back and fill in gaps – monsters are supposed to be messy anyway. The more uneven the better!
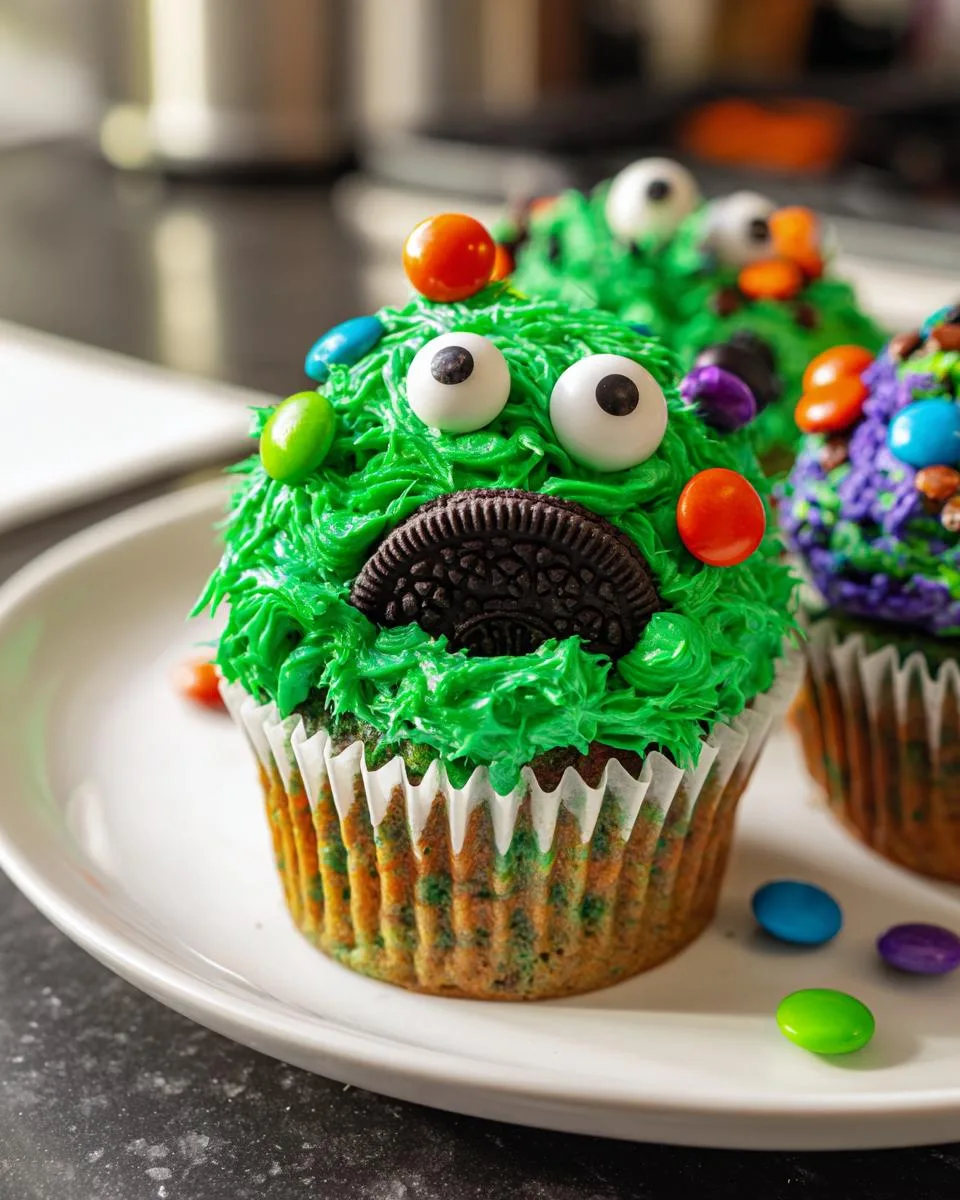
Adding Eyes and Mouths
Now comes the personality! Grab those candy eyeballs – using different sizes makes them extra fun. Press them gently into the frosting while it’s still soft. I like to give some monsters crossed eyes, others with one big eye, or even clusters of tiny eyes!
For mouths, break some OREOs in half or use mini ones whole. Press them into the frosting to create mouths. Angle them sideways for a crazy grin or upside down for a shocked expression. Feeling fancy? Pipe tiny white frosting teeth peeking out!
Remember – there are NO rules here. Some of my best monster cupcakes happened when I “messed up” and got creative!
Print
Spooky 24 Halloween Monster Cupcakes Kids Crave
- Prep Time: 15 mins
- Cook Time: 20 mins
- Total Time: 35 mins
- Yield: 24 cupcakes 1x
- Category: Dessert
- Method: Baking
- Cuisine: American
- Diet: Vegetarian
Description
Fun and easy Halloween Monster Cupcakes decorated with colorful fur, candy eyeballs, and OREO mouths.
Ingredients
- 1 Grass Icing Tip (Small star icing tip)
- 24 Cupcakes (pre-baked)
- 1 cup Buttercream Frosting
- Food Coloring (of choice for monster “fur”)
- Candy Eyeballs (assorted sizes)
- 1 package OREOs (various sizes)
Instructions
- Mix your frosting with food coloring to create monster “fur.”
- Insert the grass icing tip into a piping bag.
- Fill the piping bag with colored icing and pipe fur onto cupcakes, starting from the outside and working inward.
- Add candy eyeballs—use different sizes for a fun effect.
- Place OREO mouths (full small OREOs or halved large OREO cookies).
- Pipe white frosting teeth if desired.
- Get creative and have fun decorating!
Notes
- Use gel food coloring for vibrant colors.
- Store cupcakes in an airtight container to keep them fresh.
- Experiment with different monster designs.
Nutrition
- Serving Size: 1 cupcake
- Calories: 180
- Sugar: 12g
- Sodium: 85mg
- Fat: 7g
- Saturated Fat: 3g
- Unsaturated Fat: 2g
- Trans Fat: 0g
- Carbohydrates: 28g
- Fiber: 1g
- Protein: 2g
- Cholesterol: 15mg
Tips for Perfect Halloween Monster Cupcakes
After making more monster cupcakes than I can count (and cleaning up more frosting disasters than I’d like to admit), I’ve picked up some killer tricks that’ll take your creations from “cute” to “creep-tastic!” Here’s everything I wish I knew when I started:
- Tweezers are your secret weapon – Those tiny candy eyeballs love to roll away. A clean pair of tweezers lets you place them perfectly without smudging your frosting masterpiece.
- Freeze your OREOs first – Want super clean breaks when making monster mouths? Pop your OREOs in the freezer for 15 minutes before snapping them. They’ll break cleanly instead of crumbling!
- Chill between steps – If your kitchen’s warm, stick your frosted cupcakes in the fridge for 10 minutes before adding decorations. This keeps the fur texture perfect and prevents eye-rolling disasters (literally).
- Layer your colors – For extra wild monsters, pipe two different colored frostings in your bag (don’t mix them!). You’ll get awesome tie-dye fur effects that look professionally done.
- Use a flower nail for messy bakers – If you’re like me and get frosting everywhere, try decorating your cupcakes while they’re on a flower nail (or upside-down glass). No more fingerprint smudges on your perfect fur!
- Baby wipes save the day – Keep some unscented wipes nearby to quickly clean your hands between colors without running to the sink every two minutes.
- Embrace imperfections – Some of my best monster cupcakes happened when things went “wrong.” Crooked eyes? Lopsided mouths? That’s just extra personality!
Seriously, the only real rule is to have fun with it. Last year, one of my cupcakes ended up looking like it had a unibrow, and it was the first one gone at the party! Sometimes the “mistakes” become the most memorable creations.
Halloween Monster Cupcakes Variations
Once you’ve mastered the basic monster look, the real fun begins – time to get creative with some wild variations! I love experimenting with new monster personalities every Halloween. Here are some of my favorite twists that always get screams (the good kind) at parties:
Zombie Invasion Cupcakes
For these walking dead treats, I use pale green frosting with streaks of gray (just mix in a tiny bit of black gel coloring). Add some red gel “blood” dripping from mouths and give them lopsided OREO mouths with broken teeth. Bonus points if you add pretzel stick “bones” sticking out of the frosting!
Cyclops Cuties
Sometimes less is more – I make these with smooth frosting (no fur) in bright colors, then add one giant candy eyeball right in the center. Pipe some crazy eyelashes or angry eyebrows with black gel for extra expression. These are perfect when you’re short on time but want big impact.
Hairy Monster Madness
Take the fur technique to the extreme by mixing different colored frostings in your piping bag without blending them. When you pipe, you’ll get incredible tie-dye fur that looks professionally done. I call this my “punk rock monster” look – especially fun with neon colors!
Vegan Monster Options
For my plant-based pals, just swap in your favorite vegan buttercream (I like the coconut oil based ones) and use vegan OREO alternatives. The candy eyes can be tricky – look for ones made with plant-based shellac or make your own with royal icing. Pro tip: Melted vegan white chocolate works great for quick homemade eyes!
Gluten-Free Ghouls
Use your favorite GF cupcake recipe and swap the OREOs for gluten-free chocolate sandwich cookies (Glutino makes great ones). All other ingredients are naturally GF – just double check your candy eyes if that’s a concern.
Monster Mash-Ups
Why stop at just eyes and mouths? I’ve had a blast adding:
- Licorice laces for arms or crazy hair
- Chocolate chips for warts or spots
- Shredded coconut (dyed green) for shaggy fur
- Gummy worms crawling out of “mouths”
The best part about monster cupcakes? There are NO rules. Last year I made a whole batch where each cupcake represented a different family member’s “monster mood” – my sister still hasn’t forgiven me for the one with bedhead frosting and grumpy eyebrows!
Storing and Serving Halloween Monster Cupcakes
Okay, let’s talk about keeping your monster creations looking (and tasting) their best until the big Halloween bash! After all that hard work decorating, you don’t want your fuzzy little creatures getting stale or – horror of horrors – having their eyeballs slide off!
First rule of monster cupcake club: store them at room temperature in an airtight container. I’m serious about this – refrigeration is the enemy here. That cold air makes the frosting sweat, and suddenly your perfect monster fur turns into a flat, shiny mess. I learned this the hard way when an entire batch of my green monsters looked like they’d melted in the rain!
If you must refrigerate (maybe your kitchen is super warm), here’s my trick: Let them come fully to room temperature in the container before opening it. This prevents condensation from forming on your frosting masterpieces. But honestly? I’ve found they keep just fine at room temp for 2-3 days when stored properly.
For serving, I like to arrange them on a cool, dry platter – no direct sunlight or they’ll start sweating faster than a kid in a werewolf costume! Pro tip: If you’re transporting them, place a sheet of parchment between layers in your container to prevent any monster fur from getting squashed.
One last thing – those candy eyeballs can fade if left out too long (who knew monsters could get sunburned?). If you’re prepping more than a day ahead, store the undecorated cupcakes and add the eyes and OREO mouths just before serving. This keeps everything looking fresh and vibrant for your spooky soiree!
Halloween Monster Cupcakes Nutritional Information
Okay, let’s be real – these monster cupcakes aren’t winning any health food awards, but who cares when they’re this fun? Here’s the nutritional breakdown per cupcake (because someone’s bound to ask while they’re eating their third one). Just remember – these are estimates since your exact ingredients might vary. My philosophy? Everything in moderation – especially when it comes to edible monsters!
- Calories: About 180 per cupcake (but who’s counting on Halloween?)
- Sugar: 12g (blame the frosting and candy eyeballs)
- Fat: 7g (that buttercream is worth every gram)
- Carbs: 28g (mostly from the cupcake and OREO smiles)
- Protein: 2g (hey, those eyeballs have to come from somewhere!)
Important note – these values can change depending on whether you use homemade or store-bought frosting, different cupcake recipes, or if you go wild with extra decorations. The OREO mouths and candy eyes add more sugar than you’d expect! My advice? Enjoy them guilt-free – it’s Halloween! Maybe just balance it out with some apple slices later… or not.
Disclaimer: Nutritional values are estimates and vary based on ingredients/brands used. These calculations are based on average values and standard preparation methods – your actual nutrition may differ if you, say, add an extra handful of candy eyeballs (no judgment here).
Frequently Asked Questions
Can I use store-bought cupcakes for this recipe?
Absolutely! I do this all the time when I’m short on time – just make sure they’re completely cooled before decorating. The secret? Give them a quick “refresh” in the microwave for 5 seconds to bring back that fresh-baked texture before adding your monster fur. Some grocery store bakeries will even sell you undecorated cupcakes if you ask nicely!
How do I prevent smudged decorations when storing the cupcakes?
Ah, the tragic tale of the smudged monster face! Here’s my foolproof method: First, make sure your frosting is completely set (about 30 minutes at room temp). Then, store them in a single layer in an airtight container – I like to use cake carriers with the high dome lids. If you must stack them, place parchment paper between layers and put the sturdiest decorations (like OREO mouths) on the bottom layer.
Can I make these Halloween monster cupcakes ahead of time?
You sure can! The cupcakes themselves freeze beautifully for up to a month – just wrap them tightly. Frosting can be made 3 days in advance and stored in the fridge (bring to room temp and re-whip before using). But here’s my golden rule: Add those adorable candy eyeballs no more than a day before serving, or they might start to bleed color into your frosting. Nobody wants pink-eyed monsters!
What’s the best way to transport these to a party?
After one too many “monster mash” incidents in my backseat, I’ve perfected the transport method. Use a cupcake carrier with individual slots, or place them in a sturdy box with non-slip shelf liner underneath to prevent sliding. Pro tip: Bring extra candy eyes and OREOs in a baggie for quick touch-ups upon arrival – monsters sometimes lose their features in transit!
Can kids help decorate these monster cupcakes?
Are you kidding? This is the PERFECT kid-friendly project! I set up a “monster decorating station” with bowls of different colored frostings, toppings, and tools. Little hands might not master the piping bag right away, but they create the most hilariously creative monsters. Just be prepared for some… interesting interpretations of what a monster should look like (last year my niece gave hers spaghetti hair made from licorice strings).
There you have it – everything I’ve learned from years of creating these adorably creepy Halloween monster cupcakes! From the first time I nervously piped that green “fur” to now, when my kitchen looks like a mad scientist’s lab every October, these little monsters have brought so much joy (and a few good scares) to our Halloween celebrations. The best part? No two batches ever turn out exactly the same – each one develops its own wild personality as you decorate.
Now I want to see YOUR spooky creations! Did you invent a new monster variety? Maybe one with three eyes or rainbow fur? Did your kids come up with some hilariously weird designs? Share your monster cupcake masterpieces (or happy accidents) with us in the comments below – I can’t wait to see what terrifyingly delicious creations you’ve dreamed up! You can also find more fun recipes on our Facebook page.
And hey – if you run into any cupcake monster emergencies, just shout. I’ve made pretty much every mistake possible with these, so I’m basically a professional monster cupcake troubleshooter at this point. Happy haunting… I mean, baking!


