There’s something magical about turning summer’s bounty into a comforting dish that disappears faster than you can say “seconds please!” My yellow squash and zucchini casserole became a family favorite completely by accident – I threw together some garden veggies one rushed weeknight, and now they beg for it year-round. The beauty of this recipe lies in its simplicity: fresh zucchini and yellow squash get cozy with garlicky cream before getting crowned with that irresistible crispy parmesan-panko topping. It’s the kind of side that steals the show at potlucks yet comes together with barely any effort. I’ve served this alongside everything from Sunday roast chicken to weeknight burgers, and it never fails to make the meal feel special.

Table of Contents
Table of Contents
Why You’ll Love This Yellow Squash and Zucchini Casserole
This isn’t just another vegetable side dish – it’s the one that’ll have everyone asking for the recipe! Here’s why it’s become my go-to summer casserole:
- Effortless elegance: With just 15 minutes of prep, you’re minutes away from a dish that tastes like you spent hours in the kitchen. The vegetables do all the work!
- That irresistible crunch: The golden panko-Parmesan topping adds the perfect contrast to the tender squash underneath – I always make extra because someone inevitably steals bites straight from the pan.
- Summer freshness in every bite: Unlike heavy casseroles, this lets the natural sweetness of zucchini and yellow squash shine through, with just enough cream and garlic to make it comforting.
- Total crowd-pleaser: Even veggie skeptics go back for seconds – the crispy topping wins them over every time. It’s disappeared at every potluck I’ve brought it to!
Trust me, once you try this combination of fresh summer flavors and that addictive crispy topping, you’ll understand why it’s become my most-requested recipe! If you are looking for more great recipes, check out my recipe index!
Ingredients for Yellow Squash and Zucchini Casserole
Gathering the right ingredients makes all the difference with this simple yet spectacular casserole. Here’s exactly what you’ll need – I’m particular about these measurements because they create that perfect balance of creamy and crispy:
- 2 tablespoons butter – I always use unsalted so I can control the seasoning
- 2 medium zucchini (about 7-8 inches long), cut into 1/4-inch slices – uniform thickness ensures even cooking
- 2 medium yellow summer squash (same size as zucchini), also sliced 1/4-inch thick
- 2 shallots, minced – these add sweetness without overpowering
- 1/2 teaspoon sea salt – I prefer the clean taste of sea salt over table salt
- 1/4 teaspoon coarsely ground pepper – freshly cracked makes all the difference
- 4 garlic cloves, minced – yes, four! They mellow beautifully when cooked
- 1/2 cup heavy whipping cream – the richness makes it special
- 1 cup panko bread crumbs, divided – Japanese-style crumbs stay crispier
- 1/2 cup grated Parmesan cheese, divided – freshly grated melts better than pre-shredded
A quick tip: When selecting squash, look for firm ones about 1.5 inches in diameter – too large and they’ll be watery, too small and they won’t have developed enough flavor yet.
Equipment Needed
You won’t need any fancy gadgets for this casserole – just a few trusty kitchen staples that you probably already have:
- Large skillet – A 12-inch works perfectly for sautéing all those veggies without crowding
- 11×7-inch or 2-quart baking dish – My well-loved ceramic dish gets the job done every time
- Measuring cups and spoons – For getting those ingredient ratios just right
- Sharp knife and cutting board – Essential for those perfect 1/4-inch squash slices
That’s it! No special equipment needed – just good old-fashioned cooking basics.
How to Make Yellow Squash and Zucchini Casserole
Now for the fun part – turning those simple ingredients into something magical! Don’t let the easy steps fool you – there’s some kitchen wisdom tucked into each stage that makes all the difference. Follow along and you’ll have golden, bubbly perfection in no time.
Preparing the Vegetables
First, grab your sharpest knife – those uniform 1/4-inch slices matter more than you’d think! Too thick and they won’t cook through, too thin and they’ll turn to mush. I like to stack a few slices at a time for efficiency. Heat your skillet over medium and melt that butter until it’s just starting to foam – that’s when you know it’s ready for action. Toss in your zucchini, yellow squash, and shallots all at once. The sizzle when they hit the pan is music to my ears! Cook them just until they’re crisp-tender – about 4-6 minutes with occasional stirring.
You want them to still have some bite since they’ll cook more in the oven. Pro tip: if there’s excess liquid in the pan after cooking, tilt it slightly and spoon some out – this prevents a soggy casserole later.
Creating the Creamy Mixture
Now for the flavor boost – add your minced garlic and let it cook for about a minute until fragrant. Pour in the heavy cream and let the magic happen! As it simmers, the cream will thicken beautifully – this usually takes 3-5 minutes. You’ll know it’s ready when it coats the back of a spoon. Remove from heat and stir in half the panko and Parmesan. The breadcrumbs will soak up some moisture while keeping the mixture light. The smell at this point is absolutely heavenly – garlicky, creamy, and fresh all at once!
Baking to Perfection
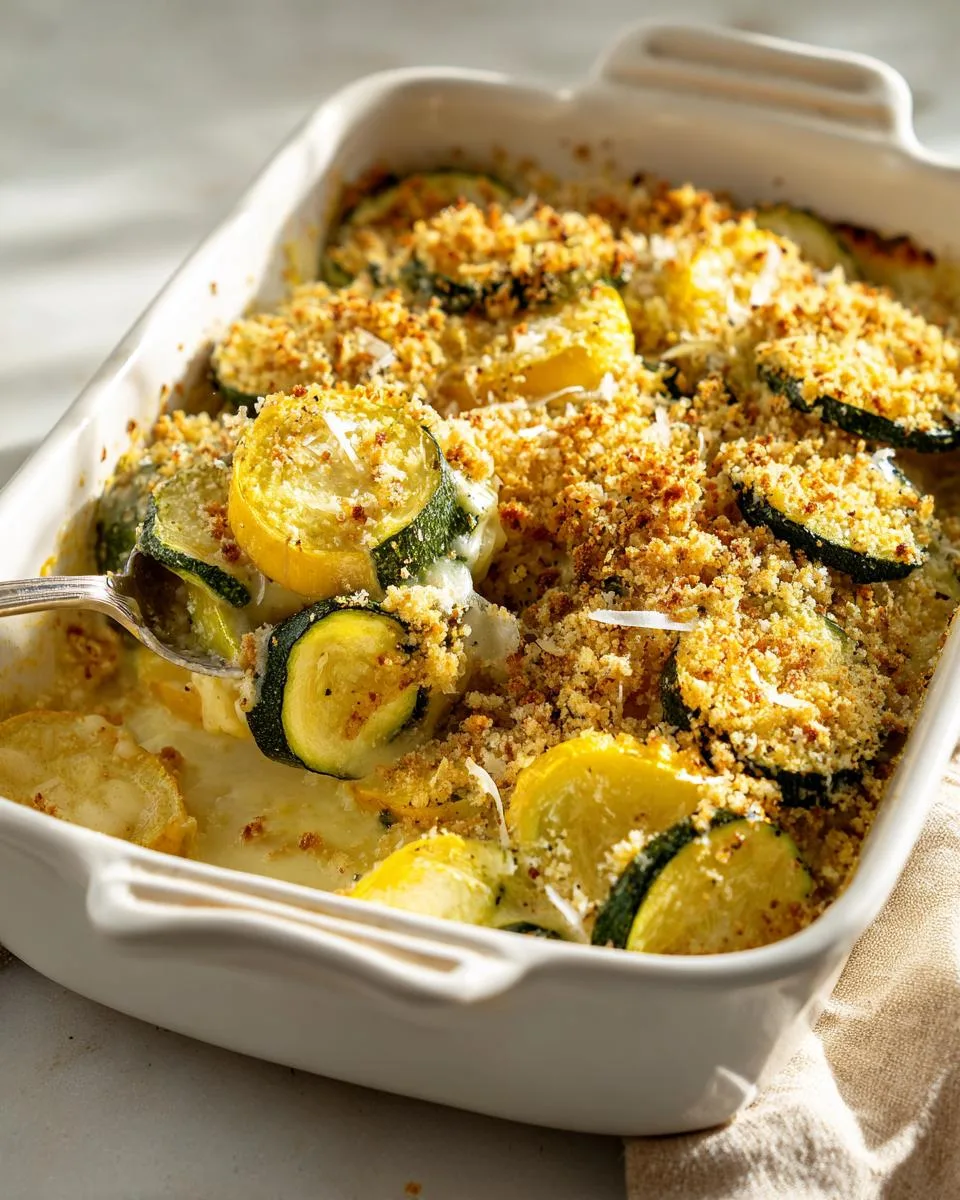
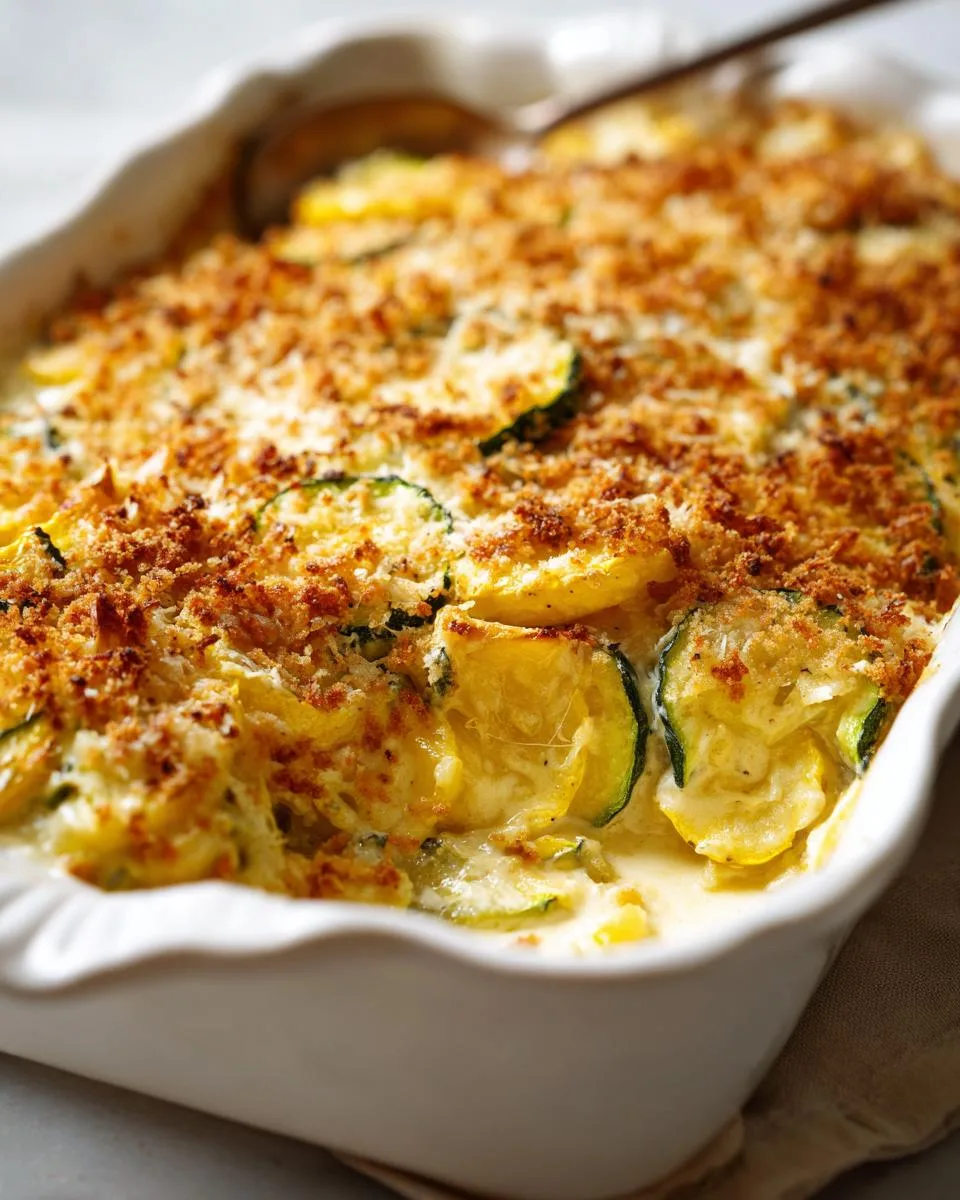
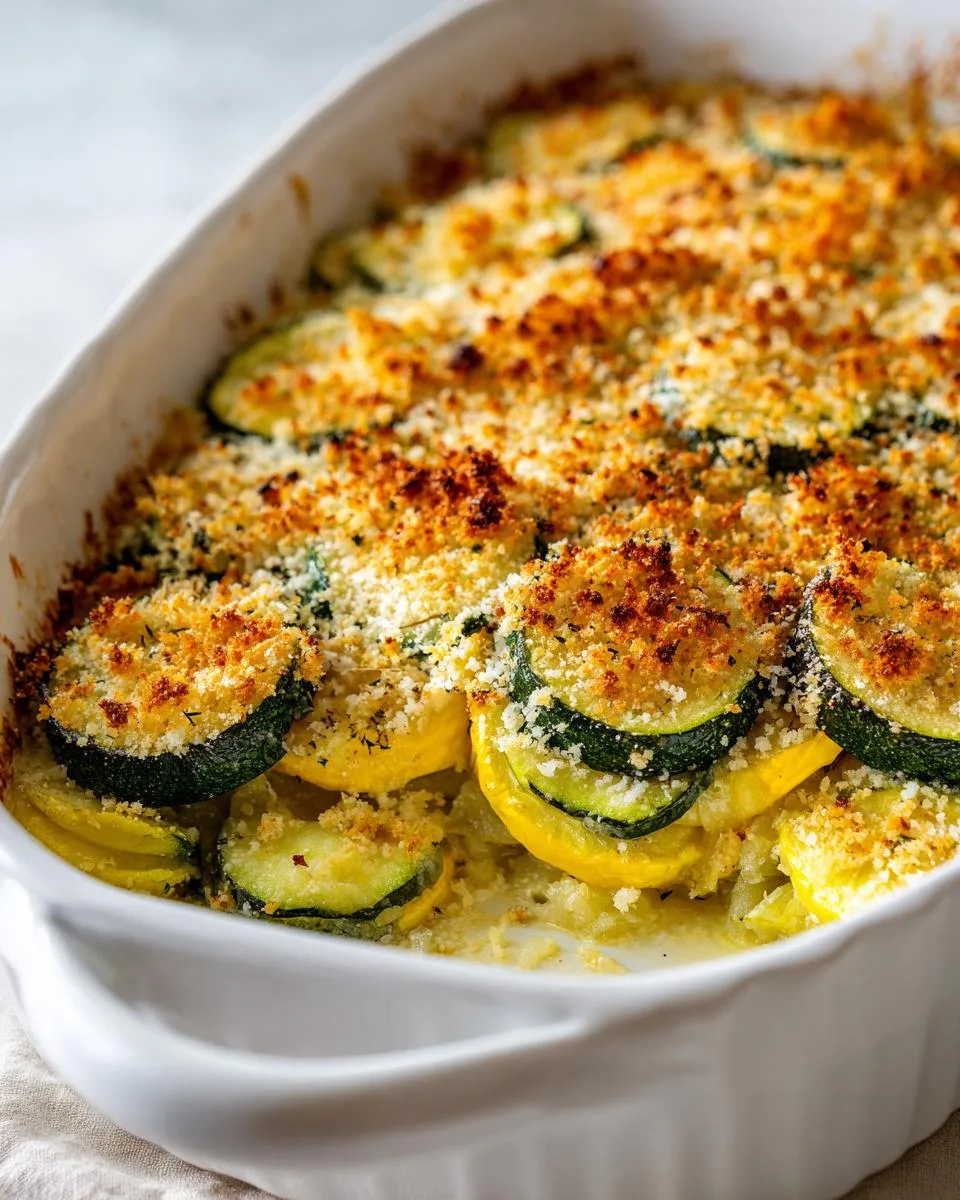
Spoon your creamy veggie mixture into your greased baking dish – I like to spread it evenly so every bite gets topping. Now for the crowning glory – sprinkle the remaining panko and Parmesan over the top. Into the 450° oven it goes! In just 8-10 minutes, you’ll have golden perfection. Watch closely – when the topping turns deep golden brown and you see little bubbles at the edges, it’s done. For extra crispiness (my personal favorite), pop it under the broiler for 1-2 minutes at the end – just don’t walk away!
Print
Creamy Yellow Squash and Zucchini Casserole with Crispy 8-Minute Topping
- Prep Time: 15 mins
- Cook Time: 20 mins
- Total Time: 35 mins
- Yield: 6 servings 1x
- Category: Side Dish
- Method: Baking
- Cuisine: American
- Diet: Vegetarian
Description
A simple vegetable casserole featuring zucchini and yellow squash with a crispy breadcrumb topping.
Ingredients
- 2 tablespoons butter
- 2 medium zucchini, cut into 1/4-inch slices
- 2 medium yellow summer squash, cut into 1/4-inch slices
- 2 shallots, minced
- 1/2 teaspoon sea salt
- 1/4 teaspoon coarsely ground pepper
- 4 garlic cloves, minced
- 1/2 cup heavy whipping cream
- 1 cup panko bread crumbs, divided
- 1/2 cup grated Parmesan cheese, divided
Instructions
- Preheat oven to 450°.
- In a large skillet, melt butter over medium heat; add zucchini, yellow squash and shallots.
- Sprinkle with salt and pepper.
- Cook, stirring occasionally, until vegetables are crisp-tender, 4-6 minutes.
- Add garlic; cook 1 minute more.
- Add the cream; cook until thickened, 3-5 minutes.
- Remove from heat; stir in 1/2 cup bread crumbs and 1/4 cup cheese.
- Spoon mixture into a greased 11×7-in. or 2-qt. baking dish.
- Sprinkle with remaining bread crumbs and cheese.
- Bake until golden brown, 8-10 minutes.
Notes
- Use fresh zucchini and squash for best texture.
- Drain excess liquid from cooked vegetables to prevent sogginess.
- For extra crispiness, broil for 1-2 minutes after baking.
Nutrition
- Serving Size: 1/6 recipe
- Calories: 210
- Sugar: 4g
- Sodium: 320mg
- Fat: 14g
- Saturated Fat: 8g
- Unsaturated Fat: 5g
- Trans Fat: 0g
- Carbohydrates: 16g
- Fiber: 2g
- Protein: 6g
- Cholesterol: 40mg
Tips for the Best Yellow Squash and Zucchini Casserole
After making this casserole more times than I can count, I’ve learned a few tricks that take it from good to “can I have the recipe?” amazing. Here are my hard-won secrets:
- Fresh is best: I know it’s tempting to grab pre-sliced squash, but trust me – fresh zucchini and yellow squash make all the difference in texture. Look for firm, shiny skins without soft spots.
- Drain that liquid: Squash releases water as it cooks – tilt your skillet and spoon out excess before adding the cream. Your future crispy topping will thank you!
- Watch the clock: Overcooked squash turns mushy fast. Pull them from the skillet when they’re just tender-crisp – they’ll finish cooking in the oven.
- Broiler magic: If your topping isn’t quite golden enough after baking, 60 seconds under the broiler works wonders. Just don’t blink – it burns fast!
One last thing – resist the urge to stir once it’s in the oven! That gorgeous crispy topping needs to stay put to do its thing.
Variations and Substitutions
While I’m fiercely loyal to my original recipe (that crispy Parmesan-panko combo is just too good!), I’ve played around with some tasty variations over the years when ingredients ran short or dietary needs popped up. Here are my favorite twists that still keep the spirit of the dish:
- Cheese swaps: Gruyère adds a nutty depth, while sharp cheddar gives it a bolder kick. For a lighter version, try pecorino romano – its salty punch means you can use less.
- Gluten-free option: Swap panko for crushed gluten-free crackers or almond flour mixed with nutritional yeast for that same satisfying crunch.
- Herb boost: Stir in a tablespoon of fresh thyme or basil with the garlic for a fragrant twist. Dried Italian seasoning works in a pinch too!
One thing I wouldn’t change? That glorious heavy cream – it’s the secret to the perfect creamy texture. But if you must, half-and-half will do in a bind – just simmer it a bit longer to thicken properly.
Serving Suggestions
This golden beauty deserves center stage at your table! Here’s how I love to serve it:
- With grilled meats: The creamy squash casserole balances smoky flavors perfectly – try it alongside juicy burgers, garlicky grilled chicken, or even simple pork chops.
- Sunday roast companion: It’s my secret weapon for making roast chicken or turkey feel extra special – the crispy topping contrasts beautifully with tender meat.
- Summer salad pairing: For lighter meals, I serve it with a crisp green salad and crusty bread. The fresh flavors just sing together!
Honestly? I’ve been known to eat it straight from the pan with just a fork – no judgment here! You can find more side dish inspiration on my Greek potato salad page.
Storing and Reheating Your Yellow Squash and Zucchini Casserole
Here’s the good news – leftovers of this casserole are almost better than fresh! Well, almost. To keep that crispy topping intact, let it cool completely before covering tightly with foil or transferring to an airtight container. It’ll stay fresh in the fridge for up to 3 days – any longer and the squash starts getting watery.
When reheating, I’ve found two foolproof methods: For individual portions, the toaster oven works wonders at 350°F for about 8 minutes – it crisps the topping right back up. For larger amounts, spread it in a baking dish and reheat at 375°F for 10-15 minutes. Whatever you do, don’t microwave it unless you want soggy sadness – trust me, I learned that lesson the hard way! If you want to see how I share my recipes, check out my Facebook page.
Nutritional Information
Just a quick note – these numbers are estimates since actual values can vary based on your exact ingredients. But here’s the scoop on what’s in each delicious serving of this casserole:
- Calories: 210
- Fat: 14g (8g saturated)
- Carbohydrates: 16g
- Fiber: 2g
- Sugar: 4g
- Protein: 6g
- Sodium: 320mg
Not too shabby for something that tastes this indulgent! The Parmesan packs a protein punch while those fresh summer squash keep it light and veggie-packed.
Frequently Asked Questions
After sharing this recipe with countless friends (and fielding all their questions!), I’ve rounded up the most common queries – along with my tried-and-true solutions:
How do I prevent a watery casserole?
Oh honey, I’ve been there! The trick is twofold: First, slice your squash evenly (those 1/4-inch measurements matter!) so they cook uniformly. Second, don’t skip draining excess liquid after sautéing – just tilt the skillet and spoon some out before adding the cream. Your topping will stay gloriously crisp instead of soggy.
Can I prepare it ahead of time?
Absolutely! I often assemble everything up to the baking step, cover tightly, and refrigerate for up to 8 hours. Just add 5 extra minutes to the bake time since it’s going in cold. The panko topping might need a quick broil at the end to crisp up perfectly.
What can I use instead of breadcrumbs?
In a pinch, crushed crackers or even crushed cornflakes work surprisingly well! For gluten-free, I love using almond flour mixed with nutritional yeast – it gives that same satisfying crunch without the gluten.
How do I get the topping extra crispy?
My secret weapon? A quick 60-second broil at the end! Just keep the oven light on and watch like a hawk – it goes from golden to burnt in seconds. Also, make sure you’re using fresh panko (stale crumbs won’t crisp as nicely) and spreading it evenly across the top.