Oh my gosh, you HAVE to try these ghost cookies recipe – they’re the cutest, easiest Halloween treat ever! I stumbled upon this recipe years ago when my niece begged me to make “something spooky but not scary” for her school party. We whipped up a batch in about 10 minutes flat, and let me tell you, the kids went absolutely wild for them. There’s something magical about transforming simple chocolate chunk cookies and marshmallows into adorable little ghosts with just some icing and a steady hand (or not-so-steady in my case – our first attempts looked more like blobs than ghosts!). The best part? No baking required – just assemble, decorate, and watch them disappear faster than actual ghosts!
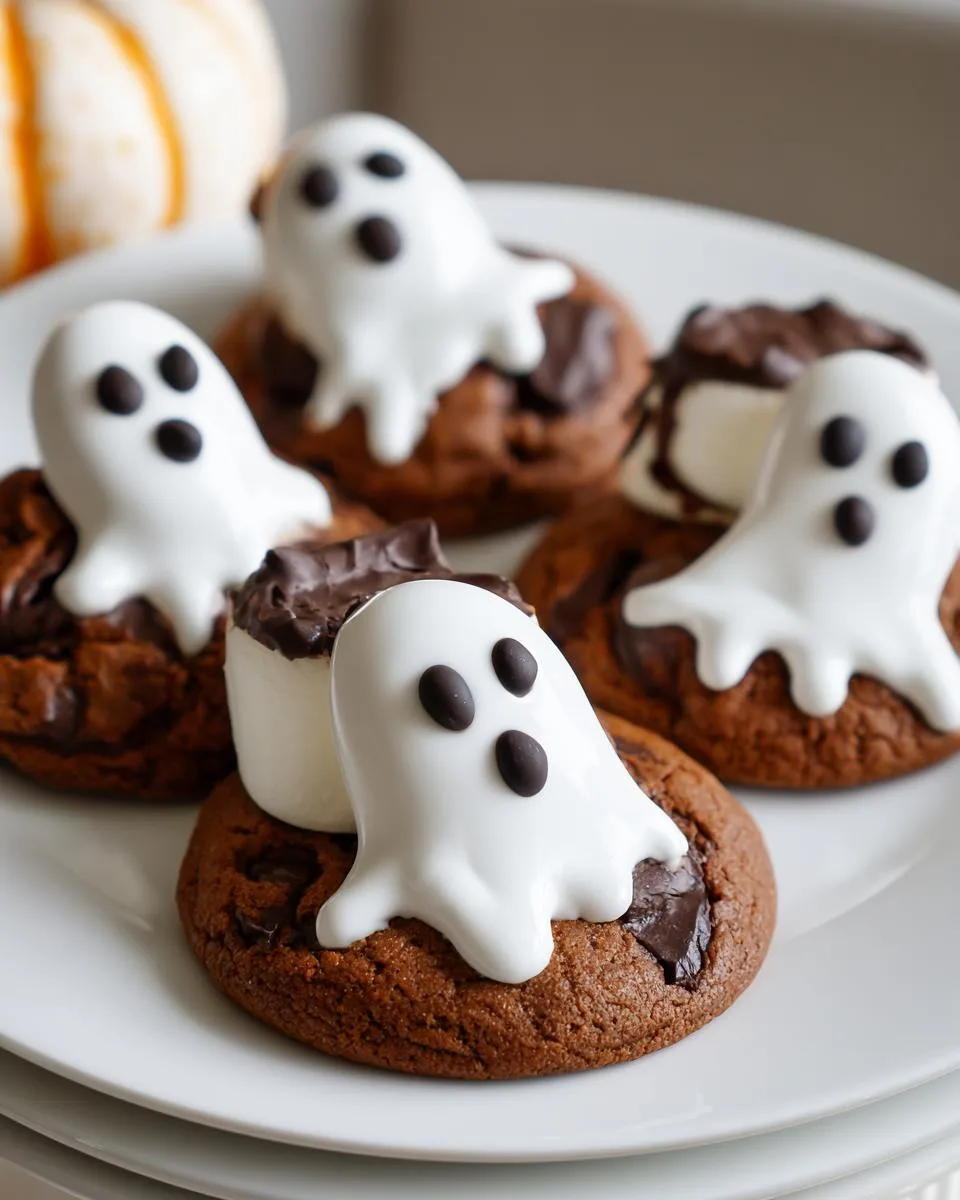
Table of Contents
Table of Contents
Why You’ll Love This Ghost Cookies Recipe
Honestly, these little ghost cookies are a Halloween lifesaver—trust me, I’ve been there! Here’s why they’re my go-to every October:
- Quick as a ghost’s sneeze: 10 minutes from start to finish—no waiting for dough to chill or ovens to preheat.
- Kid-friendly fun: Let little hands dip marshmallows and draw silly faces (crooked eyes make them extra charming!).
- No-bake magic: Perfect for when you’re drowning in costume-making and just need an easy win.
- Total crowd-pleaser: The combo of chewy marshmallow and crunchy cookie? *Chef’s ghostly kiss*.
Plus, they’re practically foolproof—my first batch survived my kitchen chaos, and yours will too!
Print
Spooky 10-Minute Ghost Cookies Recipe Kids Adore
- Prep Time: 10 minutes
- Cook Time: 0 minutes
- Total Time: 10 minutes
- Yield: 9 cookies 1x
- Category: Dessert
- Method: No-Bake
- Cuisine: American
- Diet: Vegetarian
Description
Ghost cookies are a fun and easy Halloween treat made with chocolate chunk cookies, marshmallows, and icing.
Ingredients
- 175g icing sugar
- 1 x 200g pack chocolate chunk cookies
- 9 marshmallows (regular size)
- black writing icing
Instructions
- Sift the icing sugar into a large bowl and add 5 teaspoons water to make a thick but pourable icing.
- Place the cookies on baking paper or a wooden board.
- Dip the bottom of each marshmallow into the icing and place it on the center of a cookie.
- Pour the white icing over each marshmallow, letting it drizzle onto the cookie.
- Let the icing set, then use black writing icing to make ghost eyes and a mouth.
Notes
- Use fresh marshmallows for best results.
- Let the icing dry completely before adding the black details.
- Store in an airtight container to keep them fresh.
Nutrition
- Serving Size: 1 cookie
- Calories: 120
- Sugar: 15g
- Sodium: 50mg
- Fat: 5g
- Saturated Fat: 2g
- Unsaturated Fat: 2g
- Trans Fat: 0g
- Carbohydrates: 20g
- Fiber: 1g
- Protein: 1g
- Cholesterol: 5mg
Ingredients for Ghost Cookies Recipe
Okay, let’s talk ingredients – I promise this is the shortest shopping list ever for maximum ghostly impact! You’ll need:
- 175g icing sugar (that’s about 1 1/4 cups if you’re measuring by volume – but weigh it for perfect icing every time)
- 1 x 200g pack chocolate chunk cookies (I use the store-bought ones – no shame! Look for ones about 3 inches across)
- 9 regular-sized marshmallows (not minis, not jumbo – the standard ones you’d roast for s’mores)
- Black writing icing (those little tubes with fine tips are perfect for ghost faces)
See? Told you it was simple! Now let’s make some spooky magic happen.
How to Make Ghost Cookies Recipe
Alright, let’s get ghost-making! This is where the real fun begins – I swear it’s easier than trying to keep white clothes clean at a spaghetti dinner. Follow these steps and you’ll have spooky little treats grinning up at you in no time!
Step 1: Prepare the Icing
Sift that icing sugar into a bowl – yes, sift it! Those little lumps will haunt your icing otherwise. Add water one teaspoon at a time (I use exactly 5 tsp) until it’s thick enough to coat a spoon but still pours slowly. Think “ghostly ectoplasm” consistency – too thin and it’ll run right off!
Step 2: Assemble the Cookies
Line up your chocolate chunk cookies like little edible gravestones. Dip just the bottom of each marshmallow into the icing – this acts as edible glue – then plop it dead center on a cookie. Give it a gentle twist to secure it. Pro tip: work quickly before the icing sets!
Step 3: Decorate Your Ghosts
Now the magic happens! Pour icing over each marshmallow, letting it cascade down the sides like a ghostly veil. Walk away for 10 minutes – I know it’s hard! – until the icing sets slightly. Then grab that black icing and give your ghosts personality with dots and smiles (or frowns for grumpy ghosts!).
Tips for Perfect Ghost Cookies Recipe
Listen, I’ve made enough ghost cookies recipe to know what separates “boo-tiful” from “boo-hoo” – here are my hard-earned secrets:
- Fresh marshmallows are non-negotiable – stale ones won’t stick properly and taste like disappointment.
- Patience is a virtue – let that icing dry completely before adding faces or you’ll get ghostly smudges!
- Airtight is right – store them in a container overnight and they’ll stay fresh (if they last that long!).
- Embrace imperfections – crooked eyes and wobbly smiles give them character (mine always look happily drunk!).
Trust me, follow these and your ghosts will be the talk of the graveyard!
Ingredient Substitutions & Notes for Ghost Cookies Recipe
Ran out of something? No worries – ghosts are flexible! Here’s how to adapt:
- Writing icing: Black gel icing works great too, or melt chocolate chips with a toothpick for piping.
- Cookies: Gluten-free chocolate cookies hold up beautifully – just make sure they’re sturdy enough.
- Marshmallows: Vegan ones work if needed, but they’re stickier – dust your fingers with icing sugar first.
One non-negotiable? The icing sugar must be powdered – granulated sugar won’t dissolve properly and you’ll get gritty ghosts (and nobody wants that!).
Serving and Storing Ghost Cookies
These little ghosts are happiest when showing off at Halloween parties – arrange them on a black platter with some candy corn “gravestones” for extra spooky flair! For storage (if you somehow have leftovers), just pop them in an airtight container at room temperature. They’ll keep their hauntingly good looks for about 3 days – though in my house, they rarely last past midnight!
Nutritional Information for Ghost Cookies Recipe
Now, let’s be real – these ghost cookies are treats, not health food! But here’s the scoop on what you’re getting per adorable little ghost (based on my exact ingredients):
- 120 calories – about the same as a fun-sized candy bar
- 15g sugar (hey, ghosts are sweet spirits!)
- 5g fat – mostly from that delicious chocolate cookie base
Remember, numbers can haunt you differently depending on your specific ingredients – but honestly? For Halloween, I say let those little ghosts enjoy their moment in the nutritional spotlight!
Frequently Asked Questions
Ghost cookies spark so many questions – here are the ones I get asked most often by fellow spooky treat enthusiasts!
Do ghost cookies need baking? Nope – that’s the beauty! These no-bake Halloween cookies come together faster than you can say “boo.” Just assemble and decorate.
What’s the #1 mistake people make? Rushing the icing! Too-thin icing makes a ghostly mess, and drawing faces before it’s set leads to smeared nightmares. Patience is key.
How long do they stay fresh? About 3 days in an airtight container – but they rarely last that long! The marshmallows start drying out after day two.
What’s your ghost cookie secret? Fresh ingredients, especially marshmallows! Stale ones won’t stick properly and taste like Halloween disappointment.
Share Your Creations
I’d absolutely *haunt* to see your ghost cookie masterpieces! Tag me on Instagram @SpookyTreats or use #GhostCookieMagic – crooked eyes and all! Nothing makes me happier than seeing your spooky baking adventures. You can also find more fun recipes on Facebook!


