Every Halloween, I turn my kitchen into a spooky dessert lab, and these Graveyard Chocolate Pudding Cups are always the star of the show! They’re the perfect mix of creepy and delicious – the kind of treat that makes kids squeal with delight and adults sneak second helpings when no one’s looking. What I love most is how stupidly easy they are to throw together. Just layer some chocolatey goodness, crush a few Oreos, and boom – you’ve got edible tombstones peeking out from a chocolate dirt grave. My niece still talks about the year I brought these to her school party, and now it’s our annual tradition. Trust me, once you see how simple and fun these are to make, you’ll be digging graves in your pudding cups every October too!
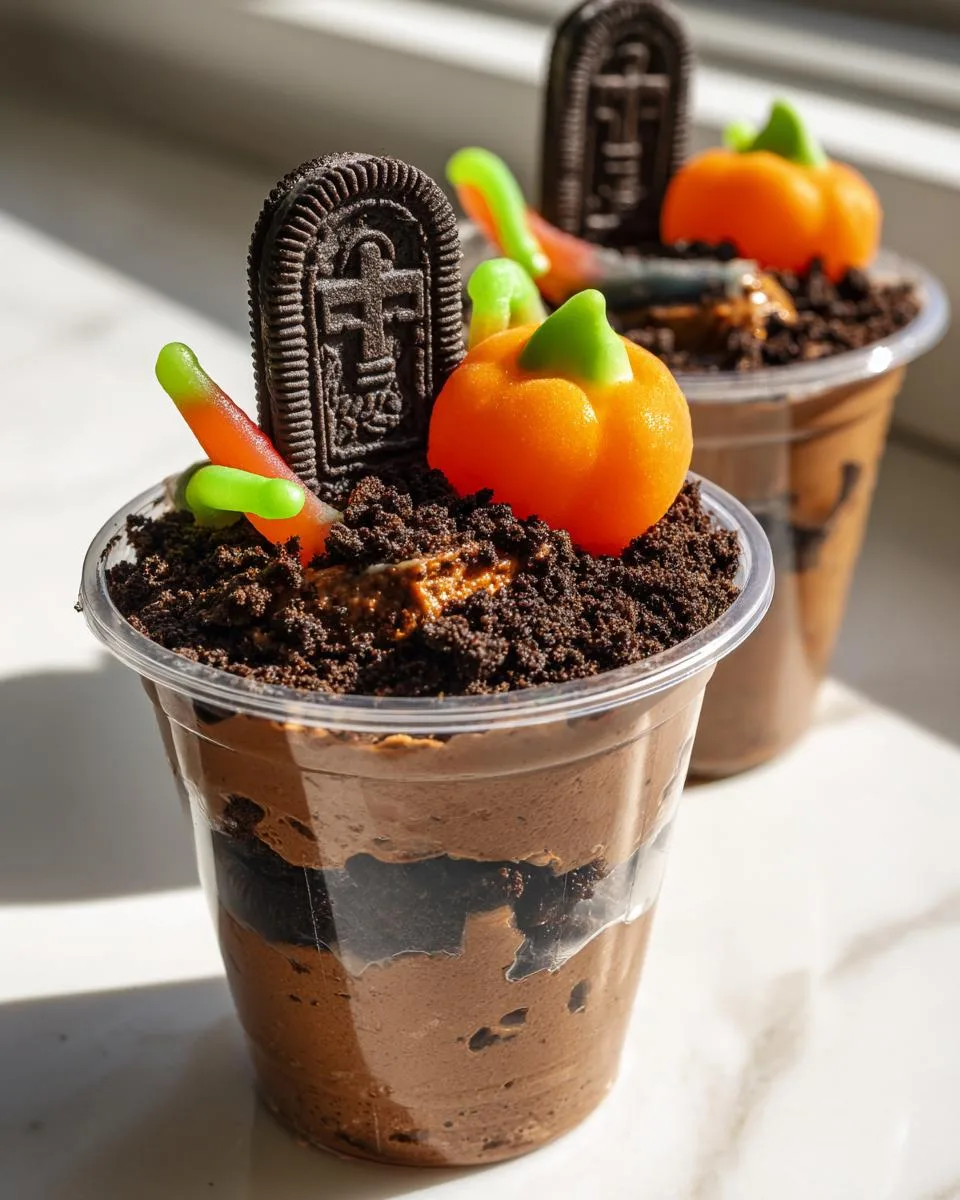
Table of Contents
Table of Contents
Why You’ll Love These Graveyard Chocolate Pudding Cups
Let me tell you why these spooky treats will become your new Halloween obsession:
- No-bake magic: Done in 20 minutes flat – no oven required! Perfect for last-minute party prep.
- Kid-approved creepy factor: The edible tombstones and googley eyes make kids go wild (mine still talk about them!).
- Customizable fun: Swap candies based on what you’ve got – gummy worms, candy bones, whatever screams Halloween to you!
- Total crowd-pleaser: Chocolate pudding + Oreos? Come on, that’s a guaranteed win every single time.

Spooky Graveyard Chocolate Pudding Cups in 20 Minutes Flat
- Prep Time: 20 minutes
- Cook Time: 0 minutes
- Total Time: 20 minutes
- Yield: 6 servings 1x
- Category: Dessert
- Method: No-Bake
- Cuisine: American
- Diet: Vegetarian
Description
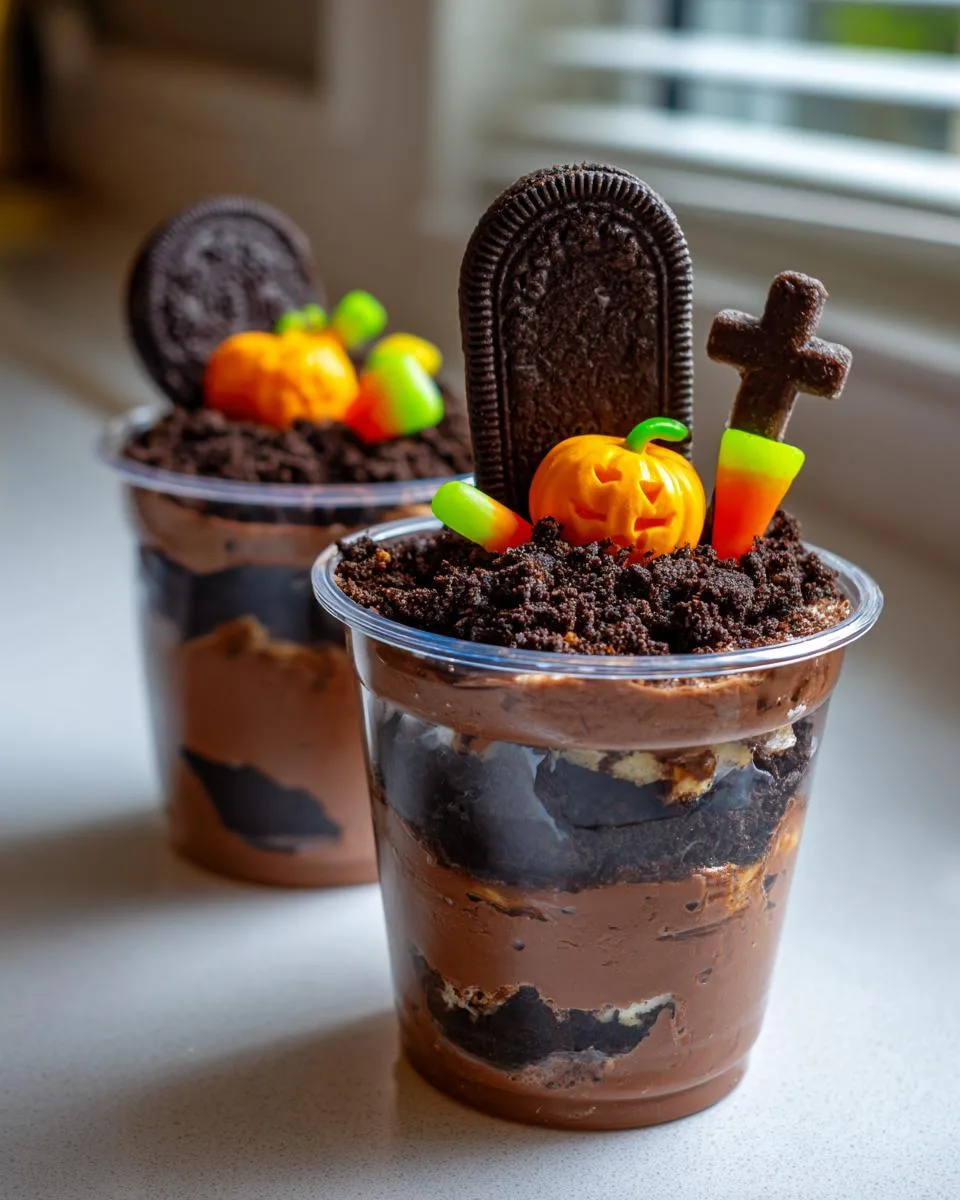
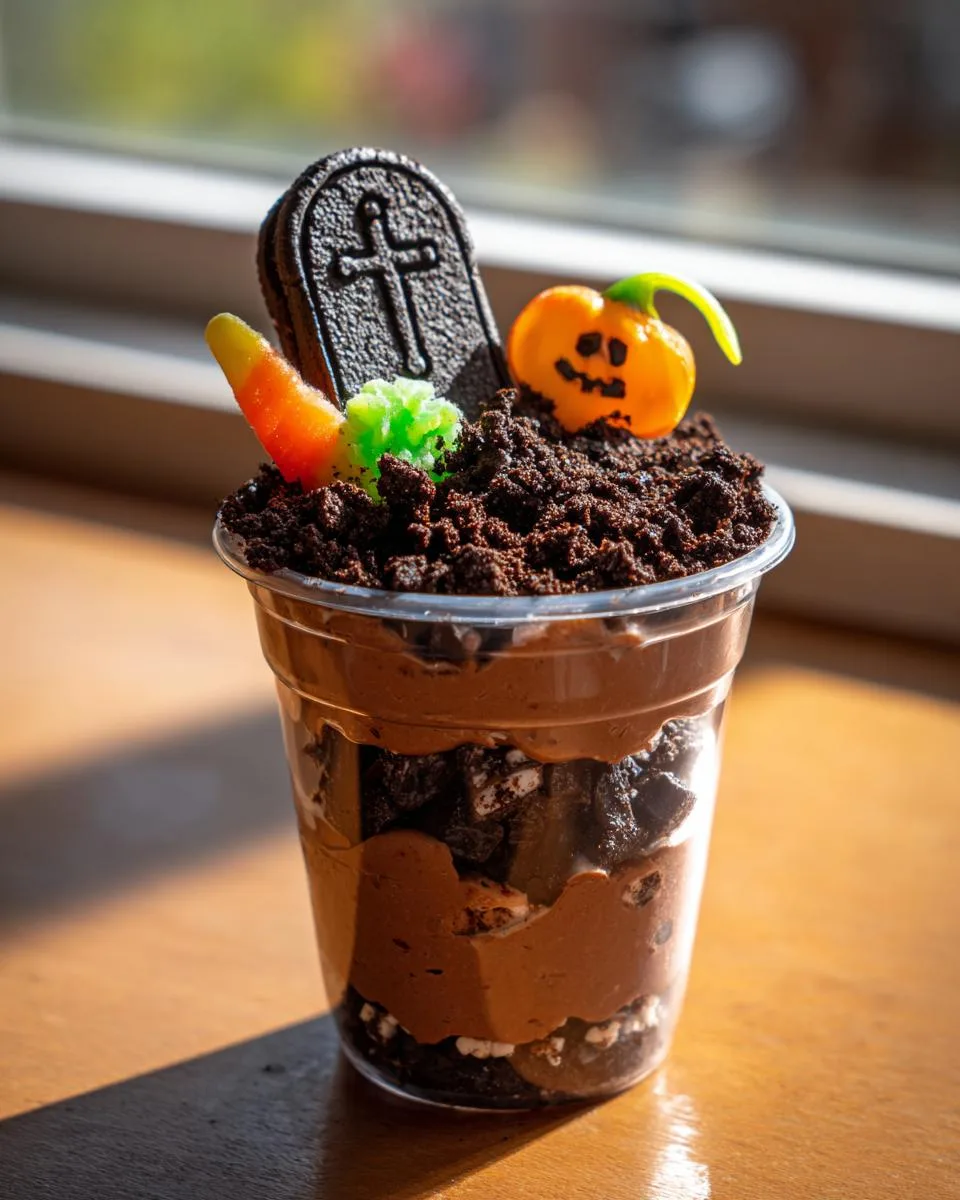
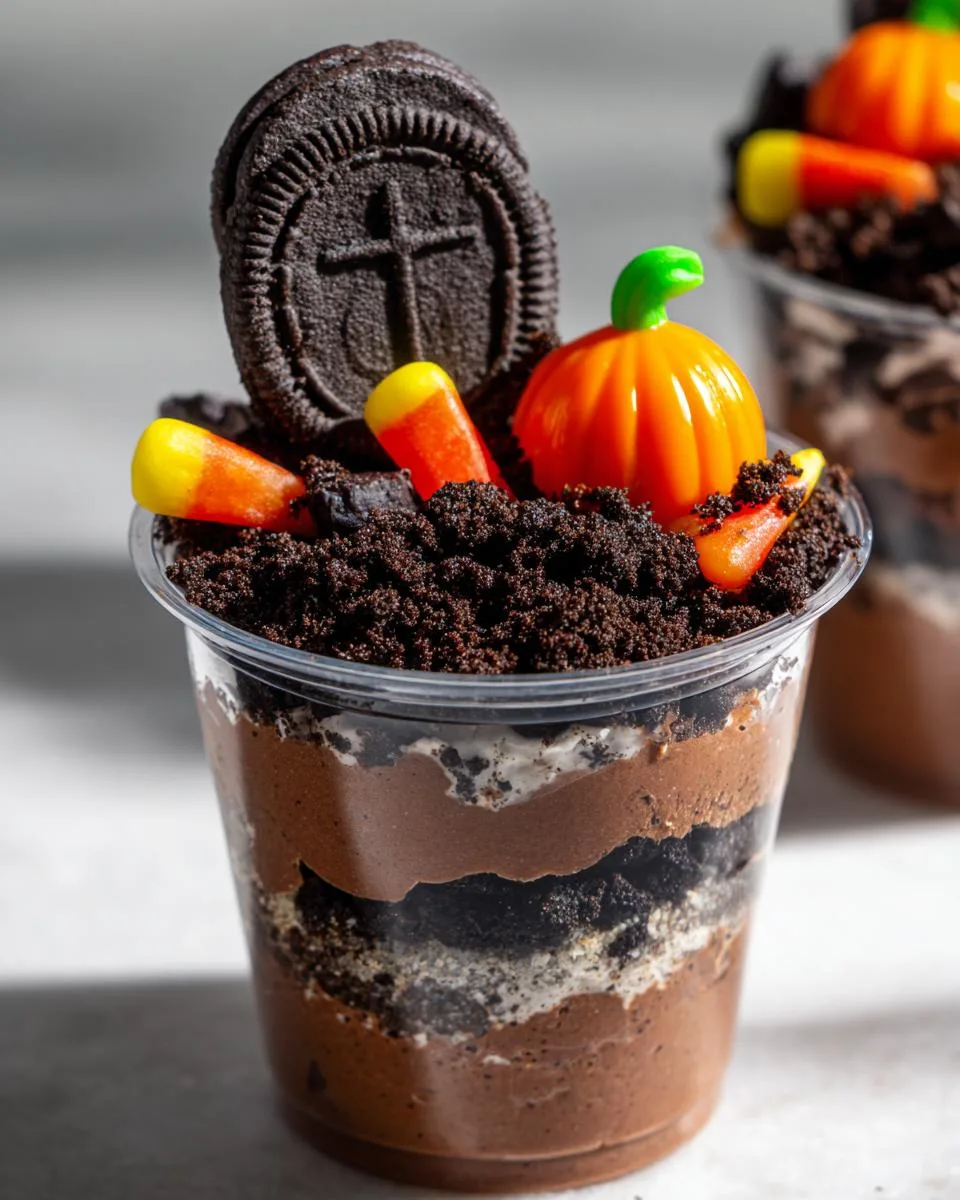
Graveyard Chocolate Pudding Cups are a fun and spooky Halloween treat. These dessert cups feature layers of chocolate pudding, Oreo crumbs, and tombstone cookies for a festive touch.
Ingredients
- 5.1 oz Chocolate Instant Pudding Mix
- 3 Cups Milk
- 8 oz Cool Whip
- 24 Oreo Cookies
- 6 Milano Double Chocolate Cookies
- Black Frosting or Black Edible Marker
- 6 Candy Pumpkins
- Googley Eyes
- Gummy Worms
Instructions
- With black frosting or an edible marker, write RIP on each Milano cookie to create tombstones. Set aside.
- In a stand mixer, whisk pudding mix and milk on medium speed for 2 minutes.
- Fold in Cool Whip until well blended.
- Crush Oreos into fine crumbs using a food processor.
- Sprinkle 3-4 tbsp of crumbs into the bottom of 6 clear 9 oz plastic cups.
- Press a few googley eyes around the edges between the crumbs and the cup.
- Spoon a layer of pudding evenly on top.
- Repeat the last three steps one more time.
- End with more crumbs on top until they almost reach the lip of the cup.
- Insert one cookie tombstone into the center of each pudding cup.
- Press a candy pumpkin beside each tombstone.
- Add gummy worms if desired.
Notes
- Refrigerate pudding cups until ready to serve.
- Use store-bought or homemade pudding.
- Adjust sweetness by reducing Cool Whip if desired.
Nutrition
- Serving Size: 1 cup
- Calories: 320
- Sugar: 28g
- Sodium: 310mg
- Fat: 12g
- Saturated Fat: 6g
- Unsaturated Fat: 4g
- Trans Fat: 0g
- Carbohydrates: 48g
- Fiber: 2g
- Protein: 5g
- Cholesterol: 10mg
Ingredients for Graveyard Chocolate Pudding Cups
Here’s everything you’ll need to dig up these spooky treats – I promise it’s all simple stuff you can grab at any grocery store:
- 5.1 oz box chocolate instant pudding mix (the regular size box – not the big family pack!)
- 3 cups cold milk (whole milk makes it extra creamy, but any kind works)
- 8 oz tub Cool Whip, thawed (or make your own whipped cream if you’re fancy)
- 24 Oreo cookies – we’re gonna crush these into delicious “dirt” (a whole standard package is perfect)
- 6 Milano Double Chocolate cookies – these become our tombstones (Pepperidge Farm makes ’em)
- Black frosting or black edible marker – for writing “RIP” on the tombstones (I’ve used both – frosting looks creepier!)
- 6 candy pumpkins – the little orange ones you see everywhere in October
- Googley eyes – because what’s Halloween without staring edible eyes? (The candy ones, not craft supplies!)
- Gummy worms – totally optional but SO fun crawling out of the “dirt”
Equipment You’ll Need
Don’t worry – you won’t need any fancy graveyard-digging tools for this one! Here’s what I grab from my kitchen:
- Stand mixer (or just a bowl and hand whisk if you wanna burn some calories)
- Food processor for crushing those Oreos into perfect “dirt” (a zip-top bag + rolling pin works in a pinch)
- 6 clear 9 oz plastic cups – the see-through kind lets everyone admire your spooky layers
- Spoons & spatulas for all that delicious layering action
That’s it! Now let’s get to the fun part…
How to Make Graveyard Chocolate Pudding Cups
Okay, let’s get our hands dirty (literally!) with these adorable spooky treats. I’ll walk you through each step like I’m right there in the kitchen with you – it’s seriously foolproof!
Step 1: Prepare the Tombstones
First, let’s make those iconic tombstones that’ll have everyone saying “RIP” to their diets! Grab your Milano cookies and either black frosting or an edible marker. I prefer frosting because it gives that messy, weathered tombstone look – just pipe “RIP” in big, drippy letters. If you’re using a marker, press gently so the cookies don’t crack. Pro tip: Make a few extra tombstones in case of “grave” mistakes (see what I did there?). Set these aside while we work on the pudding.
Step 2: Make the Chocolate Pudding Layer
Now for the creamy goodness! In your stand mixer (or a big bowl if you’re whisking by hand), combine the pudding mix and cold milk. Beat on medium speed for exactly 2 minutes – set a timer! This ensures it thickens properly. Then, gently fold in the Cool Whip with a spatula until it’s fully blended but still fluffy. Resist the urge to overmix – we want clouds of chocolatey heaven, not dense pudding bricks!
Step 3: Layer the Pudding Cups
Time to build our edible graveyard! Crush the Oreos in a food processor until they’re fine crumbs (or put them in a bag and go to town with a rolling pin). In each clear cup, add 3-4 tablespoons of crumbs and press down lightly with your fingers – this is your “dirt” layer. Now for the fun part: tuck a few googley eyes between the crumbs and cup sides so they peek out creepily. Spoon in half the pudding mixture, then repeat with another layer of crumbs and pudding. Top with more crumbs until they almost reach the cup’s lip – we want that overflowing graveyard effect!
Step 4: Assemble the Graveyard
The grand finale! Push one tombstone cookie into the center of each cup at a slight angle – like it’s been there for centuries. Add a candy pumpkin beside it (I sometimes break them in half for a “rotting” look). For extra creep factor, drape gummy worms over the edges like they’re crawling from the grave. Step back and admire your handiwork – you’ve just created the cutest little edible cemetery ever!
Tips for Perfect Graveyard Chocolate Pudding Cups
After making these spooky cups more times than I can count, here are my foolproof tricks to cemetery-level perfection:
- Chill your pudding first: Let it set in the fridge for 10 minutes before layering – it prevents the Oreo crumbs from getting soggy too fast.
- Crush Oreos unevenly: Leave some bigger chunks mixed with fine powder for realistic “dirt” texture (I use pulse mode on the food processor).
- Press those eyes in deep: Really wedge the googley eyes against the cup so they stay visible through all the layers.
- Make it extra creepy: Right before serving, drizzle a little chocolate syrup over the top like fresh grave dirt!
Trust me – these little touches take your pudding cups from cute to showstopping! Check out more dessert ideas for your next party.
Ingredient Substitutions
Listen, I know we don’t always have exactly what a recipe calls for – here’s how to improvise without losing the spooky magic:
- Pudding problems? Sugar-free pudding mix works great (my diabetic niece approves!), or try homemade pudding if you’re feeling fancy. Just make sure it’s thick enough to hold the layers.
- Cool Whip alternatives: Fresh whipped cream is delicious if you’ve got it – just add a tablespoon of powdered sugar while whipping. For dairy-free, coconut whipped cream works surprisingly well!
- Cookie swaps: Gluten-free Oreos exist now (hallelujah!), and any firm rectangular cookie can become tombstones – even graham crackers decorated with frosting.
- Candy creativity: No candy pumpkins? Use orange M&Ms or even jelly beans. Those googley eyes can be mini marshmallows with chocolate chips pressed in!
The beauty of these pudding cups? They’re practically impossible to mess up – just have fun with whatever Halloween treats you’ve got! You might also like these Halloween Deviled Eggs.
Serving and Storage
These little graveyard treats are best served chilled – pop them in the fridge for at least 30 minutes before your Halloween bash to let all the flavors cozy up together. They’ll keep happily refrigerated for up to 2 days, though the Oreo crumbs get softer by day two (still delicious!). Right before serving, I love adding extra gummy worms crawling over the edges for maximum creep factor. Pro tip: Set them out about 10 minutes before eating so the pudding isn’t too firm – that first spoonful should feel like digging into fresh grave dirt!
FAQs About Graveyard Chocolate Pudding Cups
I get asked about these spooky treats all the time – here are the answers to the questions that keep crawling up like gummy worms!
Can I Use Homemade Pudding?
Absolutely! My homemade version is just 3 cups milk, 1/2 cup sugar, 1/3 cup cocoa powder, 3 tbsp cornstarch, and a pinch of salt cooked until thick. The texture will be richer than instant, so you might want to use less Cool Whip – taste as you go! The instant mix is just quicker for busy Halloween prep.
How Long Do These Pudding Cups Last?
They’re happiest eaten within 2 days in the fridge. The Oreo crumbs soften over time (day three gets mushy), but honestly? They never last that long at my house! If you must store them, keep the tombstones separate until serving so they stay crisp.
Can I Make These Ahead of Time?
Totally! Here’s my make-ahead strategy: Prep the tombstones up to 3 days early (store in an airtight container). The pudding mixture holds for 24 hours covered in the fridge. Assemble the cups a few hours before your event for perfect texture – those googley eyes stay perkiest when fresh!
Graveyard Chocolate Pudding Cups Nutrition
Okay, let’s be real – we’re not eating pudding cups for their health benefits, but here’s the nutritional scoop per serving (about one cup): roughly 320 calories, 28g sugar, and 12g fat. You’ll get about 5g protein and 2g fiber from the Oreos and milk. Sodium lands around 310mg. But hey – these values can jump around depending on your ingredient choices (like using sugar-free pudding or light Cool Whip). It’s Halloween, people – live a little! Just maybe don’t eat all six cups yourself… unless it’s been that kind of day.
For more fun Halloween recipes, check out our recipes page. You can also follow our adventures on Facebook!


