Oh my gosh – Halloween baking season is my absolute favorite time of year! There’s something magical about turning simple chocolate cupcakes into a spooky Halloween cupcake box that’ll have all your party guests oohing and aahing. I still remember the first time I made these for my daughter’s classroom party – the kids went wild for the little ghost cupcakes with chocolate chip eyes!
What makes this recipe special is how easy it is to create three totally different Halloween designs from one simple batch. We’re talking fluffy chocolate cupcakes with the dreamiest vanilla buttercream that pipes like a dream. Whether you go for creepy spider webs, silly ghosts, or scary skulls, these will be the hit of any Halloween bash. Trust me – once you see how simple the decorations are, you’ll be addicted to Halloween baking just like I am!
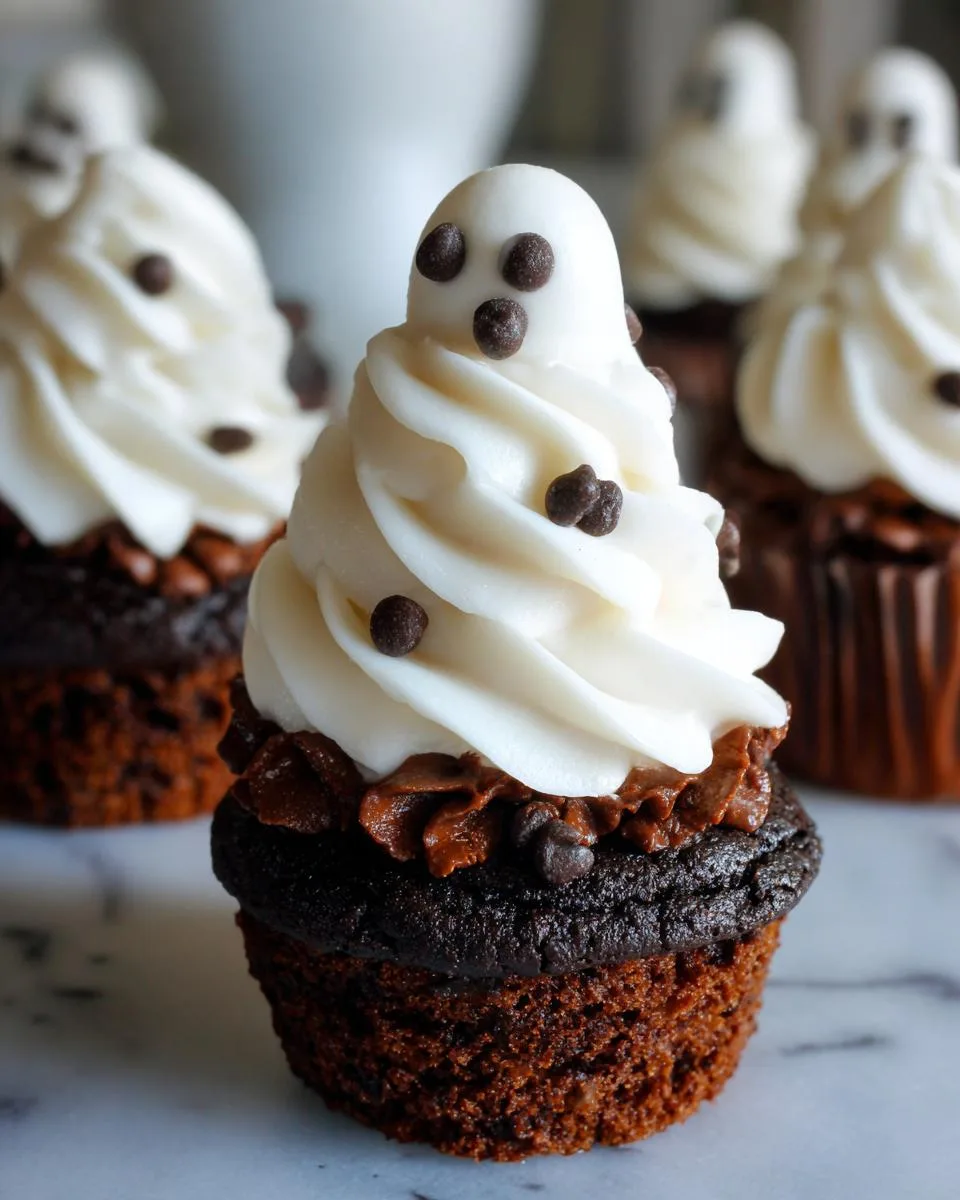
Table of Contents
Table of Contents
Why You’ll Love This Halloween Cupcake Box Recipe
Listen, I know you’re going to fall head over heels for these cupcakes – here’s why:
- The chocolate cupcakes are insanely moist thanks to that sneaky bit of sour cream (shh, it’s our little secret)
- Decorating is so easy even my 6-year-old can do the ghost faces – just swirl and dot!
- That vanilla buttercream? Fluffy clouds of perfection that hold their shape for picture-worthy designs
- One batch makes three different spooky looks – ghosts, spider webs AND skulls? Yes please!
- They travel like champs in their cupcake box – no smushed frosting disasters here
Seriously, these disappear faster than candy corn at a Halloween party. You’ve been warned!
Halloween Cupcake Box Ingredients
Okay, let’s dig into what we need to make these little Halloween treats! I’ve broken everything down so you can grab-and-go at the store. Trust me, having everything measured and ready makes the baking process SO much smoother – especially when you’ve got excited kids (or let’s be real, excited adults) waiting to decorate!
For the Chocolate Cupcakes
- 1 ¼ cup (156 g) all purpose flour
- ¾ teaspoon baking soda
- ½ teaspoon salt
- 1 cup (96 g) unsweetened cocoa powder (nonalkalized) – the good, dark stuff!
- 1 teaspoon espresso powder (or coffee powder) – secret flavor booster!
- 1 cup (240 mL) boiling water
- ½ cup (120 g) sour cream or plain greek yogurt, room temperature
- 2 teaspoons pure vanilla extract
- 1 cup (226 g or 2 sticks) unsalted butter, room temperature – very important!
- 1 ½ cups (300 g) granulated sugar
- 2 large eggs, room temperature
For the Vanilla Buttercream Frosting
- 1 cup (226 g or 2 sticks) unsalted butter, room temperature – see a pattern here?
- 2 ½ cups (300 g) confectioners’ sugar, sifted – no lumps!
- 2 teaspoons pure vanilla extract
- Pinch salt – balances the sweetness perfectly
- 1-2 tablespoons milk, room temperature – for perfect piping consistency
Halloween Decorations
- 2 Tablespoons mini chocolate chips – for those adorable ghost eyes
- ½ cup bittersweet chocolate, chopped – we’ll melt this for spider webs and spooky faces
Pro tip: I always set my butter and eggs out about an hour before baking. Room temp ingredients make SUCH a difference in how everything comes together. And don’t skip sifting that powdered sugar – lumpy frosting is a Halloween horror we don’t need!
How to Make Your Halloween Cupcake Box
Alright, let’s get baking! I’ll walk you through each step like we’re baking together in my kitchen. Don’t worry if you’re new to cupcakes – I’ve included all my little tricks to make sure your Halloween cupcake box turns out perfect. Just follow along and have fun with it!
Preparing the Chocolate Cupcake Batter
First things first – preheat that oven to 350°F and line your muffin tins with cute Halloween liners. I love using the black and orange ones for extra festive vibes!
Now, in a medium bowl, whisk together your flour, baking soda, and salt. Set this aside – we’ll come back to it. In another bowl, mix the cocoa powder and espresso powder (this is what gives our cupcakes that deep, rich chocolate flavor). Pour in the boiling water and whisk until it’s smooth as a witch’s spell. Let this cool for about 10 minutes – trust me, you don’t want to add hot liquid to eggs! Then whisk in the sour cream and vanilla.
Time for the fun part – creaming the butter and sugar! Beat them together in your stand mixer for a good 3 minutes until light and fluffy. Add the eggs one at a time, mixing well after each. Now we’ll alternate adding the flour mixture and chocolate mixture – start with 1/3 of the flour, then half the chocolate, and so on, ending with flour. Scrape the bowl and give it one final mix – but don’t overdo it! A few streaks are fine.
Baking and Cooling the Cupcakes
Fill those liners about 2/3 full – I use an ice cream scoop for perfect portions. Bake for 18-22 minutes until a toothpick comes out clean. Here’s my secret: rotate the pans halfway through for even baking!
When they’re done, let them cool in the pan for 5 minutes – this helps them set. Then transfer to a wire rack to cool completely. I know it’s tempting, but don’t frost warm cupcakes! The frosting will melt right off, and we don’t want sad, runny ghosts.
Making the Vanilla Buttercream Frosting
While the cupcakes cool, let’s make that dreamy frosting. Whip the butter in your mixer for a full 5 minutes – yes, really! This makes it extra fluffy. Gradually add the powdered sugar on low speed unless you want a sugar cloud in your kitchen (been there!). Mix in the vanilla, salt, and just enough milk to make it pipeable. You’re looking for stiff peaks that hold their shape when you lift the beater.
Decorating Your Halloween Cupcake Box
Now for the most fun part – decorating! Here’s how I do my three favorite designs:
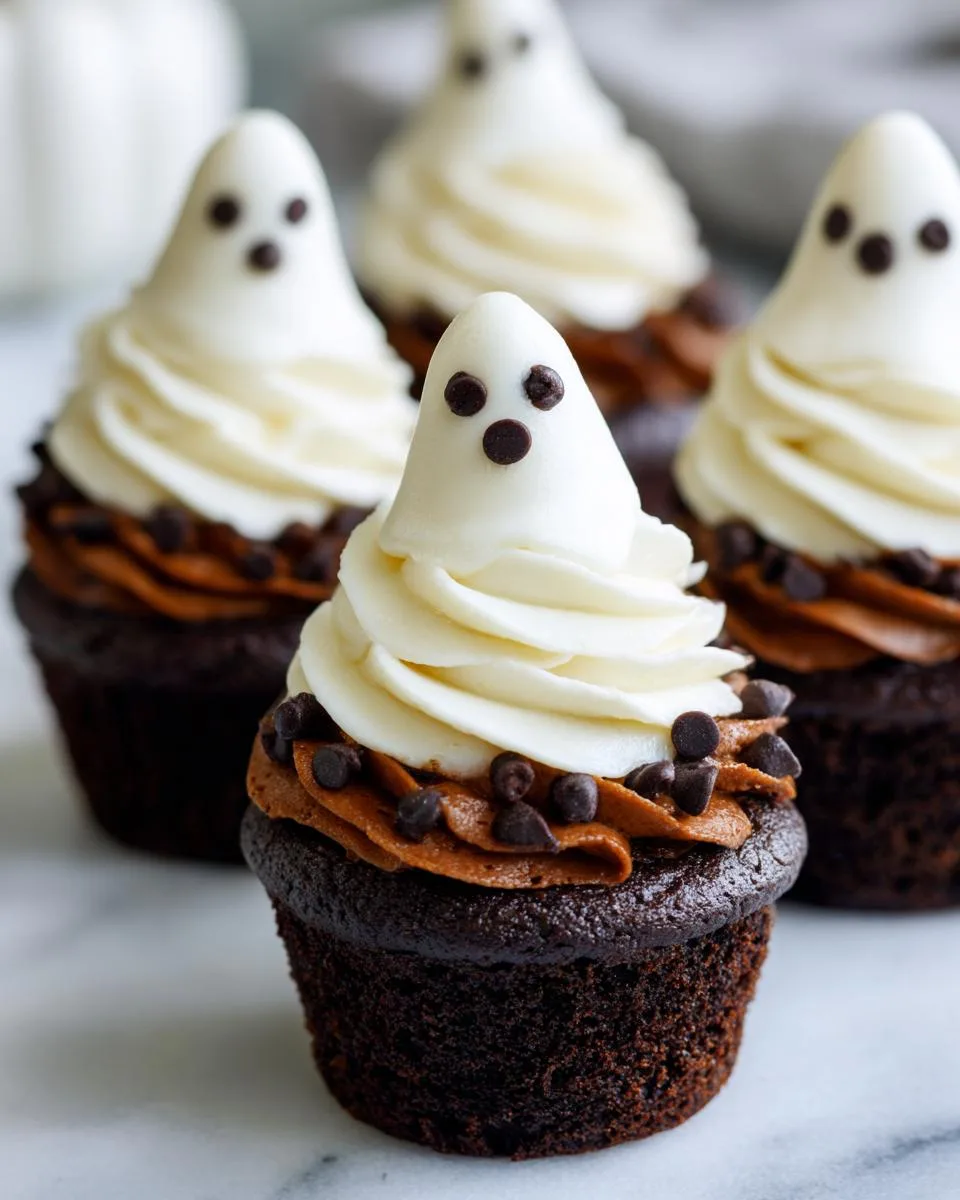
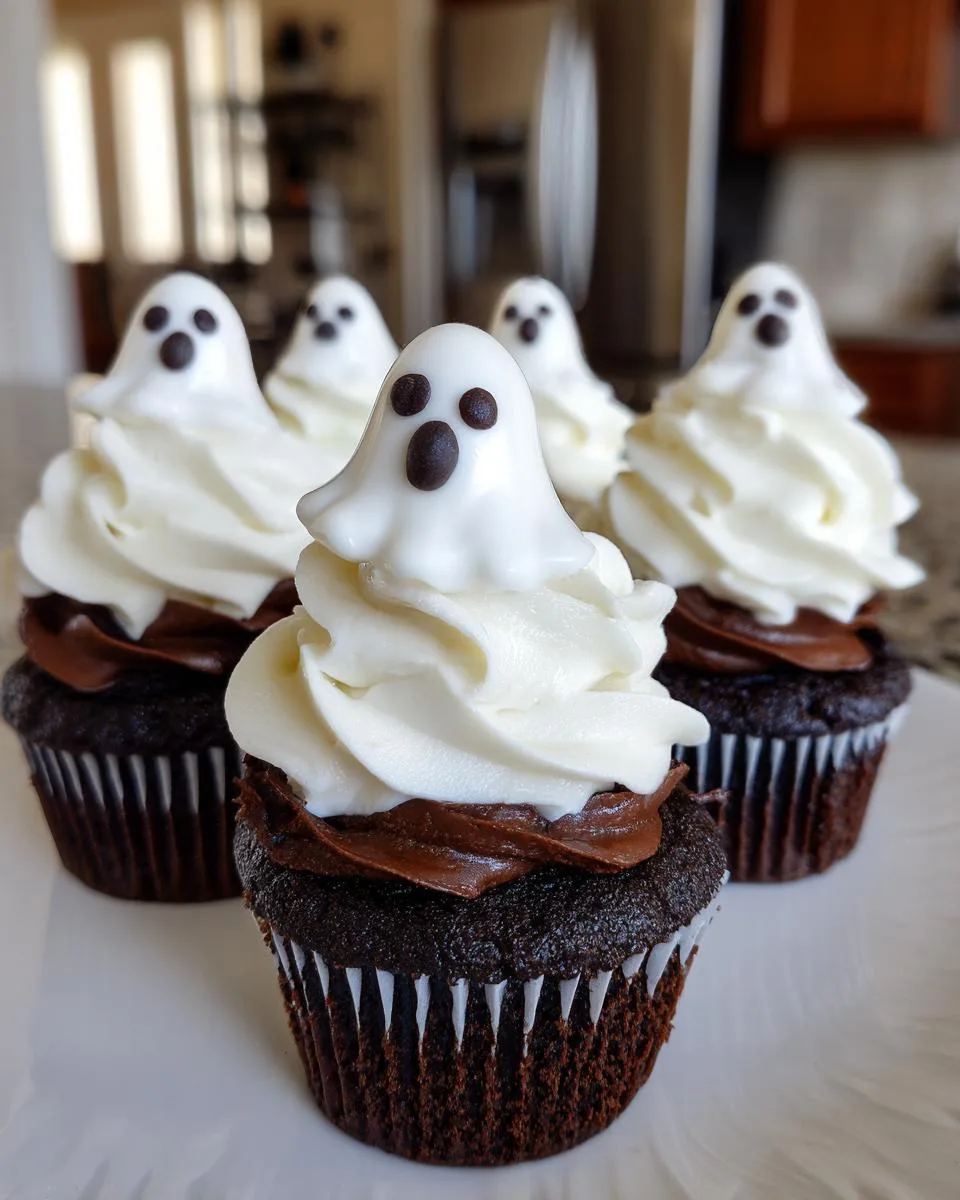
Ghosts: Pipe tall swirls of frosting using a large round tip. Gently press two mini chocolate chips into each for eyes – so cute!
Spider Webs: Spread frosting smoothly over the cupcakes. Melt your chopped chocolate and pipe concentric circles. Drag a toothpick from center to edge to make web lines – easy peasy!
Skulls: Smooth on frosting, then pipe melted chocolate for eyes, a nose, and a stitched mouth. A little spooky, but mostly adorable!
Print
8 Spooky Halloween Cupcake Box Designs Kids Gobble Up
- Prep Time: 30 minutes
- Cook Time: 22 minutes
- Total Time: 52 minutes
- Yield: 24 cupcakes 1x
- Category: Dessert
- Method: Baking
- Cuisine: American
- Diet: Vegetarian
Description
A festive Halloween cupcake recipe featuring chocolate cupcakes with vanilla buttercream frosting and spooky decorations.
Ingredients
- 1 ¼ cup (156 g) all purpose flour
- ¾ teaspoon baking soda
- ½ teaspoon salt
- 1 cup (96 g) unsweetened cocoa powder (nonalkalized)
- 1 teaspoon espresso powder (or coffee powder)
- 1 cup (240 mL) boiling water
- ½ cup (120 g) sour cream or plain greek yogurt, room temperature
- 2 teaspoons pure vanilla extract
- 1 cup (226 g or 2 sticks) unsalted butter, room temperature
- 1 ½ cups (300 g) granulated sugar
- 2 large eggs, room temperature
- 1 cup (226 g or 2 sticks) unsalted butter, room temperature
- 2 ½ cups (300 g) confectioners’ sugar, sifted
- 2 teaspoons pure vanilla extract
- Pinch salt
- 1–2 tablespoons milk, room temperature
- 2 Tablespoons mini chocolate chips
- ½ cup bittersweet chocolate, chopped
Instructions
- Preheat oven to 350° F. Line two standard muffin tins with paper liners and set aside.
- In a medium bowl, whisk together flour, baking soda, and salt. Set aside.
- In a separate medium bowl, whisk together cocoa powder and espresso powder. Add boiling water and whisk until smooth. Let cool to room temperature, then whisk in sour cream and vanilla. Set aside.
- In a stand mixer bowl, combine butter and sugar. Beat on medium-high speed until light and fluffy (about 3 minutes). Add eggs one at a time, beating after each addition.
- Add one-third of the flour mixture and mix on low speed. Add half the chocolate mixture and mix. Repeat, ending with the last third of flour. Scrape the bowl and mix briefly.
- Fill muffin cups two-thirds full. Bake for 18-22 minutes until a toothpick comes out clean. Cool for 5 minutes in the pan, then transfer to a wire rack.
- For frosting: Whip butter on medium-high speed for 5 minutes until fluffy. Gradually add confectioners’ sugar on low speed. Add vanilla, salt, and milk. Beat until fluffy.
- For ghost cupcakes: Pipe frosting in a cone shape and add mini chocolate chip eyes.
- For spider web cupcakes: Spread frosting evenly. Pipe melted chocolate in concentric circles and drag lines outward with a toothpick.
- For skull cupcakes: Spread frosting evenly. Pipe chocolate eyes, nose, and a stitched smile.
Notes
- Use room temperature ingredients for even mixing.
- Adjust frosting consistency with milk as needed.
- Decorate cupcakes immediately after frosting for best results.
Nutrition
- Serving Size: 1 cupcake
- Calories: 280
- Sugar: 22g
- Sodium: 120mg
- Fat: 16g
- Saturated Fat: 10g
- Unsaturated Fat: 5g
- Trans Fat: 0g
- Carbohydrates: 32g
- Fiber: 2g
- Protein: 3g
- Cholesterol: 55mg
Pro tip: Work on one design at a time, and keep unused frosting covered with a damp towel. And most importantly – have fun with it! Even “messy” decorations look intentionally spooky for Halloween.
Pro Tips for the Perfect Halloween Cupcake Box
Listen, I’ve made every mistake in the book with these cupcakes – lumpy batter, runny frosting, you name it. But that’s how I learned all these little tricks that’ll guarantee your Halloween cupcake box turns out perfect every time!
For flawless chocolate cupcakes
First up – sift that cocoa powder! I learned this the hard way when I ended up with little cocoa lumps in my batter. A fine mesh strainer works wonders. And don’t skip letting the chocolate mixture cool before adding it to the eggs – unless you want scrambled egg cupcakes (yuck!).
When alternating the dry and wet ingredients, mix just until combined. Overmixing makes tough cupcakes – we want them light and fluffy, not hockey pucks! And here’s my secret weapon: rotate those pans halfway through baking. Ovens have hot spots, and this ensures even baking.
For dreamy buttercream that behaves
Room temperature butter is non-negotiable. If it’s too cold, you’ll have lumpy frosting; too warm, and it’ll be soup. The perfect butter should leave a slight indent when pressed but still feel cool.
Beat that butter for a full 5 minutes – I set a timer! This incorporates air and makes the fluffiest frosting. Add powdered sugar gradually unless you enjoy cleaning up sugar explosions. And if your frosting gets too stiff? A teaspoon of milk at a time will save the day.
Decorating like a pro
Wait until cupcakes are completely cool to frost – warm cupcakes = melty mess. If you’re in a hurry, pop them in the fridge for 15 minutes.
For piping bags, I use a tall glass to fill them – way less messy than trying to hold the bag open. Keep a damp towel over unused frosting to prevent crusting. And if your chocolate decorations aren’t cooperating, microwave it in 15-second bursts, stirring between each.
Most importantly? Have fun with it! Even “mistakes” can look intentionally spooky. A ghost with wonky eyes? That’s just extra haunted. A spider web with uneven lines? More realistic! The kids at my daughter’s school never notice imperfections – they’re too busy devouring them!
Halloween Cupcake Box Variations
Want to mix things up with your Halloween cupcake box? I’ve tried nearly every variation under the moon (and some that were downright spooky experiments!), so let me share my favorite twists on this classic recipe.
Frosting Swaps That Work Magic
That vanilla buttercream is divine, but sometimes you want something different:
- Cream Cheese Frosting: Swap half the butter for cream cheese – adds the perfect tang that cuts through the chocolate. Just be sure everything’s room temp!
- Chocolate Ganache: For ultra-decadent cupcakes, skip the frosting and pour warm ganache over the tops. Let it drip down for a haunted house effect.
- Peanut Butter Frosting: Replace ¼ cup butter with creamy peanut butter – pairs amazingly with the chocolate. Great for “dirt” themed cupcakes with crumbled cookie “graves.”
Gluten-Free & Allergy-Friendly Options
Got dietary restrictions? No problem!
- Gluten-Free: Use your favorite 1:1 gluten-free flour blend (I like Bob’s Red Mill). The cupcakes might be slightly denser but just as tasty.
- Dairy-Free: Substitute coconut oil for butter and coconut yogurt for sour cream. Use dairy-free chocolate chips too.
- Egg-Free: Replace each egg with ¼ cup applesauce or 1 tablespoon flaxseed meal + 3 tablespoons water. The texture changes slightly but still works!
Spooky Flavor Twists
Why stop at chocolate? Here are some fun flavor variations I’ve tried:
- Pumpkin Spice: Replace half the cocoa with pumpkin puree and add pumpkin pie spice. Orange frosting makes perfect little jack-o-lanterns!
- Red Velvet: Use red food gel instead of cocoa for “bloody” cupcakes. White chocolate webs look extra creepy!
- Mint Chocolate: Add ½ teaspoon peppermint extract to the frosting for a cool “witches’ brew” effect. Green food coloring optional!
Remember – baking is all about creativity, especially at Halloween! The most important thing is that you and your little monsters (I mean, children) have fun with it. Some of my best Halloween cupcake box creations came from happy accidents!
Storing and Transporting Your Halloween Cupcake Box
Alright, let’s talk about keeping your Halloween cupcake box looking picture-perfect until party time! I’ve learned some hard lessons transporting cupcakes – like the year I stacked them without protection and ended up with ghost faces smeared across spider webs (spooky, but not the look I wanted!). Here’s how to avoid my mistakes:
Storing Your Spooky Creations
First rule: always store decorated cupcakes in a single layer! I learned this after ruining hours of work with frosting fingerprints. An airtight container is best – those plastic cupcake carriers with lids are worth every penny. No container? Place them on a tray and tent loosely with foil.
Room temperature is fine for 1-2 days if they’re unfrosted. Once frosted, I recommend refrigerating (especially if using cream cheese frosting). Just bring them to room temp before serving – cold buttercream tastes like…well, butter.
The Art of Layering
Need to stack cupcakes in your Halloween cupcake box? Here’s my foolproof method:
- Cut parchment squares: Slightly larger than your cupcake tops
- First layer: Place cupcakes snugly in box
- Add parchment: Cover first layer completely
- Second layer: Nestle cupcakes right over the spaces between bottom ones
This keeps decorations pristine! For extra security, stick a toothpick halfway into each top cupcake – it’ll act like a little tent pole preventing smushing.
Transportation Tips That Work
Driving with cupcakes is scarier than any haunted house! Here’s what I do:
- Non-slip mat: Place a silicone baking mat or damp paper towel under the box
- Chill first: 15 minutes in fridge helps frosting set
- Passenger seat: Floorboards are bumpy death traps!
- Emergency kit: Bring extra frosting/chocolate for repairs
For spider web cupcakes, transport them LAST – those delicate chocolate lines are fragile! And if it’s warm out? Cooler with ice packs (but don’t let cupcakes touch them directly).
Remember: even if decorations get a little messy, they’re still delicious! I once dropped a whole tray and called them “zombie cupcakes” – the kids thought it was intentional genius.

Halloween Cupcake Box Nutritional Information
Okay, let’s be real – we’re not eating Halloween cupcakes for their health benefits! But I know some folks like to keep track, so here’s the nutritional scoop on these spooky treats. Just remember – nutritional values are estimates and vary based on brands used. And hey, it’s Halloween – if there was ever a time to enjoy dessert guilt-free, this is it!
- Serving Size: 1 cupcake (because let’s face it, who stops at half?)
- Calories: 280 – consider it fuel for all that trick-or-treating!
- Sugar: 22g – but it’s Halloween sugar, which totally doesn’t count
- Sodium: 120mg – practically health food compared to some snacks
- Fat: 16g – but it’s the good kind of fat that makes taste buds happy
- Saturated Fat: 10g – blame that delicious butter
- Carbohydrates: 32g – perfect pre-haunted house energy boost
- Fiber: 2g – hey, there’s cocoa powder in there!
- Protein: 3g – eggs count, right?
- Cholesterol: 55mg – worth every milligram
Now, if you’re looking to lighten things up (though why would you?), you could try substituting applesauce for some of the butter or using a sugar alternative. But between you and me? The original version tastes SO much better – and Halloween only comes once a year! Just balance it out with some extra walking while trick-or-treating and enjoy every bite.
Halloween Cupcake Box FAQs
I get asked the same questions about these Halloween cupcakes every year, so let me save you some time and share all my hard-earned knowledge! From shelf life to transportation tricks, here’s everything you need to know:
How long will Halloween cupcakes last in a box?
Properly stored in an airtight container, your Halloween cupcake box will stay fresh for 2-3 days at room temperature or up to 5 days in the fridge. The chocolate cake actually gets moister over time (bonus!). Frosted cupcakes with perishable ingredients like cream cheese should always be refrigerated.
What makes homemade cupcakes better than box mix?
Oh honey, where do I start? The sour cream makes them extra moist, real butter gives that rich flavor, and the espresso powder enhances the chocolate in ways box mixes just can’t match. Plus, you control the quality of ingredients – no weird preservatives here!
How do I keep cupcakes from sliding in the box?
Two words: parchment paper! Cut squares slightly larger than your cupcake tops and layer them between rows. For extra security, you can stick a toothpick halfway into each top cupcake – just remember to warn people before they bite! A dab of frosting under each cupcake liner helps them stay put too.
Can I make these Halloween cupcakes ahead of time?
Absolutely! Bake the cupcakes 1-2 days before and store unfrosted at room temperature. Make the frosting separately and refrigerate it (just let it come to room temp and rewhip before decorating). Decorated cupcakes are best within 24 hours though – the fresher, the better!
Why do my cupcakes sink in the middle?
Oh no, the dreaded cupcake collapse! Usually it means either too much leavener (measure that baking soda carefully!) or opening the oven door too early. Let them bake undisturbed for at least 15 minutes before checking. And don’t overmix the batter – just until no flour streaks remain.
My frosting is too runny/thick – help!
Been there! For runny frosting, chill it for 15 minutes then rewhip. Too thick? Add milk 1 teaspoon at a time. The perfect piping consistency should hold peaks but still flow smoothly. Pro tip: If you’re decorating in a warm kitchen, work with small amounts of frosting and keep the rest chilled.
Can I freeze Halloween cupcakes?
You bet! Unfrosted cupcakes freeze beautifully for up to 3 months – just wrap individually in plastic then foil. Thaw overnight in the fridge. Frosting can be frozen separately too. I don’t recommend freezing decorated cupcakes though – the textures get weird.
Got more questions? Drop them in the comments – I love helping fellow Halloween bakers conquer their cupcake fears!
Share Your Halloween Cupcake Box Creations
Alright, here’s my favorite part – seeing YOUR spooky cupcake masterpieces! I get giddy every Halloween when photos start rolling in of your ghostly creations, creepy spider webs, and skulls that would make any haunted house proud.
Snap pictures of your Halloween cupcake box and tag me on Instagram @SpookyBakes – I feature my favorites every week leading up to Halloween! Did your toddler “help” decorate and end up with frosting everywhere? Send it! Accidentally make your ghosts look more like blobs than spirits? Been there! Some of my most-liked posts are the “happy accidents” that turned out hilariously creepy.
Pro tip: Natural daylight shows off your decorations best. Morning light streaming through kitchen windows makes those chocolate spider webs glisten perfectly. And don’t forget to capture the decorating process too – those messy hands and chocolate-smeared faces are what Halloween memories are made of!
Can’t wait to see what spooky magic you create this year. Happy baking, my fellow Halloween cupcake enthusiasts!
For More recipes Follow me on Facebook!


