Picture this: It’s Halloween night, the kids are buzzing with excitement, and you need a spooky dessert that’s as fun to make as it is to eat. That’s where these Halloween Dirt Cups come in – they’ve been my go-to party trick for years! I’ll never forget the first time I made them for my niece’s costume party. The moment those gummy worms peeked out from the “dirt,” the whole room erupted in giggles.
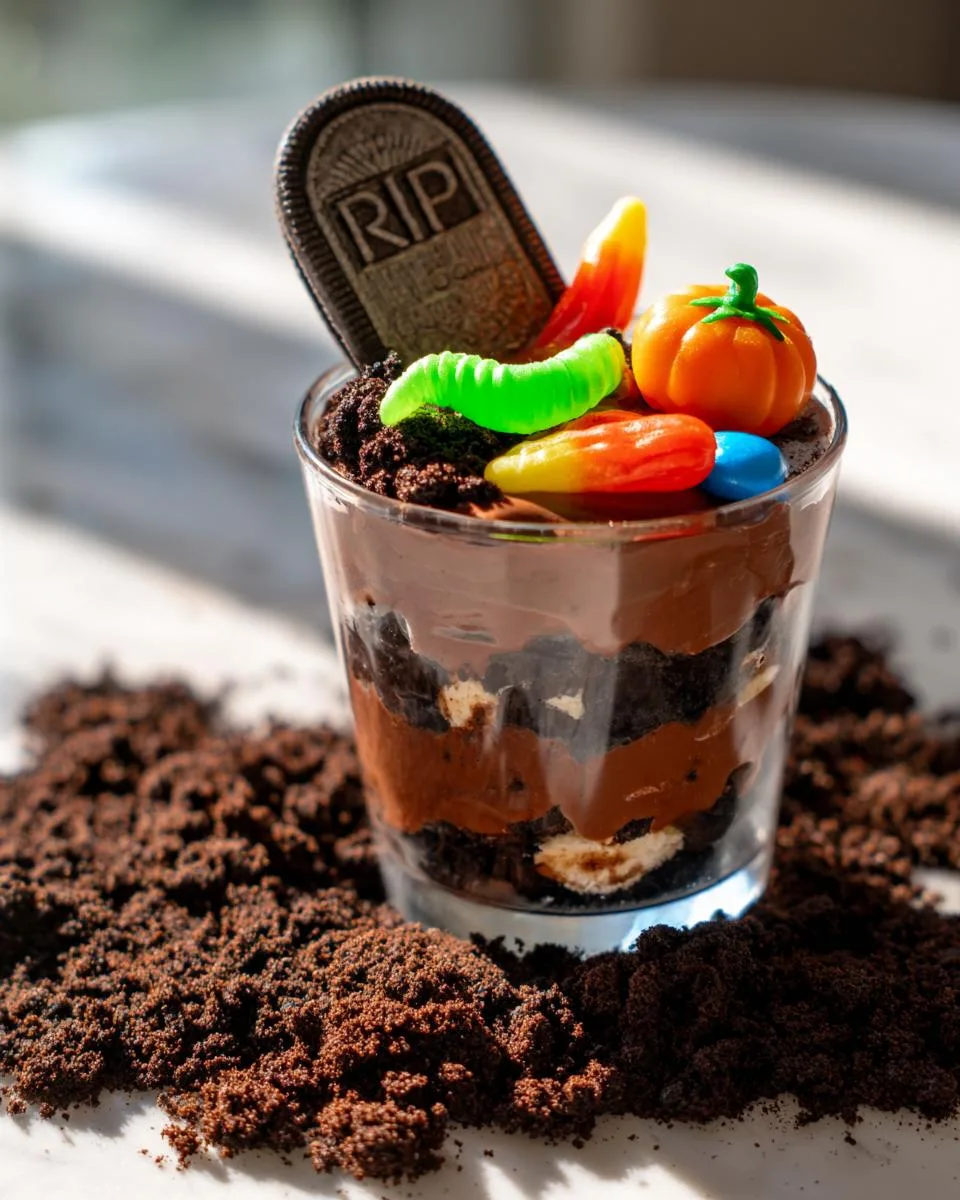
Table of Contents
Table of Contents
Why You’ll Love These Halloween Dirt Cups
What I love most? These creepy-crawly treats couldn’t be simpler. Just layers of chocolatey goodness, crushed Oreos that look like fresh-dug earth, and playful toppings that bring the Halloween spirit. No baking required – just mix, layer, and watch the magic happen. Trust me, these dirt cups disappear faster than ghosts at dawn!
Listen, some Halloween recipes look impressive but take way too much effort. Not these dirt cups! Here’s why they’re absolutely perfect:
- No-bake bliss – Skip the oven entirely. Just whisk, chill, and assemble while watching your favorite spooky movie
- Kid-approved fun – My little monsters go wild decorating these with gummy worms (the more the merrier!)
- Fast frights – Ready in 30 minutes flat – quicker than carving a pumpkin
- Endless creativity – Swap candy pumpkins for eyeball sprinkles or use vanilla pudding for “graveyard” dirt
- Party superstar – Always the first dessert to disappear at our Halloween gatherings
Seriously, these dirt cups are the edible equivalent of a perfect Halloween costume – spooky, silly, and secretly simple to pull off!
Print
Spooky Halloween Dirt Cups Ready in 30 Minutes Flat
- Prep Time: 10 minutes
- Cook Time: 0 minutes
- Total Time: 30 minutes
- Yield: 8 servings 1x
- Category: Dessert
- Method: No-Bake
- Cuisine: American
- Diet: Vegetarian
Description
A fun and spooky Halloween dessert made with layers of chocolate pudding, crushed Oreos, and topped with gummy worms and candy pumpkins.
Ingredients
- 12 Oreo Cookies
- 16 oz Cool Whip
- 1 box (3.3 oz) Instant Chocolate Pudding Mix
- 2 cups Milk
- 8 Milano Cookies
- Gummy Worms (optional)
- Candy Pumpkins (optional)
- Wilton Black Writing Icing
Instructions
- Whisk together the pudding mix and milk in a medium bowl.
- Refrigerate for 10 minutes or until set.
- Fold in the Cool Whip until well combined.
- Refrigerate for 20 minutes to chill the mixture.
- Crush Oreos in a food processor or blender until fine.
- Fill small cups 1/3 full with pudding mixture.
- Top with a small amount of crushed Oreos.
- Repeat layers in all cups.
- Write ‘RIP’ on Milano cookies with black icing.
- Place cookies in cups as tombstones.
- Decorate with gummy worms and candy pumpkins.
- Enjoy!
Notes
- Refrigerate dirt cups if not serving immediately.
- Safe for kids to eat, but supervise with small decorations.
- Dirt cups are a no-bake dessert with a playful, earthy look.
- Originated as a fun party treat, popular for Halloween.
Nutrition
- Serving Size: 1 cup
- Calories: 280
- Sugar: 22g
- Sodium: 200mg
- Fat: 12g
- Saturated Fat: 6g
- Unsaturated Fat: 5g
- Trans Fat: 0g
- Carbohydrates: 38g
- Fiber: 1g
- Protein: 4g
- Cholesterol: 10mg
Ingredients for Halloween Dirt Cups
Here’s the magical lineup that transforms into edible Halloween fun – I’ve made this enough times to know these exact measurements work perfectly:
- 12 Oreo cookies – The “dirt” star! Must be regular (not Double Stuf) for the right texture
- 1 box (3.3 oz) instant chocolate pudding mix – My secret? Always use name-brand for that rich chocolate flavor
- 2 cups cold milk – Whole milk makes it extra creamy, but any kind works
- 16 oz Cool Whip – Important: Thawed but still chilled – not runny!
- 8 Milano cookies – These become the cutest little tombstones
- Wilton black writing icing – For those spooky “RIP” messages
Fun Extras (optional but highly recommended):
- Gummy worms – The more the creepier!
- Candy pumpkins – Tiny orange pops of Halloween spirit
- Crushed graham crackers – Extra “dirt” texture if you’re feeling wild
Pro tip: Set everything out before starting – this recipe moves fast once the pudding’s ready!
Equipment You’ll Need
Don’t worry – you won’t need any fancy gadgets for these dirt cups! Here’s what I always grab from my kitchen:
- Medium mixing bowl – For that dreamy pudding mixture
- Whisk – My trusty tool for lump-free pudding every time
- Food processor or blender – To crush those Oreos into perfect “dirt”
- 8 small cups – Clear plastic or glass shows off those creepy layers best
- Spoon or piping bag – For neat pudding layers (though messy fingers work too!)
That’s it! No special equipment required – just everyday kitchen basics you probably already have.
How to Make Halloween Dirt Cups
Alright, let’s get our hands dirty – in the most delicious way possible! I’ve made these creepy cups so many times, I could probably do it in my sleep. Follow these simple steps, and you’ll have a graveyard of edible fun in no time.
Step 1: Prepare the Pudding Mixture
First things first – let’s make that chocolatey base. Grab your mixing bowl and whisk together the pudding mix and milk until it’s silky smooth. No lumps allowed! This takes about 2 minutes of good whisking action.
Now here’s the important part – pop it in the fridge for 10 minutes. I know, waiting is hard, but trust me, this chilling time helps the pudding set just enough so it holds those perfect layers later. While you wait, this is the perfect time to…
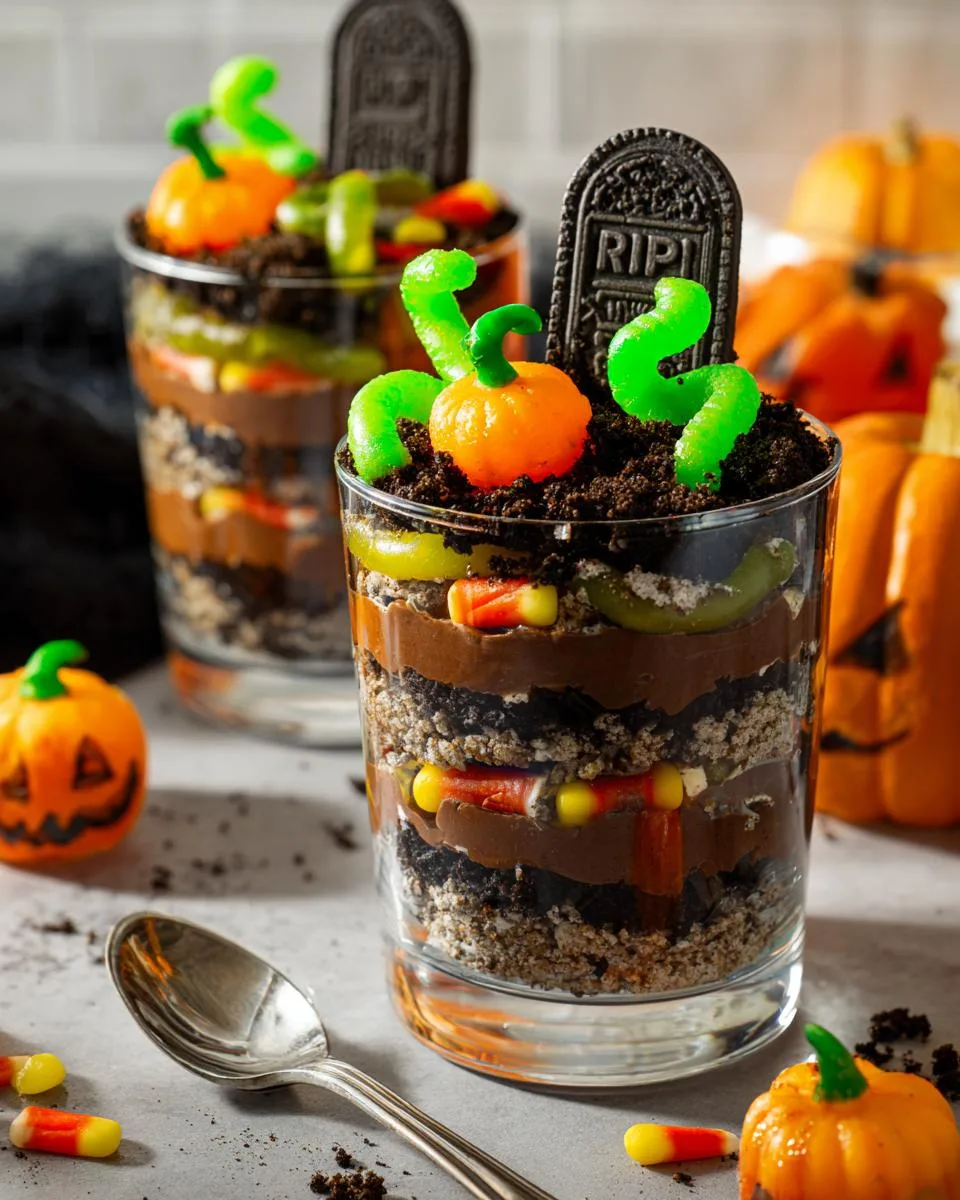
Step 2: Layer the Dirt Cups
Crush those Oreos! Toss them in your food processor and pulse until they look like rich, dark dirt. No processor? No problem – a zip-top bag and rolling pin work just as well (and lets out some Halloween frustration!).
Now the fun begins – fold the Cool Whip into your chilled pudding until it’s fully combined. Time to assemble! I like to use a small ladle or spoon to:
- Fill each cup 1/3 full with pudding mixture
- Sprinkle a tablespoon of Oreo “dirt” on top
- Repeat the layers once more
Chill the cups for 20 minutes – this helps the layers set so your decorations don’t sink into the pudding abyss!
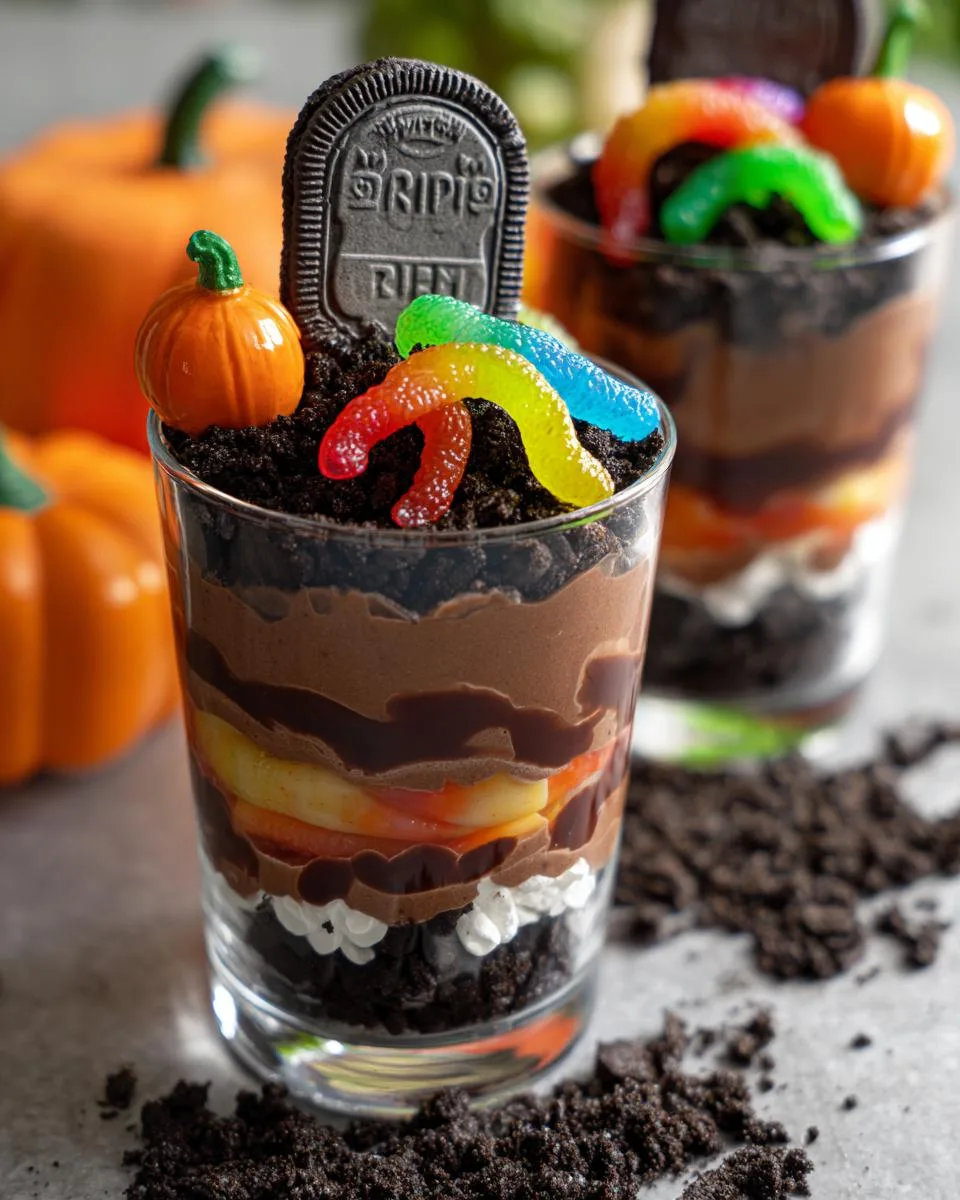
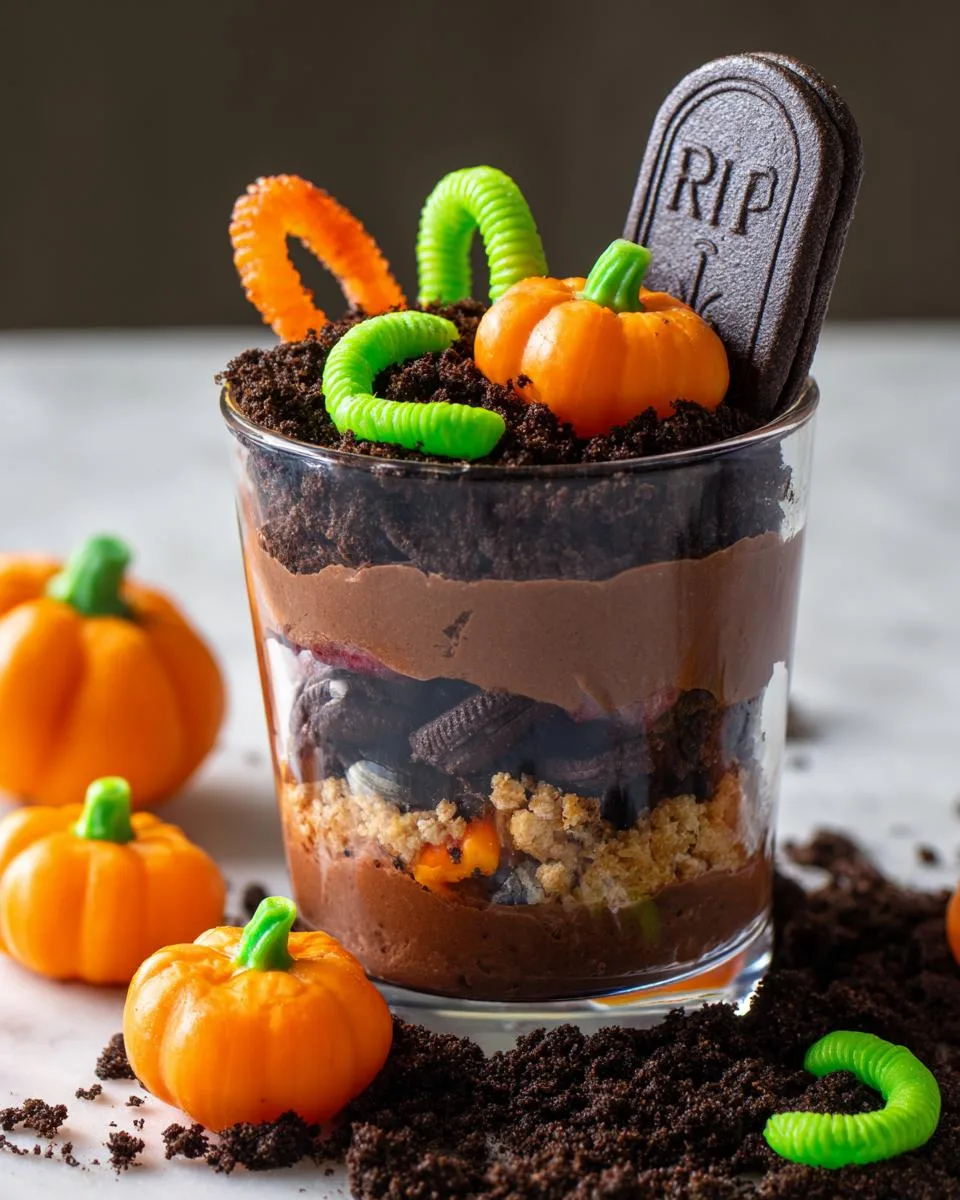
Step 3: Add Halloween Decorations
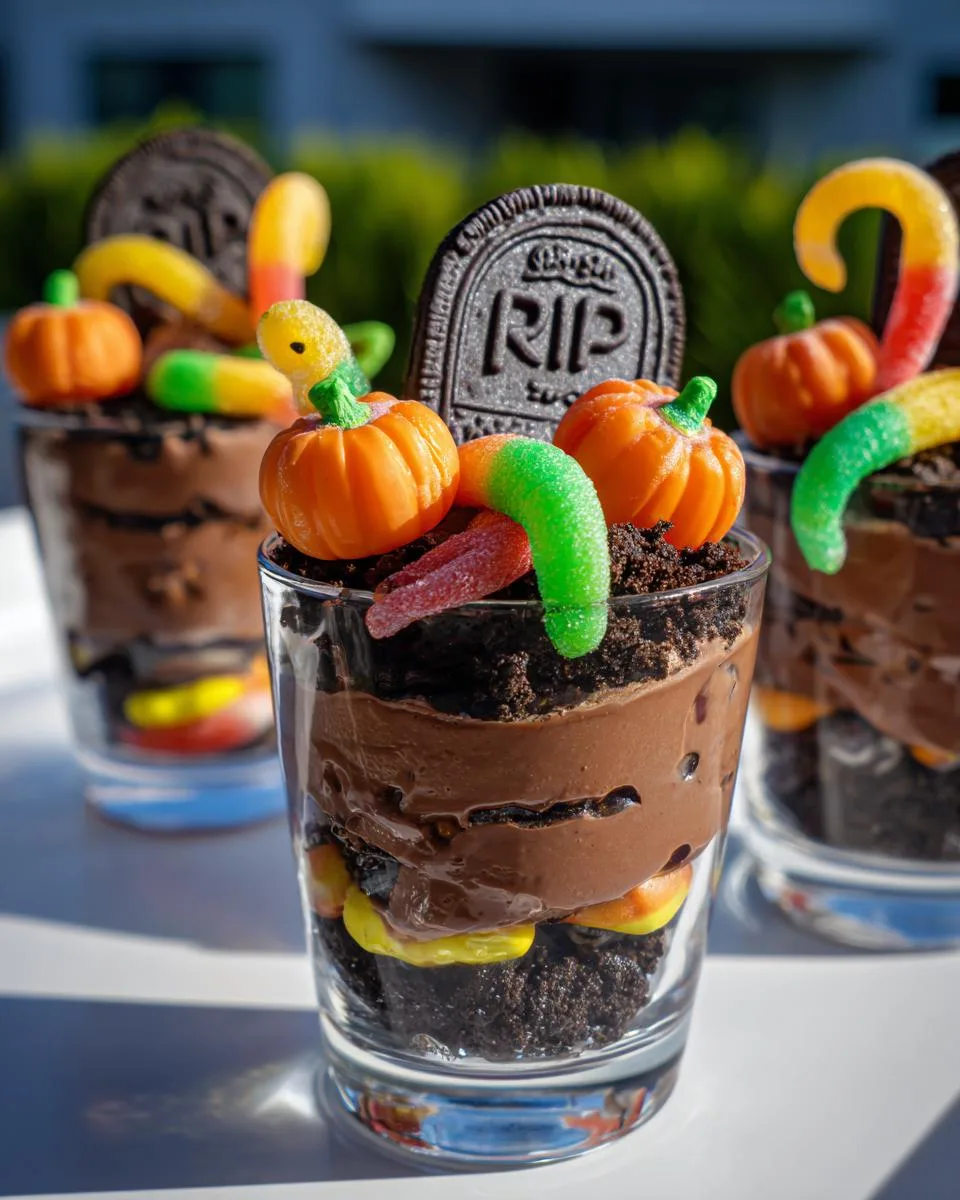
This is where the magic happens! While your cups chill, write “RIP” on the Milano cookies with black icing – make the letters nice and drippy for extra spook factor. When the cups are ready:
- Stick one cookie “tombstone” into each cup at a slight angle
- Poke 3-4 gummy worms halfway into the dirt – like they’re crawling out!
- Tuck a few candy pumpkins around the edges
And voila! You’ve just created the most delightfully disgusting Halloween treat. The kids at my house always fight over who gets the wormiest cup!
Tips for Perfect Halloween Dirt Cups
After making these creepy cups more times than I can count, I’ve learned a few tricks to make them absolutely foolproof:
- Crush those Oreos to dust – Big chunks won’t give you that authentic “dirt” look. Pulse them in the food processor until they’re basically powder!
- Chill like your life depends on it – That 20-minute rest between layers? Non-negotiable. It keeps your decorations from sinking into pudding oblivion.
- Kid supervision is key – Those gummy worms are tiny! I always help little hands place decorations to prevent choking hazards.
- Work fast with the pudding – Once you fold in the Cool Whip, assemble immediately before it starts to set.
- Extra creep factor – Add a few drops of green food coloring to some Cool Whip for “moldy” patches!
Trust me – follow these tips and your dirt cups will be the talk of the graveyard… I mean, party!
Ingredient Substitutions & Variations
Listen, I know we don’t always have exactly what a recipe calls for – here are my favorite swaps that still make killer dirt cups:
- Pudding panic? Vanilla works great for “ghostly” dirt cups, or try butterscotch for a caramel twist
- Dairy-free? Use almond milk and vegan Cool Whip – my niece’s allergic and never knows the difference!
- Gluten concerns? Gluten-free Oreo dupes crush up just as nicely
- No Milano cookies? Graham crackers make great tombstones too
- Extra spooky: Add crushed chocolate sandwich cookies for “graveyard dirt” texture
The beauty of dirt cups? They’re like Halloween costumes – endlessly customizable! Last year I even used crushed chocolate grahams and candy corn for an autumnal twist.
Serving & Storage
Here’s the dirt on keeping your creepy creations perfect! These cups absolutely must stay chilled – I always keep them in the fridge until the very last second before serving. That cool temperature makes the pudding extra creamy and prevents any wiggly worm meltdowns.
Got leftovers? (Unlikely in my house!) Cover them tightly with plastic wrap and they’ll keep happily in the fridge for about 2 days. Though honestly, the Oreos start losing their crunch after day one – but that never stops my kids from gobbling them up!
Halloween Dirt Cups FAQs
I get asked these questions every Halloween – let me save you some time with the dirt cup wisdom I’ve collected over the years!
Do dirt cups need refrigeration?
Absolutely! Those creamy layers will turn into a spooky mess if left out. I always keep them chilled until serving – the cold makes the pudding extra firm and keeps the worms from getting too wiggly!
Are they safe for kids?
Totally kid-friendly… with supervision. The pudding and Oreos are harmless, but watch little ones with the small decorations. I chop gummy worms in half for toddlers – same creepy effect, less choking risk!
Where did dirt cups come from?
These started popping up at 90s potlucks as a playful no-bake dessert. The “worms in dirt” concept took off for Halloween because it’s just so delightfully gross looking! My mom made her first batch for my 6th grade Halloween party, and I’ve been hooked ever since. My mom made her first batch for my 6th grade Halloween party, and I’ve been hooked ever since.
Can I make these ahead?
You bet! Assemble them (without decorations) up to a day in advance. Add the tombstones and worms right before serving so they stay picture-perfect.
Nutritional Information
Okay, let’s be real – we’re not eating dirt cups for their health benefits! But since I know some folks like to keep track, here’s the scoop on what you’re getting in one of these spooky treats. Remember: These numbers can change based on your exact ingredients and how generous you are with the candy decorations!
One dirt cup (about 1 serving) typically contains roughly:
- 280 calories – Mostly from that dreamy chocolate pudding and Oreo goodness
- 22g sugar – It’s Halloween, let’s be festive!
- 12g fat – That’s what makes it so creamy and delicious
- 38g carbs – Perfect for fueling a night of trick-or-treating
- 4g protein – Hey, milk has protein, right?
My philosophy? Halloween comes once a year – enjoy your dirt cups guilt-free! Just maybe balance them out with some carrot sticks earlier in the day (wink).
Final Thoughts
There you have it – my foolproof recipe for the most delightfully disgusting Halloween treat around! These dirt cups have been bringing joy (and giggles) to my Halloween celebrations for years. I can’t wait for you to try them and make your own spooky memories. Snap a photo of your creepy creations and tag me – I love seeing how everyone puts their own spin on this classic!
For More recipes Follow me on Facebook!


