Okay, I have to confess – these Halloween meringue ghosts are my absolute favorite treats to make when October rolls around. They’re like little edible ghosts floating on your baking sheet, and my nieces and nephews go crazy for them every year. I remember the first time my sister and I made them – we had flour everywhere, chocolate chips stuck to our fingers, and so much laughter that our ghost faces came out more “blobby” than “boo-tiful.” But you know what? They still tasted amazing!
The best part is how simple they are – just a few ingredients, mostly stuff you already have in your pantry. These delicate, melt-in-your-mouth ghosts are perfect for Halloween parties, classroom treats, or just a fun baking project with kids. And don’t worry if your piping isn’t perfect – ghosts are supposed to be a little wobbly and imperfect, right? That’s part of their charm!
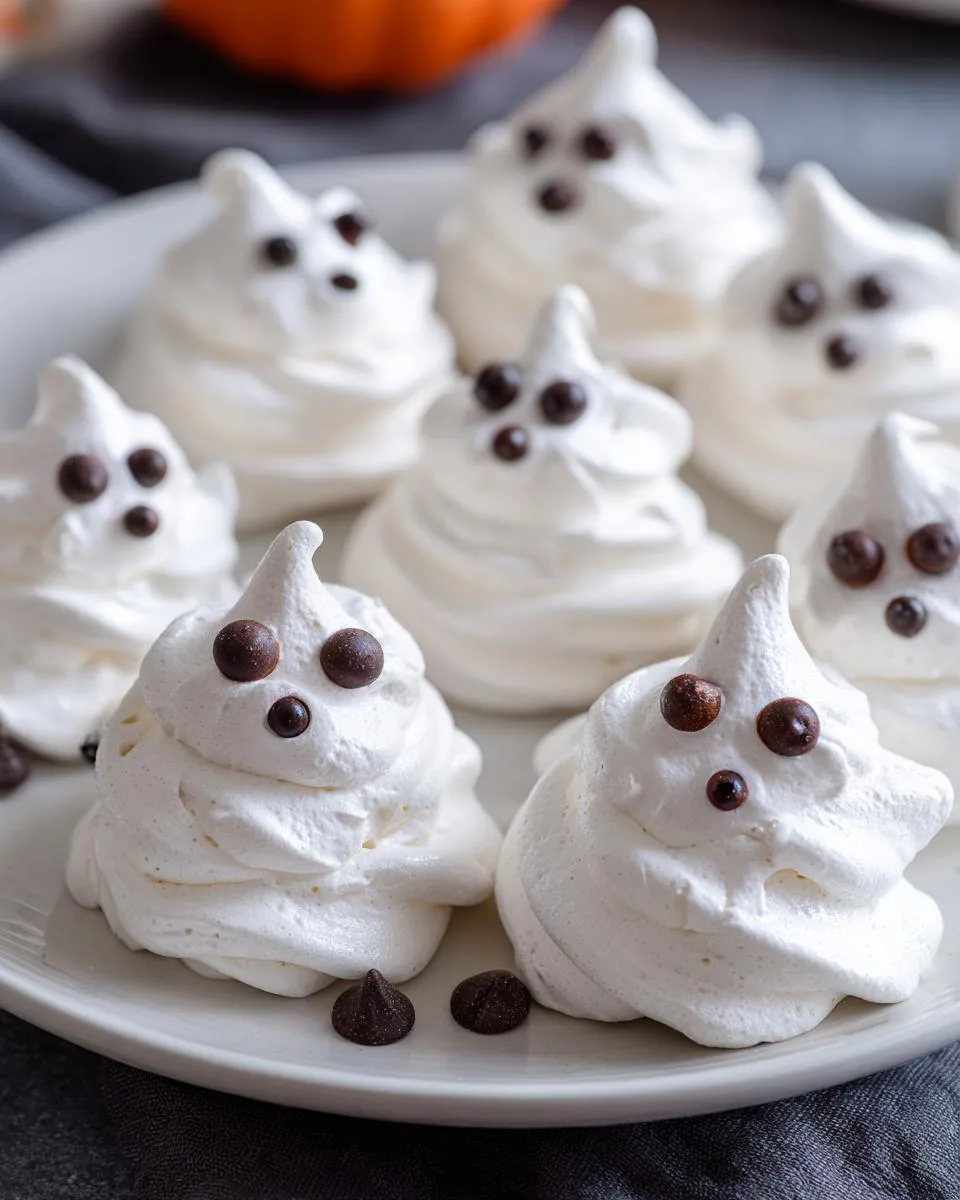
Table of Contents
Table of Contents
Why You’ll Love These Halloween Meringue Ghosts
Let me tell you why these little spooky treats will become your new Halloween tradition:
- So easy even ghosts could make them – Just a handful of basic ingredients and you’re ready to boo-k some baking!
- Perfect for little hands to help – Kids go wild for piping (or spooning) the ghosts and sticking on the chocolate chip eyes
- Light as a ghost’s whisper – That airy, melt-in-your-mouth texture makes them impossible to resist
- Halloween party showstoppers – Pile them on a cake stand for an eerie centerpiece that disappears fast
- No-fail festive fun – Even your “messy” ghosts will look adorable and taste heavenly
Trust me, once you make these once, you’ll be haunting your kitchen with meringue ghosts every October!
Ingredients for Halloween Meringue Ghosts
Here’s everything you’ll need to summon these sweet little spirits – and yes, every single ingredient matters more than you’d think!
- 2 large egg whites (room temperature – trust me, cold ones just won’t whip up right!)
- 1/4 teaspoon cream of tartar (our secret weapon for stable, fluffy ghosts)
- Pinch of salt (just a tiny one to balance the sweetness)
- 1/2 cup super-fine sugar (regular sugar works, but super-fine dissolves better for that perfect smooth texture)
- Mini chocolate chips (for those adorable ghost eyes – about 20-30 pieces)
- Optional: 1/4 teaspoon vanilla extract or other flavoring (I sometimes add peppermint around the holidays!)
That’s it! Simple ingredients for spooktacular treats. Now let’s make some magic!
How to Make Halloween Meringue Ghosts
Alright, let’s get spooky! Making these little ghosts is easier than you think – just follow these steps and you’ll have a haunted batch in no time.
Preparing the Meringue
First things first – preheat that oven to 225°F (110°C) and line your baking sheets with parchment paper. Now, here’s where the magic happens. In a clean, dry bowl (and I mean spotless – any grease will ruin everything!), beat your room-temperature egg whites until foamy. Add that pinch of salt and cream of tartar, then crank up the mixer to medium. When it looks like a bubble bath, start adding your super-fine sugar one tablespoon at a time while beating on high. Keep going until you get stiff peaks – you’ll know they’re ready when the meringue holds its shape when you lift the beater. This takes about 5-7 minutes, but don’t rush it!
Piping the Ghosts
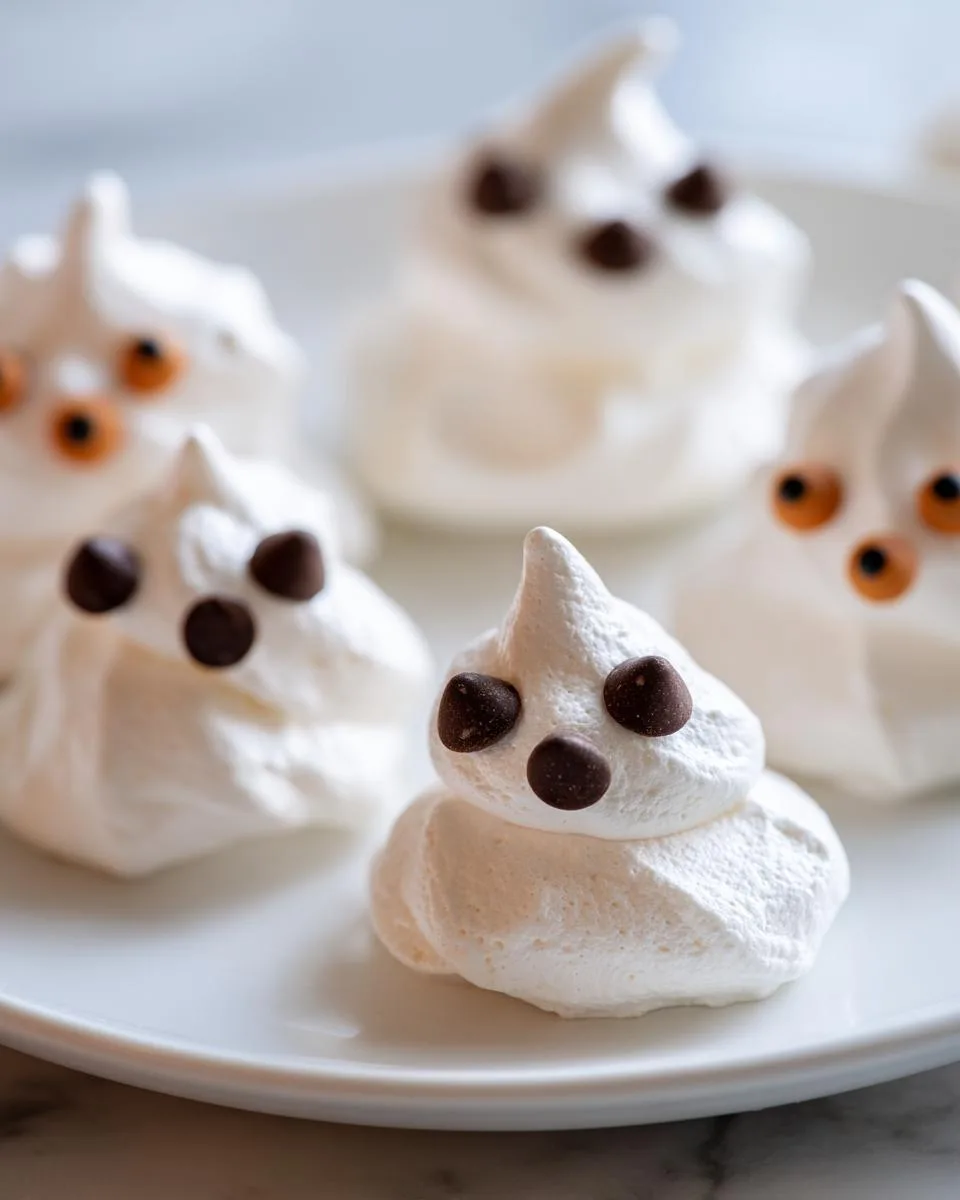
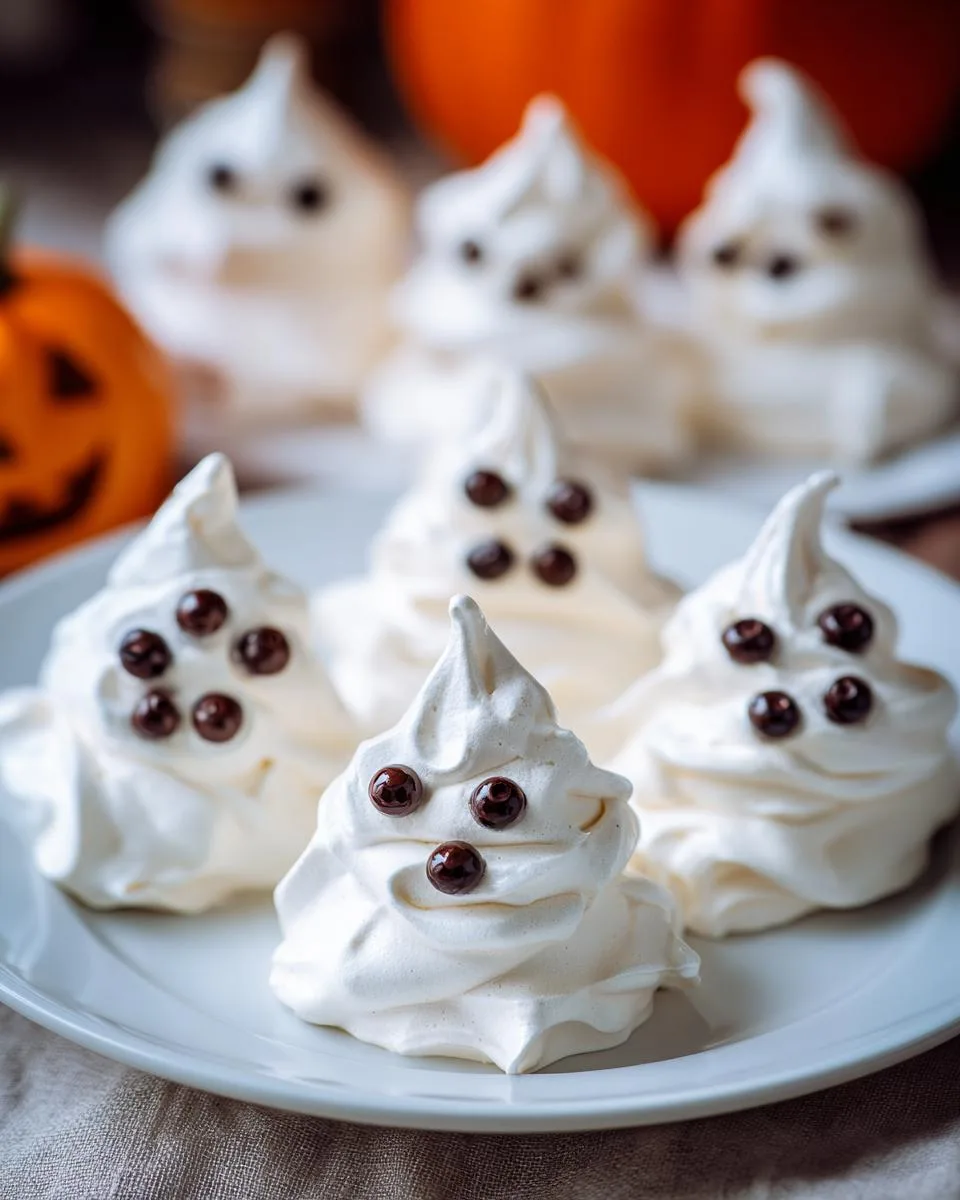
Now for the fun part! Spoon your meringue into a piping bag with a round tip (or just use a plastic bag with the corner snipped off – no fancy equipment needed here). Pipe little ghost shapes onto your prepared sheets – I do mine about 2 inches tall with a wobbly base and a slightly tapered top for that classic ghost look. No piping bag? No problem! Just spoon dollops and use the back of the spoon to shape them. Remember – ghosts aren’t perfect, so any little imperfections just add character!
Decorating and Baking
Time to give your ghosts personality! Using tweezers or clean fingers (careful – they’re sticky!), place two mini chocolate chips for eyes on each ghost. Then pop them in the oven for 45 minutes. Here’s the secret – when the time’s up, turn off the oven but leave them inside for another hour or two to dry out completely. Don’t peek! The slow cooling prevents cracking and gives them that perfect crisp exterior with a slightly chewy center. When they’re done, they should lift easily off the parchment – if they stick, they need more time.
Print
5 Secrets to Perfect Halloween Meringue Ghosts Every Time
- Prep Time: 15 minutes
- Cook Time: 45 minutes
- Total Time: 2 hours 45 minutes
- Yield: 20 ghosts 1x
- Category: Dessert
- Method: Baking
- Cuisine: International
- Diet: Vegetarian
Description
Easy-to-make Halloween meringue ghosts with a light, airy texture and cute chocolate chip eyes.
Ingredients
- 2 large egg whites (room temperature)
- 1/4 teaspoon cream of tartar
- Pinch of salt
- 1/2 cup granulated sugar (super-fine)
- Mini chocolate chips
- Candy eyes
- Vanilla extract or other flavoring (optional)
Instructions
- Preheat oven to 225°F. Line a cookie sheet with parchment paper or silicone baking sheet.
- Separate egg whites carefully, ensuring no shell or yolk gets into the bowl. Let egg whites sit at room temperature for at least 30 minutes.
- Beat egg whites on low speed. Add cream of tartar and salt, then increase to medium speed until foamy.
- Switch to high speed and gradually add sugar, one tablespoon at a time, until stiff peaks form (5-7 minutes).
- Optional: Fold in flavoring if desired.
- Pipe meringue onto baking sheets using a piping bag with a round tip, spacing 2 inches apart. Alternatively, spoon mounds of meringue.
- Place 2 candy eyes and 1 mini chocolate chip on each meringue ghost using tweezers.
- Bake for 45 minutes, then turn off the oven and let meringues cool inside for 1-2 hours without opening the door.
Notes
- Store in an airtight container at room temperature for up to 1 week.
- Meringues are done when they easily lift off the parchment paper.
- Super-fine sugar dissolves better for smoother meringue.
- Room-temperature egg whites whip up faster and hold more air.
Nutrition
- Serving Size: 1 ghost
- Calories: 25
- Sugar: 5g
- Sodium: 5mg
- Fat: 0.1g
- Saturated Fat: 0g
- Unsaturated Fat: 0g
- Trans Fat: 0g
- Carbohydrates: 5g
- Fiber: 0g
- Protein: 0.5g
- Cholesterol: 0mg
Pro Tips for Perfect Halloween Meringue Ghosts
Over years of making these little ghosts, I’ve learned a few tricks that make all the difference between “meh” and “BOO-tiful” meringues:
- Egg whites must be spotless – Even a speck of yolk will sabotage your fluffiness! Separate them carefully in a small bowl first.
- Room temp is non-negotiable – Cold eggs just won’t whip up properly. Let them sit out for at least 30 minutes (I put mine in a bowl of warm water for 5 minutes if I forget!).
- Super-fine sugar is worth it – Regular sugar works, but the finer stuff dissolves completely for that smooth, glossy texture we love.
- No peeking while baking! The slow oven-drying is what gives your ghosts that perfect crisp exterior.
- Humidity is the enemy – Save meringue-making for dry days, or they might get sticky and weepy (just like real ghosts!).
Follow these, and your ghosts will be the talk of every Halloween gathering!
Storing and Serving Halloween Meringue Ghosts
Here’s the spooky truth – these little ghosts hate moisture more than sunlight! Store them in an airtight container at room temperature (never the fridge – they’ll get soggy and sad), and they’ll stay crisp for up to a week. I like to layer them between sheets of parchment paper so they don’t stick together. For serving, pile them on a cake stand with other Halloween treats – they look especially haunting next to chocolate spiderwebs or orange-frosted cupcakes!
Halloween Meringue Ghosts Variations
Want to haunt your kitchen with different flavors? Try folding in 1/4 teaspoon peppermint extract for “frosty” ghosts, or swap vanilla for almond extract for a nutty twist. Feeling colorful? Add a drop of purple or green food coloring – just avoid liquid kinds (they can deflate your meringue). My niece loves pink ghosts with strawberry extract – because who says spirits can’t be girly?
Halloween Meringue Ghosts Nutrition
Now, let’s be real – we’re not eating these for their health benefits! But if you’re curious, each little ghost clocks in at about 25 calories and 5g sugar (nutrition varies slightly by brand). They’re naturally fat-free and gluten-free – which basically means you can eat a whole haunted army of them guilt-free, right? Okay, maybe not completely guilt-free, but definitely worth every sweet, spooky bite!
FAQs About Halloween Meringue Ghosts
Got questions about these spooky little treats? I’ve got answers! Here are the things people ask me most:
Can I make these ahead of time?
Absolutely! These ghosts actually taste better after a day or two. Just store them in an airtight container at room temperature (no fridge – they’ll get weepy!). They’ll stay crisp for up to a week… if they last that long!
Why did my meringues crack or collapse?
Oh no! Usually this means either: 1) Your oven was too hot (225°F is perfect), 2) You peeked while baking (tempting, but don’t!), or 3) There was a tiny bit of yolk in your whites. Next time, separate eggs carefully in a small bowl first.
Can I use regular sugar instead of super-fine?
You can, but super-fine dissolves better for that smooth texture. If you only have regular sugar, just pulse it in a blender for 30 seconds – instant super-fine sugar!
Help! My ghosts are sticky after baking!
No worries – just pop them back in the turned-off oven for another hour. Humidity is a meringue’s worst enemy! On rainy days, I sometimes bake them an extra 15 minutes.
Share Your Spooky Creations
I’d love to see your ghostly masterpieces! Tag me on Instagram or leave a comment – did your ghosts turn out cute, creepy, or wonderfully wonky? Every spooky creation tells a story!
For More recipes Follow me on Facebook!


