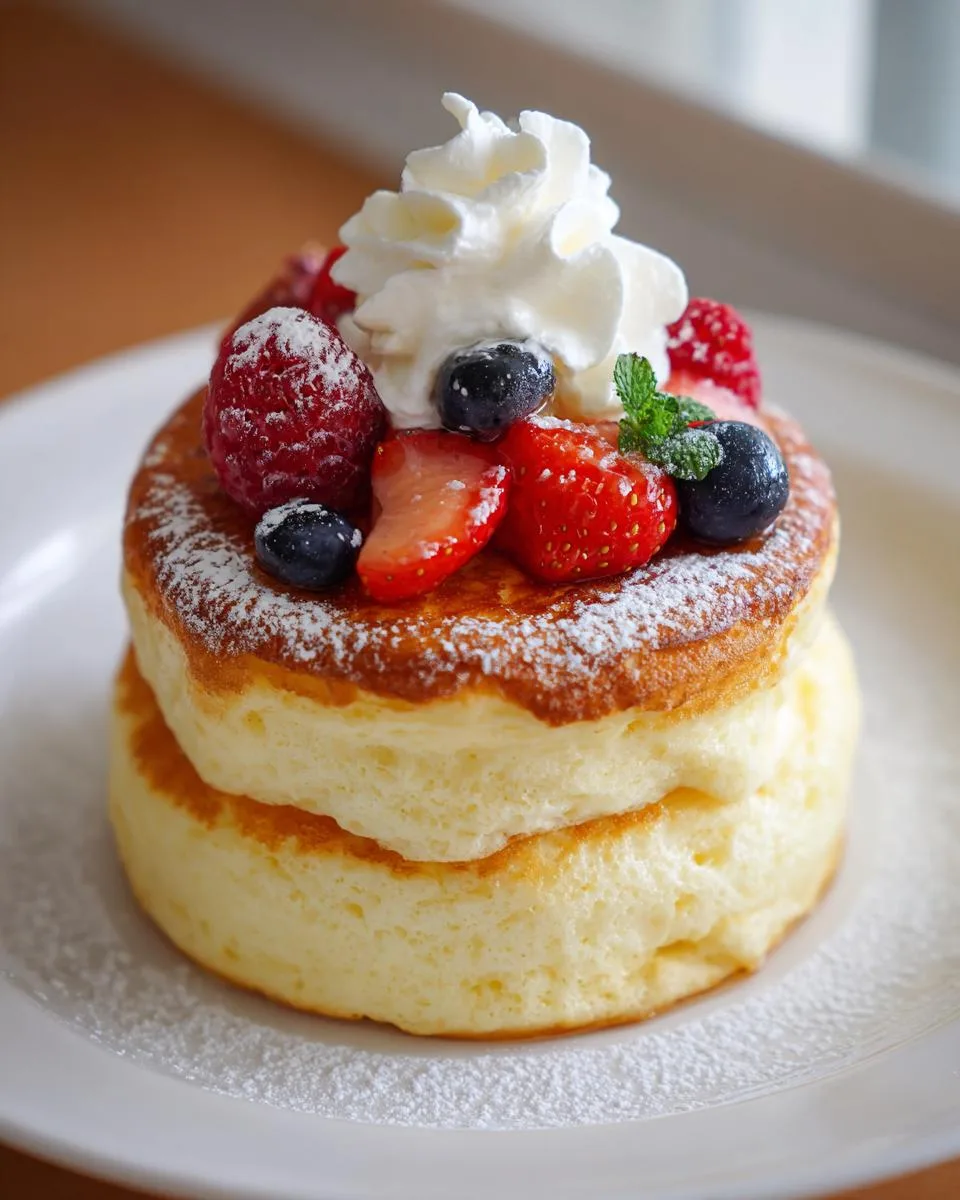
Oh my gosh, have you ever seen those wobbly, cloud-like stacks of jiggly Japanese pancakes that look too magical to eat? I first fell in love with them during a trip to Tokyo, where breakfast cafes serve them still jiggling on the plate—like edible trampolines! These aren’t your average pancakes; they’re soufflé-style miracles with an airy texture that makes them dance when you poke them. My kitchen experiments (and many pancake casualties) finally led me to a foolproof method for recreating that famous fluffiness at home. Perfect for lazy weekend brunches when you want something special, these jiggly Japanese pancakes turn basic ingredients into pure breakfast joy with their delicate sweetness and dreamy softness. Trust me—once you master these, regular pancakes just won’t compare!
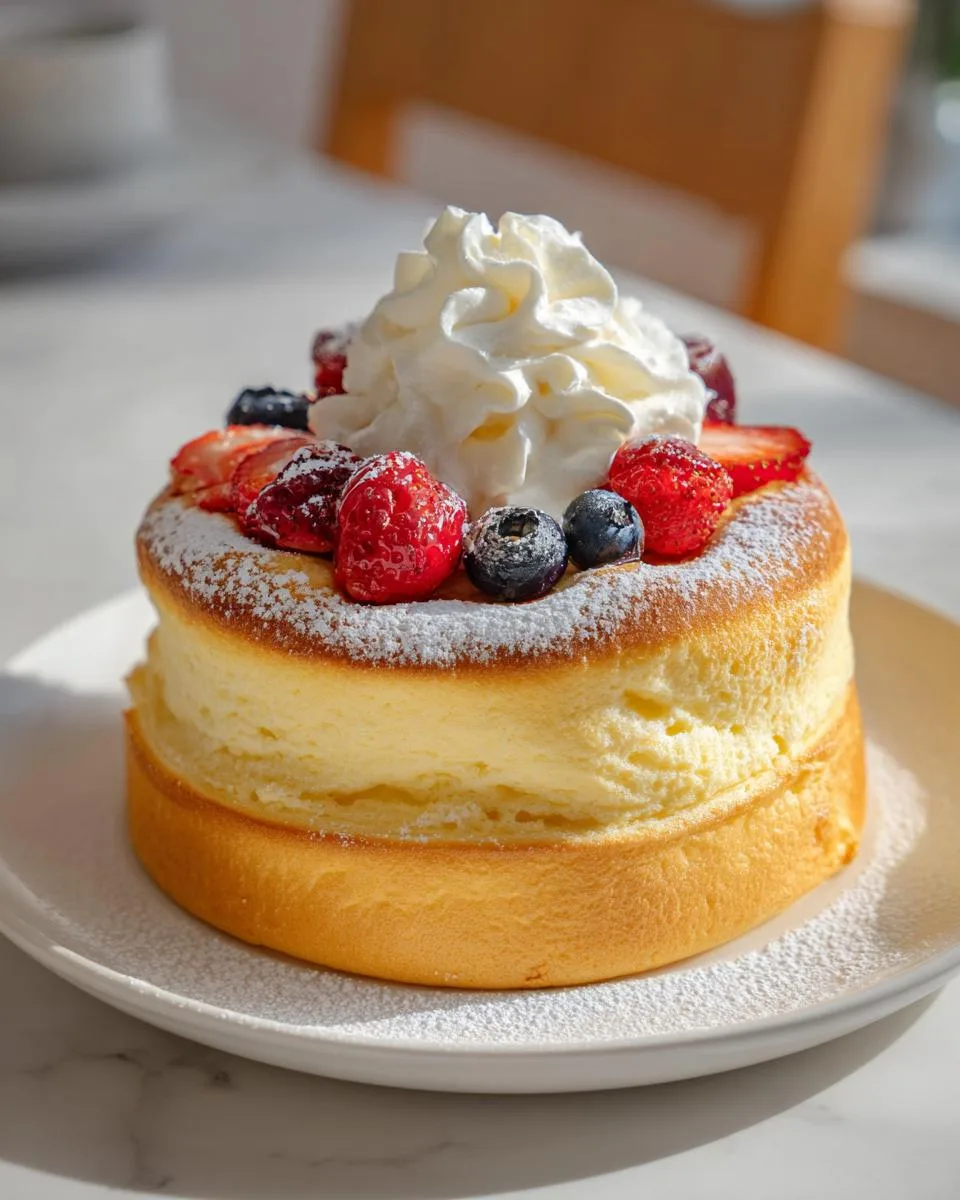
Table of Contents
Table of Contents
Why You’ll Love These Jiggly Japanese Pancakes
Oh, where do I even start? These pancakes aren’t just food—they’re an experience! Here’s why they’ll become your new brunch obsession:
- Cloud-like texture that literally jiggles when you shake the plate (so satisfying to watch!)
- Endless topping options – go classic with berries and cream or get creative with matcha powder and red bean paste
- Totally Instagram-worthy – that dramatic height and wobble make everyone ask for your recipe
- Lighter than traditional pancakes – you won’t feel stuffed after eating them
- Fun to make – there’s something magical about watching the batter puff up under the lid
Seriously, once you’ve had pancakes that bounce, there’s no going back to flat breakfasts! If you enjoy making unique breakfast items, check out our other breakfast recipes.
Ingredients for Jiggly Japanese Pancakes
You won’t believe how simple the ingredient list is for these fluffy wonders! The magic comes from technique, but every item matters. Here’s what you’ll need for that perfect wobble:
- 2 large eggs (room temperature – cold eggs won’t whip as well)
- 2 tablespoons milk (whole milk gives richest texture, but any works)
- ½ teaspoon vanilla extract (the good stuff – skip imitation!)
- 1 teaspoon lemon zest (optional but adds brightness)
- ¼ cup all-purpose flour (fluffed, spooned, and leveled – don’t pack it!)
- ¼ teaspoon baking powder (freshness matters – test if yours bubbles in water)
- ½ teaspoon white vinegar (or lemon juice – stabilizes the meringue)
- 2 tablespoons granulated sugar (superfine dissolves faster but regular works)
- Neutral oil (just enough to lightly coat the pan – I use grapeseed)
Toppings (all optional but oh-so-fun):
- Sweetened whipped cream
- Assorted fresh berries
- Powdered sugar dusting
- Warm maple syrup
Ingredient Substitutions & Notes
Out of something? No panic! Here’s how to adapt:
- No vinegar? Lemon juice works identically – same ½ teaspoon.
- Dairy-free? Almond or oat milk substitutes beautifully.
- Egg size matters! Large eggs (~50g each) give ideal structure. If using medium, add an extra egg white.
- Flour tip: If you only have cake flour, use 2 tablespoons + 2 teaspoons (it’s finer).
- No vanilla? Skip it or use a pinch of cinnamon for warmth.
One golden rule: Never substitute the eggs or sugar – they’re the backbone of that famous jiggle!
How to Make Jiggly Japanese Pancakes
Okay, here’s where the magic happens! Making these pancakes is like conducting a symphony – every step matters, but when it all comes together? Pure breakfast bliss. Let me walk you through it exactly how I do it in my kitchen (after many, many trial runs!).
Preparing the Batter
First things first – separate those eggs carefully! Even a tiny bit of yolk in your whites can ruin your meringue. I crack each egg into a small bowl first, then transfer the yolk back and forth between shell halves until all the white drips out. Old-school, but foolproof!
Now, whisk your yolks with milk, vanilla, and lemon zest until smooth and slightly frothy. Sift in the flour and baking powder – yes, sifting matters here! We want that airiness. Mix until just combined; small lumps are okay.
For the meringue: beat the whites with vinegar until frothy (about 30 seconds), then gradually add sugar while beating. Here’s the key – you want stiff peaks that hold their shape when you lift the beaters. The meringue should look glossy like marshmallow fluff. Under-beaten? Your pancakes won’t rise properly. Over-beaten? They’ll be dry. It’s a Goldilocks situation!
Cooking Jiggly Japanese Pancakes
Now for the fun part – folding! Scoop about 1/3 of the meringue into the yolk mixture and gently fold with a spatula. Don’t stir – imagine you’re turning the batter over onto itself. Repeat with the rest until no white streaks remain. Some tiny bubbles are fine – we’re preserving that precious air!
Heat your nonstick pan on low (I use setting 2 out of 10). Seriously, low and slow wins here. Lightly grease it, then wipe with a paper towel – too much oil makes them slide around. Spoon or pipe tall mounds (about 3 inches high). Cover immediately with a lid – this traps steam for that signature rise.
Set a timer for 7-8 minutes. No peeking! When you see bubbles forming on top and the edges look set, it’s flip time. Slide your spatula gently underneath, take a deep breath, and flip in one confident motion. Cover and cook another 5-6 minutes. If they start deflating? Your heat might be too high – adjust next batch.
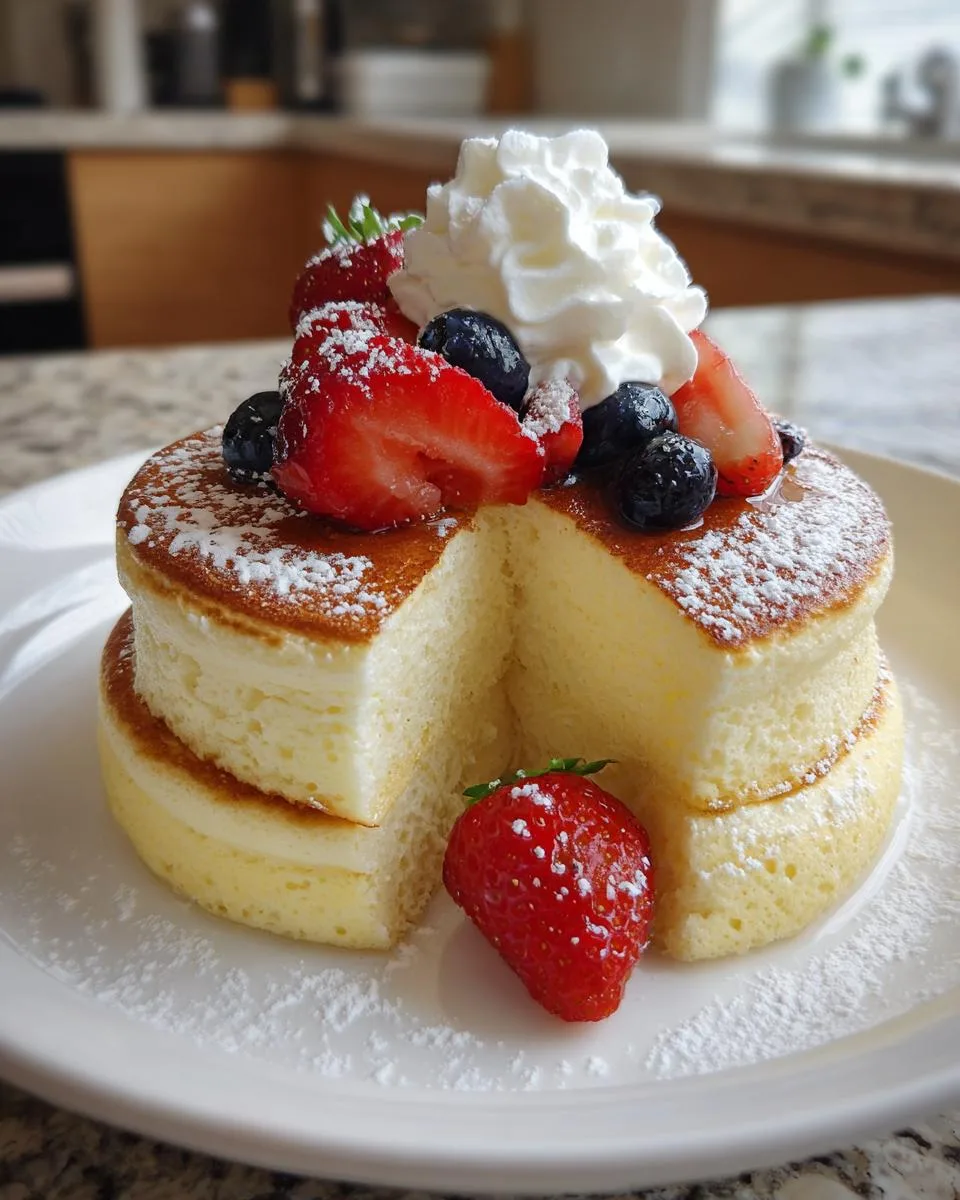
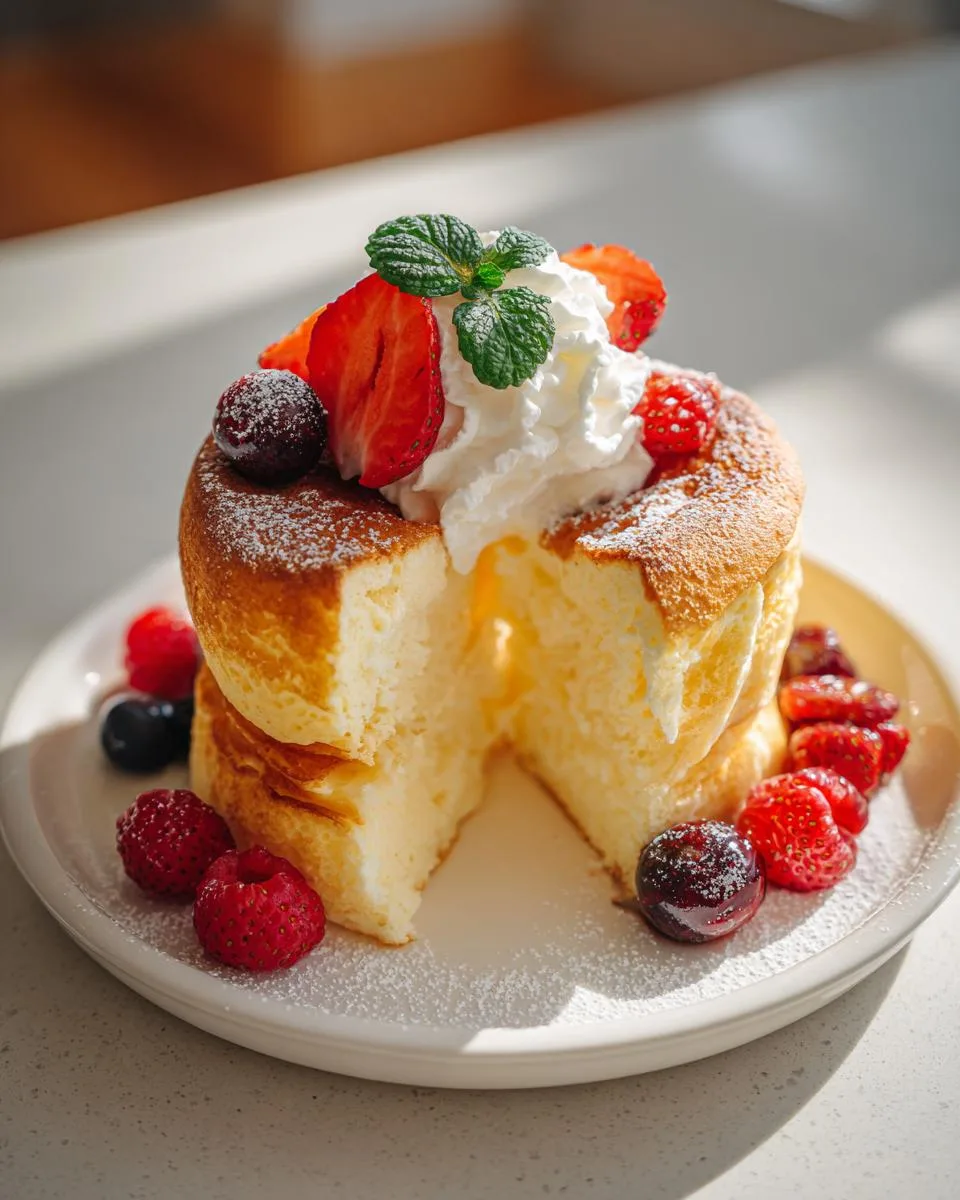
Serve immediately – these beauties wait for no one! The jiggle should be dramatic but not collapsing. If they hold their shape when you poke them but wobble like jelly, you’ve nailed it!
Print
3 Secrets to Perfect Jiggly Japanese Pancakes That Bounce
- Prep Time: 10 minutes
- Cook Time: 15 minutes
- Total Time: 25 minutes
- Yield: 2–3 pancakes 1x
- Category: Breakfast
- Method: Stovetop
- Cuisine: Japanese
- Diet: Vegetarian
Description
Fluffy and jiggly Japanese soufflé pancakes, a delightful brunch treat with a light, airy texture.
Ingredients
- 2 large eggs
- 2 tablespoons milk
- ½ teaspoon vanilla extract
- 1 teaspoon lemon zest (optional)
- ¼ cup all-purpose flour (fluffed, spooned, and leveled)
- ¼ teaspoon baking powder
- ½ teaspoon white vinegar (or lemon juice)
- 2 tablespoons granulated sugar
- Oil (any neutral oil for cooking)
- Sweetened whipped cream (optional)
- Assorted berries (optional)
- Powdered sugar (optional)
- Maple syrup (optional)
Instructions
- Separate egg whites and yolks into separate bowls.
- Whisk yolks with milk, vanilla, and lemon zest. Sift in flour and baking powder. Mix until smooth.
- Beat egg whites with vinegar until frothy. Gradually add sugar and beat until stiff peaks form.
- Fold ⅓ of the meringue into the yolk mixture gently. Repeat with the rest.
- Heat a nonstick pan on low. Lightly grease and wipe excess oil.
- Scoop or pipe batter into tall mounds. Cover and cook 7-8 minutes until golden.
- Flip carefully, cover, and cook another 5-6 minutes.
- Serve immediately with toppings.
Notes
- Use an electric stovetop for best results.
- Keep batter tall for fluffy pancakes.
- Do not overmix to avoid deflating.
Nutrition
- Serving Size: 1 pancake
- Calories: 180
- Sugar: 10g
- Sodium: 50mg
- Fat: 8g
- Saturated Fat: 3g
- Unsaturated Fat: 4g
- Trans Fat: 0g
- Carbohydrates: 22g
- Fiber: 1g
- Protein: 5g
- Cholesterol: 120mg
Equipment You’ll Need
You don’t need fancy gadgets for these jiggly wonders, but a few key tools make all the difference. Here’s what I always grab:
- A good nonstick pan – mine’s 8 inches with straight sides (perfect for flipping!)
- Electric hand mixer – whisking egg whites by hand? Brave soul, but no thanks!
- Thin spatula – the flatter, the better for those delicate flips
- Small ladle or piping bag – helps create those tall, Instagram-worthy mounds
- Glass or metal bowl for whipping egg whites (plastic can hold grease)
- Lid that fits your pan – crucial for trapping steam and getting maximum rise
That’s it! No special pancake rings needed—just everyday tools with a little extra love.
Tips for Perfect Jiggly Japanese Pancakes
After making these pancakes more times than I can count (and yes, plenty of flops along the way!), here are my golden rules for that perfect wobble every time:
- Patience is key – preheat your pan properly on low heat before adding batter. I wait 5 full minutes to ensure even cooking.
- Resist the peek! Every time you lift that lid, precious steam escapes. Trust the process and your timer.
- Flip with confidence – hesitation leads to pancake casualties. Use two spatulas if needed, and commit to one smooth motion.
- Serve immediately – these beauties start deflating after about 2 minutes. Have your toppings ready to go!
- If they deflate: Your heat might be too high (try lower next batch) or the meringue wasn’t stiff enough (beat those whites longer!).
- Pro trick: For extra height, stack the batter in layers – cook 1 minute, add more batter, repeat until you get skyscraper pancakes!
Remember – even slightly flat jiggly pancakes still taste amazing. The wobble is just the delicious cherry on top! If you’re looking for other fluffy breakfast ideas, check out our fluffy pancake recipe.
Serving Suggestions for Jiggly Japanese Pancakes
Now for the best part – dressing up these wobbly wonders! My absolute favorite way is a simple dusting of powdered sugar with fresh strawberries – the tart berries cut through the sweetness perfectly. But don’t stop there! Here’s how I like to serve them:
- Classic café style: Generous swirl of whipped cream, mixed berries, and a drizzle of honey
- Japanese-inspired: Matcha whipped cream with red bean paste and kinako (roasted soybean flour) sprinkle
- Decadent treat: Warm chocolate sauce and sliced bananas – like a soufflé version of banana pancakes!
- Brunch spread: Pair with miso soup, tamagoyaki (rolled omelet), and fresh fruit for a full Japanese breakfast experience
Pro tip: Serve them straight from the pan – that initial dramatic jiggle is half the fun! The toppings should complement, not overwhelm, that delicate cloud-like texture. We love sharing our cooking adventures on Facebook!
Storage & Reheating
Okay, confession time – these pancakes are absolute perfection fresh off the pan, but if you must save some (who has that kind of willpower?!), here’s how: Let them cool completely, then store in an airtight container in the fridge for up to 2 days. When reheating, skip the microwave – it turns them rubbery! Instead, warm them gently in a dry nonstick pan over low heat for about 1 minute per side. They won’t be quite as jiggly, but still delicious – think of it as enjoying soufflé pancakes’ equally tasty cousin!

Nutritional Information
Now, let’s be real—we’re not eating jiggly pancakes for their health benefits, but here’s the scoop per pancake (based on my kitchen scale measurements!): about 180 calories, 10g sugar, and 5g protein. These numbers are estimates—your actual count depends on toppings. The good news? That airy texture means you’re mostly eating delicious clouds! Pro tip: Balance them with protein-rich sides if you’re watching sugar intake.
FAQs About Jiggly Japanese Pancakes
What makes Japanese pancakes different from regular pancakes?
Oh honey, it’s all about that jiggle! The magic comes from whipping egg whites into stiff peaks (like a soufflé) before folding them into the batter. This creates those famous air pockets that make them bounce when you poke them. Regular pancakes? They’re dense little frisbees compared to these cloud-like wonders! For another take on pancakes, see our cottage cheese pancakes.
What are jiggly Japanese pancakes actually called?
In Japan, they’re known as “soufflé pancakes” – though my kids call them “bouncy breakfast clouds!” The technical name is fuwa fuwa pancakes (meaning “fluffy fluffy” in Japanese). Whatever you call them, they’re pure happiness on a plate.
Why do my pancakes keep deflating?
Been there! Usually it’s one of three things: 1) Your meringue wasn’t stiff enough (beat those whites longer!), 2) You peeked too soon (steam escape = pancake collapse), or 3) The heat was too high. Low and slow is the golden rule – I keep my burner at a 2 out of 10.
What toppings do Japanese cafes serve with these?
The classics are always whipped cream and fresh berries, but don’t be afraid to get creative! My favorite Tokyo spot serves them with sweet red bean paste and matcha powder. At home, I love a simple dusting of powdered sugar – lets that amazing texture shine.


