I’ll never forget the first time my mom made No Peek Chicken and Rice for our busy weeknight dinner. The smell of chicken and herbs filling the kitchen while we impatiently waited (without peeking, of course!) became one of my favorite childhood food memories. This one-pan wonder is still my go-to when I need something comforting, easy, and absolutely foolproof.
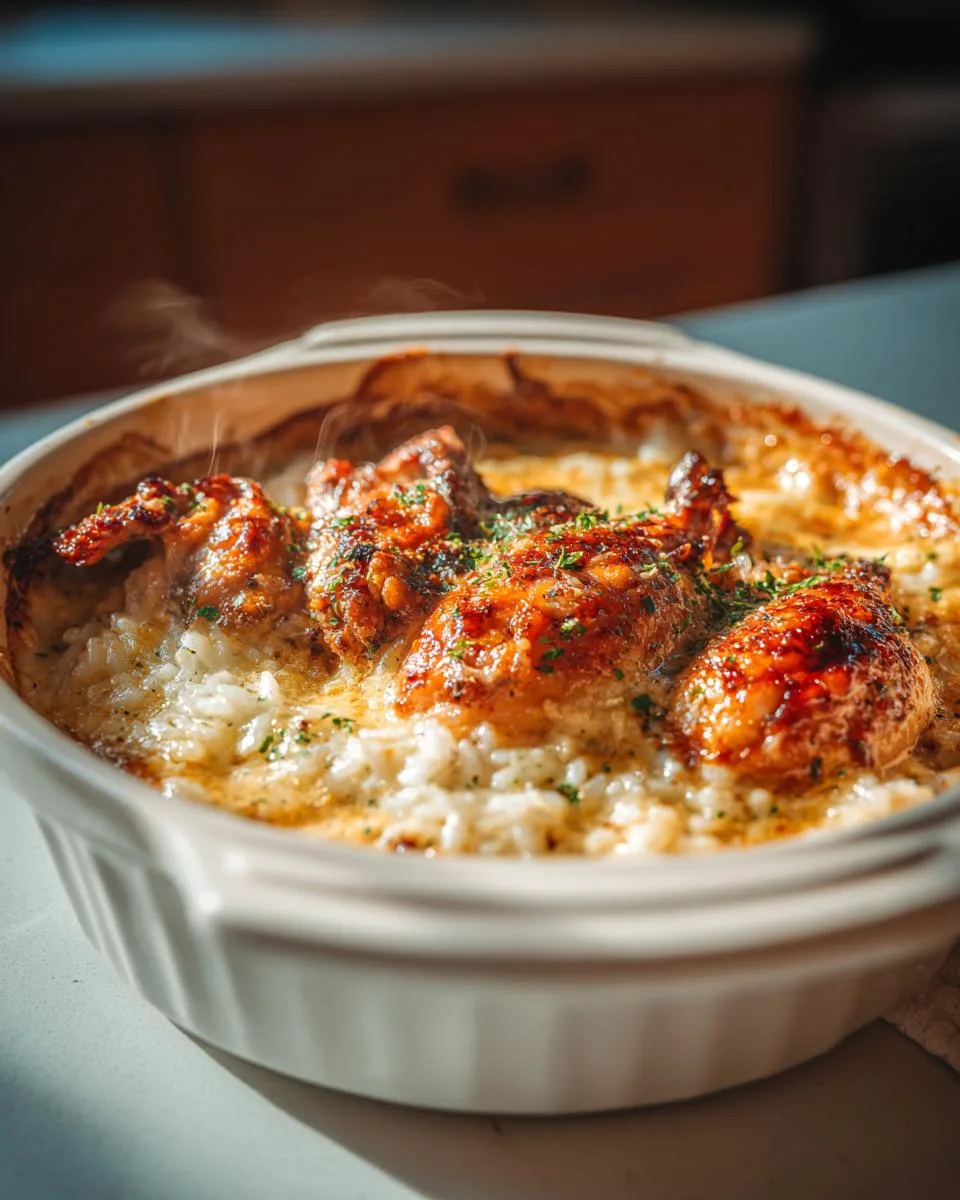
Table of Contents
Table of Contents
Why You’ll Love This No Peek Chicken and Rice
What I love most about this No Peek Chicken and Rice recipe is how it practically cooks itself. You just mix a few simple ingredients, pop it in the oven, and walk away. No stirring, no checking, no fuss. An hour later, you’ve got tender chicken sitting atop perfectly fluffy rice with the most delicious creamy sauce. It’s the kind of meal that makes everyone at the table ask for seconds while you secretly smile because you know how little work it actually took.
Trust me, this recipe is about to become your new best friend in the kitchen. Here’s why:
- One-pan wonder: Just dump, mix, and bake – no messy stovetop splatters or piles of dishes
- Hands-off cooking: Once that foil goes on, you’re free to relax (no stirring required!)
- Comfort food magic: Creamy rice and tender chicken with flavors that taste like you spent hours cooking
- Weeknight lifesaver: Uses pantry staples you probably already have on hand
- Perfect every time: The “no peek” rule guarantees perfectly cooked rice and juicy chicken
Seriously, it’s like the easiest homemade meal you’ll ever make that still tastes impressively delicious.
Ingredients for No Peek Chicken and Rice
Here’s everything you’ll need to make this cozy, no-fuss meal. I promise it’s nothing fancy – just simple ingredients that work magic together in the oven!
- 4 boneless, skinless chicken breasts (about 1.5 lbs total) – look for evenly sized pieces so they cook at the same rate
- 1 (10.5-oz) can unsalted cream of chicken soup – the unsalted version lets you control the seasoning
- 1 (10.5-oz) can unsalted cream of mushroom soup – this adds such great depth of flavor
- 2 cups chicken broth – I like low-sodium so the onion soup mix doesn’t make it too salty
- 2 cups regular white rice, uncooked – long grain works best, don’t use instant!
- 1 package onion soup mix – this little packet is the flavor powerhouse!
Ingredient Substitutions
Don’t stress if you’re missing something – here are my tested swaps that still give great results:
- For the cream soups: Mix 1 cup Greek yogurt + 1/4 cup milk + 1 tsp chicken bouillon per can if you’re out of cream soups
- Rice alternatives: Brown rice works but add 1/2 cup extra broth and 15 minutes to bake time
- Chicken options: Thighs work beautifully too – just remove skin and keep same bake time
- Vegetarian version: Skip chicken, use veggie broth, and add 2 cups chopped mushrooms for substance
The beauty of this recipe is how forgiving it is – I’ve made all these variations and they all turn out delicious in their own way!
Equipment You’ll Need
One of the best things about this recipe? You probably already have everything you need sitting in your kitchen! Here’s the short and sweet list:
- 9×13-inch baking dish – Mine’s a little battered but it works perfectly every time
- Heavy-duty aluminum foil – The thick kind that won’t tear when you’re wrapping it tight
- Whisk – Or just grab a fork if you can’t find yours (we’ve all been there!)
That’s seriously it – no fancy gadgets required. Just these three trusty kitchen staples and you’re ready to make magic happen!
How to Make No Peek Chicken and Rice
Okay, here’s where the magic happens! I promise this is so easy you’ll wonder why you haven’t been making it every week. Just follow these simple steps and resist that temptation to peek – I’ll explain why that’s so important later!
Step 1: Preheat and Prep
First things first – crank that oven to 350°F so it’s nice and hot when we’re ready. While it’s heating, grab your trusty 9×13 baking dish and give it a quick spritz with cooking spray. This little step makes cleanup a breeze later – trust me, you’ll thank yourself!
Step 2: Mix the Base
Now the fun part! Dump both cans of soup, the chicken broth, uncooked rice, and that flavor-packed onion soup mix right into your prepared dish. Grab your whisk (or a fork in a pinch) and go to town mixing until everything’s smooth and well combined. You’ll notice the rice will start absorbing some of the liquid – that’s perfect! Just make sure there aren’t any dry pockets of soup mix hiding in there.
Step 3: Layer the Chicken
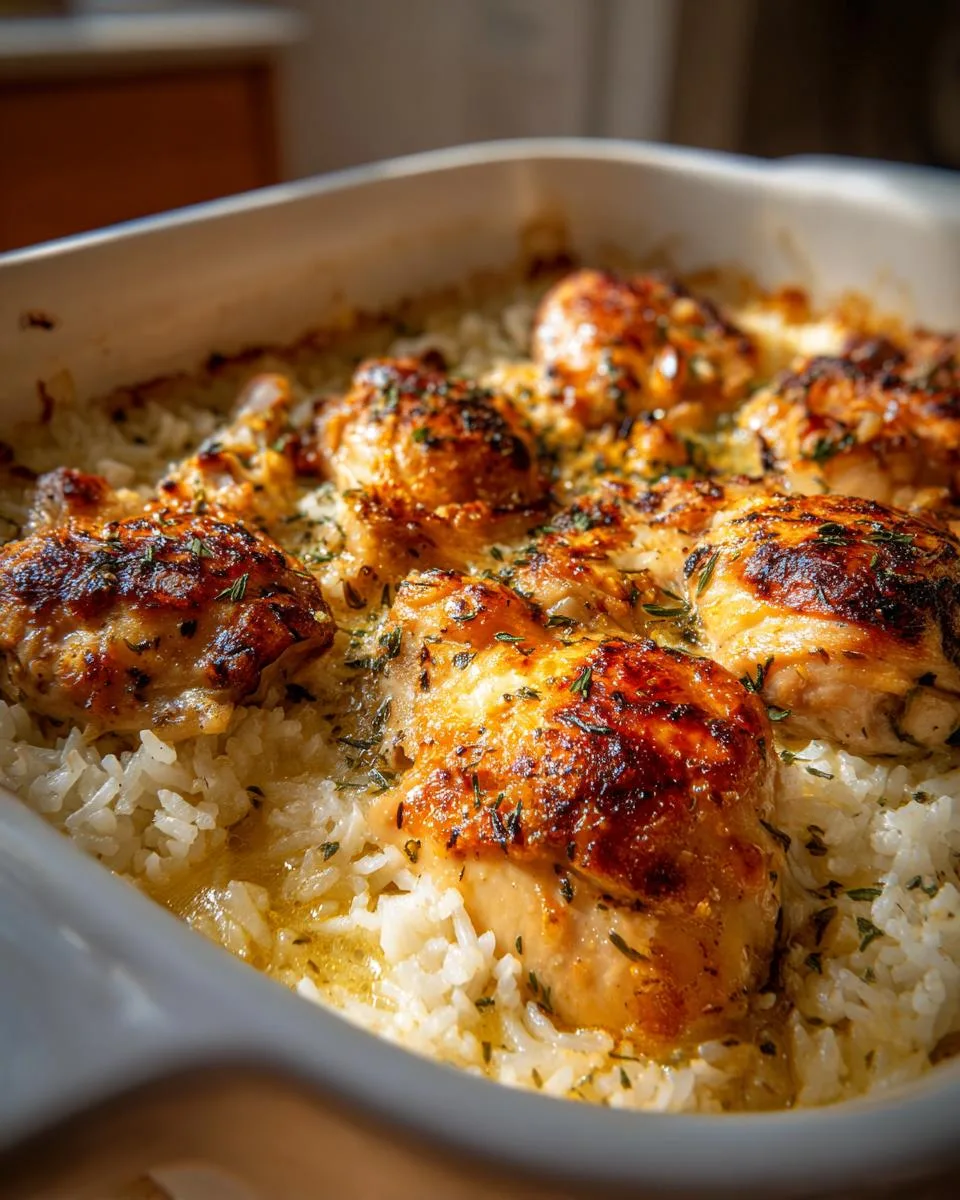
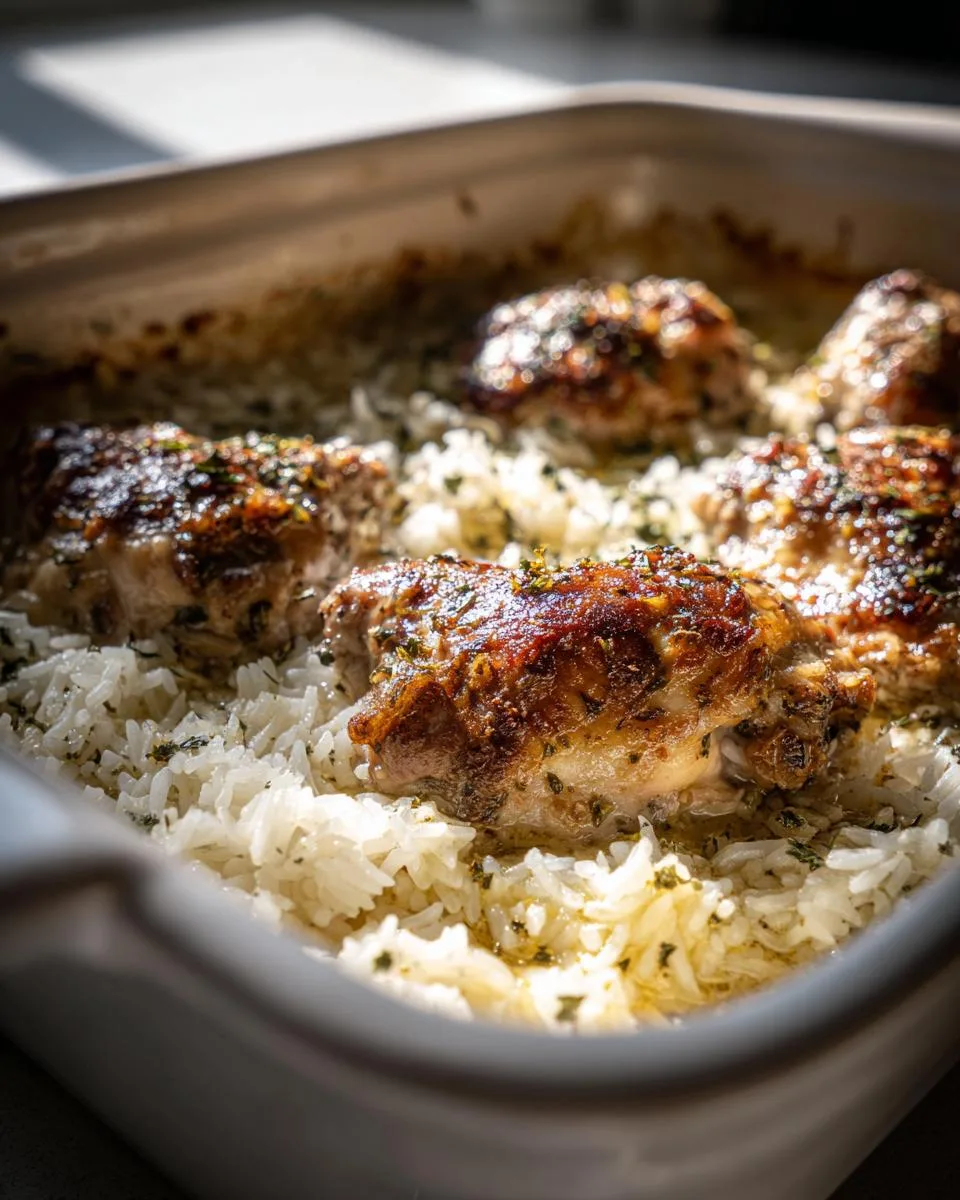
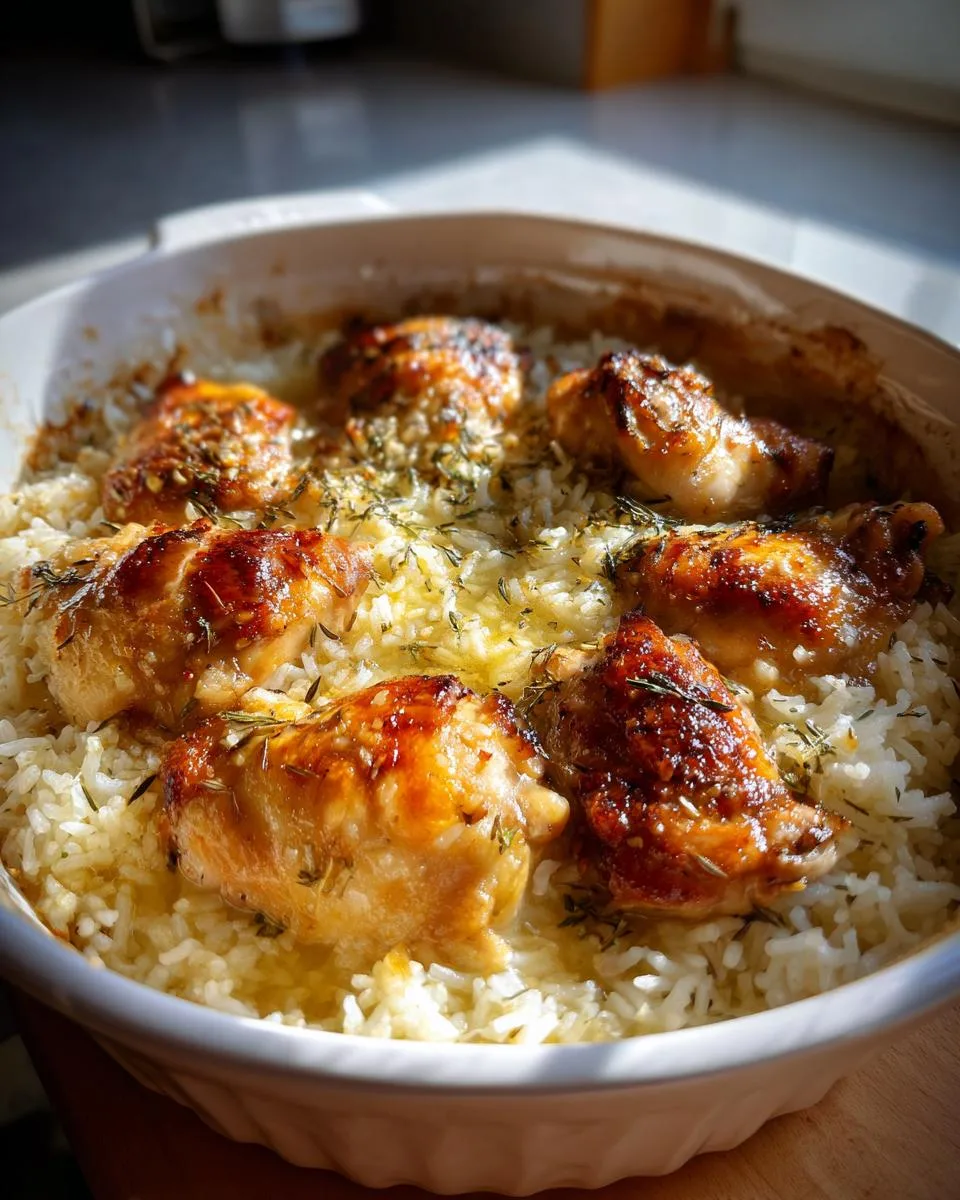
Here’s where some people go wrong – don’t mix the chicken in! Simply place your chicken breasts right on top of that creamy rice mixture. I like to arrange them in a single layer with a little space between each piece. This lets the heat circulate evenly so everything cooks perfectly. The chicken will baste in all those delicious flavors without getting soggy.
Step 4: Bake Without Peeking
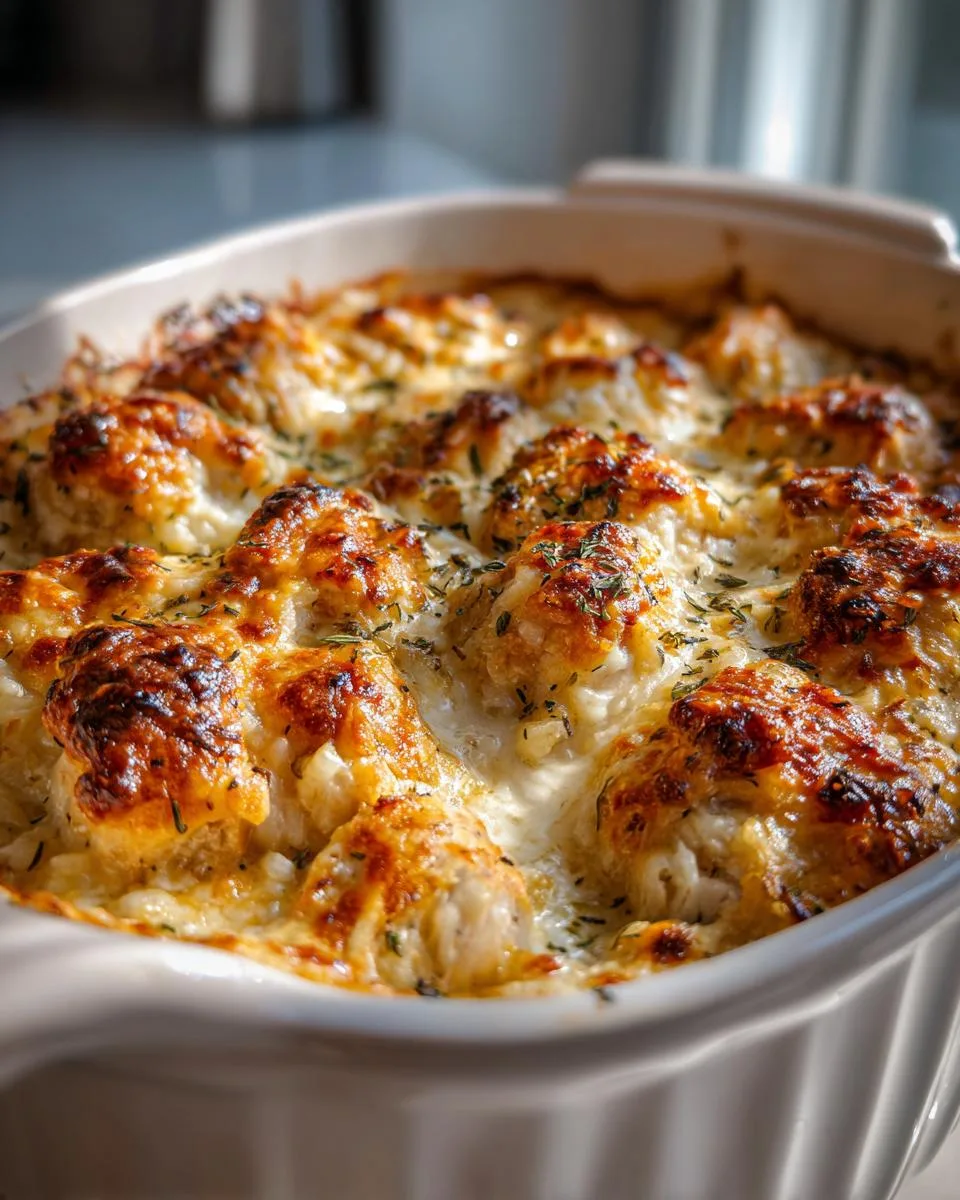
Seal everything up tight with a double layer of heavy-duty foil – no gaps allowed! Pop it in the oven and set a timer for 1 hour 15 minutes to 1 hour 30 minutes. Now comes the hardest part – don’t peek! Every time you open that oven, precious heat escapes and throws off the cooking time. The “no peek” rule ensures the rice cooks evenly and the chicken stays juicy. When the timer goes off, carefully remove the foil (steam is hot!) and check that the chicken reaches 165°F. The rice should be tender and all that liquid absorbed into creamy deliciousness!
Print
No Peek Chicken and Rice: 1 Magical Dish You’ll Crave
- Prep Time: 10 minutes
- Cook Time: 1 hour 30 minutes
- Total Time: 1 hour 40 minutes
- Yield: 4 servings 1x
- Category: Main Dish
- Method: Baking
- Cuisine: American
- Diet: Low Lactose
Description
A simple and delicious one-pan meal with chicken and rice, baked to perfection without peeking.
Ingredients
- 4 boneless, skinless chicken breasts
- 1 (10.5-oz) can Unsalted Cream of Chicken Soup
- 1 (10.5-oz) can Unsalted Cream of Mushroom Soup
- 2 cups chicken broth
- 2 cups regular white rice, uncooked
- 1 package onion soup mix
Instructions
- Preheat oven to 350ºF.
- Lightly spray a 9x13x2-inch baking dish with cooking spray.
- Pour cream of chicken soup, cream of mushroom soup, chicken broth, rice, and onion soup mix into the baking dish.
- Whisk together.
- Place chicken on top of rice mixture.
- Cover tightly with foil and bake for 1 hour 15 minutes to 1 hour 30 minutes.
Notes
- Do not peek while baking to ensure even cooking.
- Leftovers can be stored in the refrigerator for up to 3 days.
Nutrition
- Serving Size: 1 serving
- Calories: 450
- Sugar: 2g
- Sodium: 800mg
- Fat: 10g
- Saturated Fat: 3g
- Unsaturated Fat: 5g
- Trans Fat: 0g
- Carbohydrates: 60g
- Fiber: 2g
- Protein: 30g
- Cholesterol: 70mg
Tips for Perfect No Peek Chicken and Rice
After making this recipe dozens of times (and learning from my mistakes!), here are my foolproof tips to guarantee amazing results every single time:
- Foil is your friend: Use heavy-duty foil and crimp it tightly around the edges – no sneaky gaps! I once used regular foil that tore, and my rice didn’t cook evenly. Lesson learned!
- Let it rest: When the timer goes off, resist diving right in. Let it sit for 5 minutes with the foil off – this lets the rice absorb any last bits of liquid and the chicken juices redistribute.
- Temp check is key: That instant-read thermometer isn’t just for fancy cooks! Chicken should hit 165°F at the thickest part. If it’s close but not quite there, recover and give it 5 more minutes.
- Even thickness matters: If your chicken breasts are super thick, pound them to even thickness first. Otherwise the edges dry out while the center cooks through.
Follow these simple tricks, and you’ll have the most tender chicken and perfectly fluffy rice every time. And remember – no peeking means no cheating! That oven door stays shut until the timer dings.
Serving Suggestions
Oh, the joy of lifting that foil to reveal your perfectly cooked No Peek Chicken and Rice! Now let’s talk about how to turn this one-pan wonder into a complete meal that’ll have everyone asking for seconds. Here are my favorite simple pairings that make this dish shine:
- Crisp green veggies: Steamed broccoli or roasted green beans add the perfect fresh crunch to balance the creamy rice
- Warm bread: Garlic bread or buttery dinner rolls are perfect for soaking up every last bit of that delicious sauce
- Bright salad: A simple garden salad with vinaigrette cuts through the richness beautifully
- Extra flair: Sprinkle with chopped parsley or green onions right before serving for a pop of color
My family loves it just as is – straight from the pan with a big spoon! But when I want to fancy it up for company, I’ll add two of these sides and suddenly it feels like a special occasion meal.
Storing and Reheating Leftovers
One of the best things about No Peek Chicken and Rice? It makes fantastic leftovers that taste just as good the next day – maybe even better as the flavors really settle in! Here’s how I keep mine tasting fresh and delicious:
Storing in the fridge: Let your leftovers cool just until they’re no longer steaming (about 20 minutes), then transfer to an airtight container. They’ll keep perfectly for up to 3 days. I like to store the chicken and rice together – the rice absorbs all those yummy chicken juices!
Reheating magic: When you’re ready for round two, I’ve got two favorite methods. For single servings, the microwave works great – just sprinkle a tablespoon of broth over the top before reheating to keep everything moist. If I’m reheating the whole batch, I put it back in a baking dish, add about 1/4 cup broth, cover with foil, and warm at 350°F for 15-20 minutes.
Freezer tip: While you can freeze this dish, I find the rice gets a bit mushy when thawed. If you must freeze, undercook the rice slightly and expect to add extra broth when reheating. Honestly though? It’s so delicious fresh that we rarely have leftovers to freeze!
Nutrition Information
Now, I’m no nutritionist, but I know we all like to have a general idea of what we’re eating. Keep in mind these numbers are estimates – they’ll vary a bit depending on your exact ingredients and brands. Here’s the breakdown per serving (about 1 chicken breast with 1 cup rice mixture):
- Calories: 450
- Protein: 30g (that chicken really packs a punch!)
- Carbohydrates: 60g
- Sugar: 2g
- Fat: 10g
- Saturated Fat: 3g
- Sodium: 800mg
- Fiber: 2g
If you’re watching certain nutrients, here are my easy tweaks: Use low-sodium broth and soups to cut the sodium nearly in half. Swap half the rice for cauliflower rice to lower carbs. And if fat’s a concern, you can use reduced-fat cream soups – though I’ll admit, the full-fat version tastes richer!
Remember, this is comfort food meant to be enjoyed – not something to stress over. I figure if I’m making a homemade meal with real ingredients, that’s already a win in my book!
Frequently Asked Questions
Over the years, I’ve gotten so many questions about this No Peek Chicken and Rice recipe – and I love sharing what I’ve learned through trial and error! Here are the answers to the most common things people ask me:
How long to cook no-peek chicken in the oven?
The magic number is 1 hour 15 minutes to 1 hour 30 minutes at 350°F. I always set my timer for the lower end first, then check the chicken’s temperature. If it’s not quite at 165°F yet, I’ll give it another 5-10 minutes. The exact time depends on your oven and how thick your chicken breasts are – that’s why the thermometer is your best friend here!
Can I use different rice?
Absolutely! Brown rice works great but needs some adjustments – add an extra 1/2 cup broth and extend the bake time by about 15 minutes. For quinoa lovers, use 1 3/4 cups quinoa (rinsed well!) with the same liquid amounts, but check at 1 hour since it cooks faster than rice. Just remember – no matter what grain you use, that “no peek” rule still applies!
Why can’t I peek?
Oh, I learned this the hard way! Every time you open that oven door, you lose precious heat and steam that’s cooking your rice evenly. It’s like letting all the air out of a balloon – suddenly your cooking time gets thrown off and you might end up with crunchy rice or dry chicken. Trust the process – that foil seal creates the perfect little steam oven inside your dish!
How long can leftovers sit out?
Food safety first! Leftovers should only sit at room temperature for max 2 hours before going in the fridge. I like to portion mine out as soon as we’re done eating – that way the containers cool faster. Pro tip: If your kitchen’s really warm, cut that time down to 1 hour. Better safe than sorry when it comes to chicken!
Final Thoughts
There you have it – my absolute favorite no-fuss, one-pan wonder that never fails to impress! Whether you’re cooking for picky kids, last-minute guests, or just your future lunch leftovers, this No Peek Chicken and Rice recipe is a guaranteed winner. I can’t tell you how many times this dish has saved my sanity on busy weeknights when cooking felt like the last thing I wanted to do.
The beauty of this recipe is in its simplicity – ordinary ingredients transform into something extraordinary with just a little patience (and that crucial no-peek rule!). I’d love to hear how it turns out for you. Did your family gobble it up like mine always does? Did you try any fun variations? Drop me a note or tag me if you share pictures – nothing makes me happier than seeing others enjoy this comfort food classic as much as we do! You can also follow along for more simple recipes over on Facebook.
Now go preheat that oven, grab your trusty baking dish, and get ready for the easiest, most satisfying meal you’ll make all week. Just remember – hands off that oven door! Happy cooking, friends!