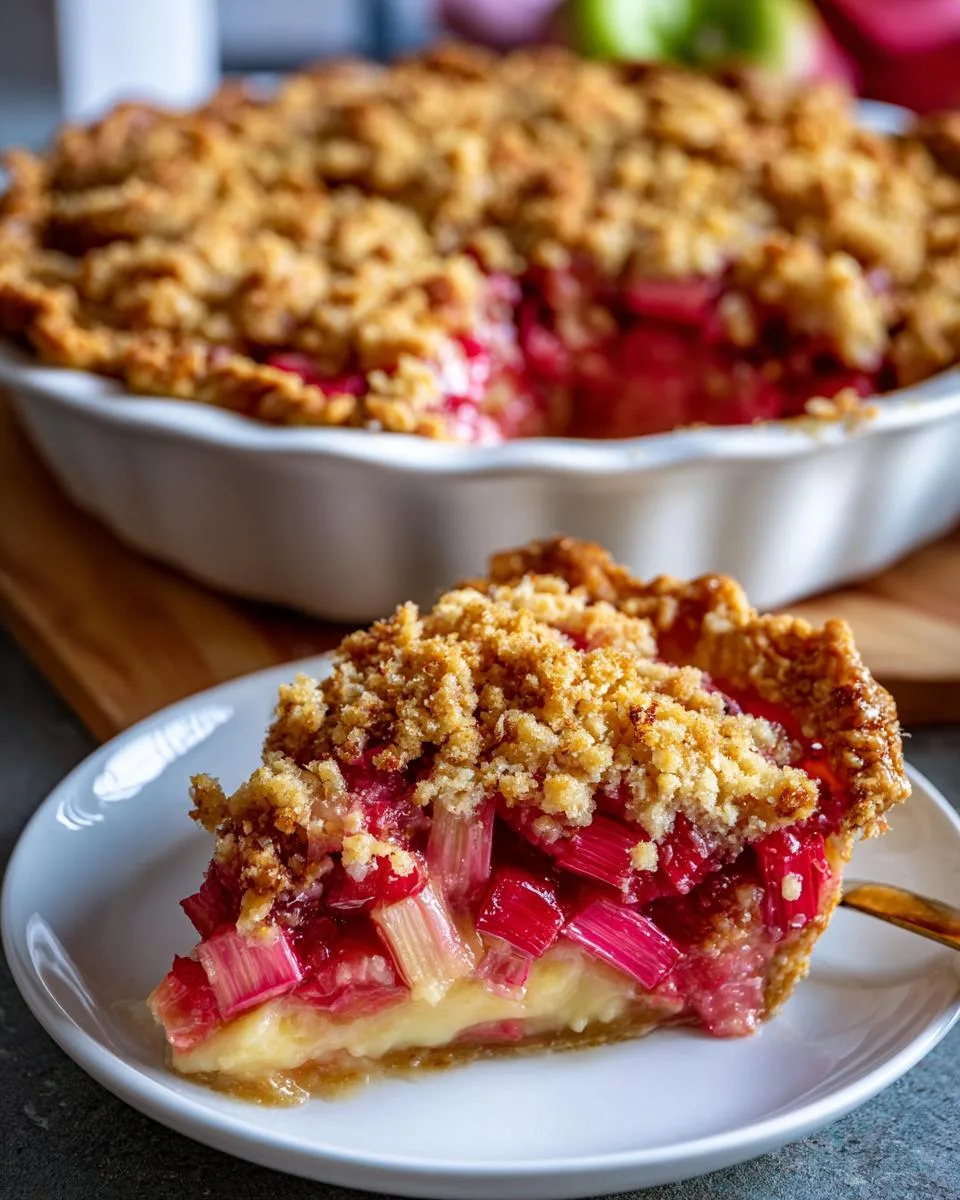
There’s nothing quite like the first bite of an old fashioned rhubarb pie recipe – that perfect balance of tart and sweet, wrapped in a flaky crust with a creamy, dreamy filling. This recipe takes me straight back to my grandma’s kitchen every spring, when the rhubarb in her garden grew taller than me!
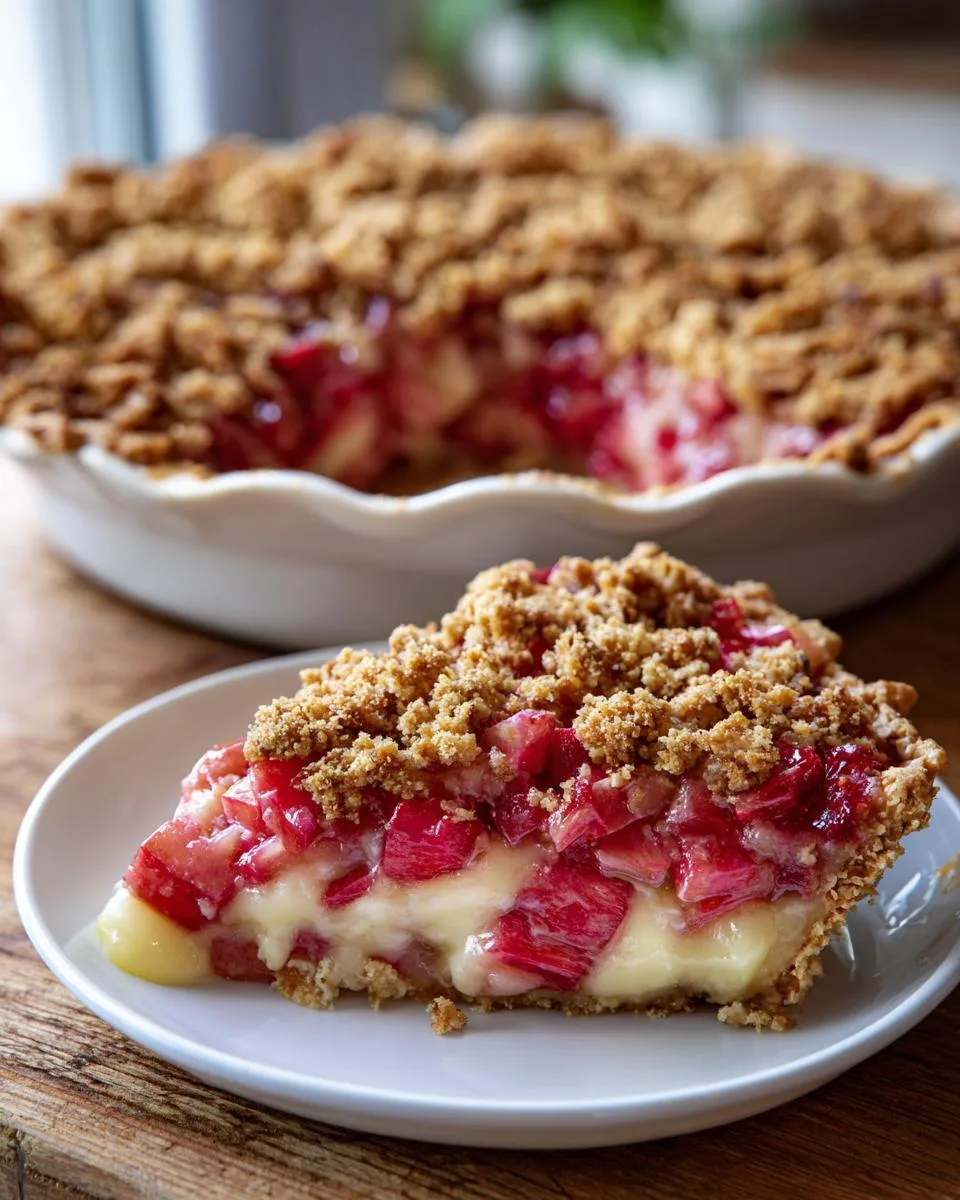
Table of Contents
Table of Contents
Why You’ll Love This Old Fashioned Rhubarb Pie Recipe
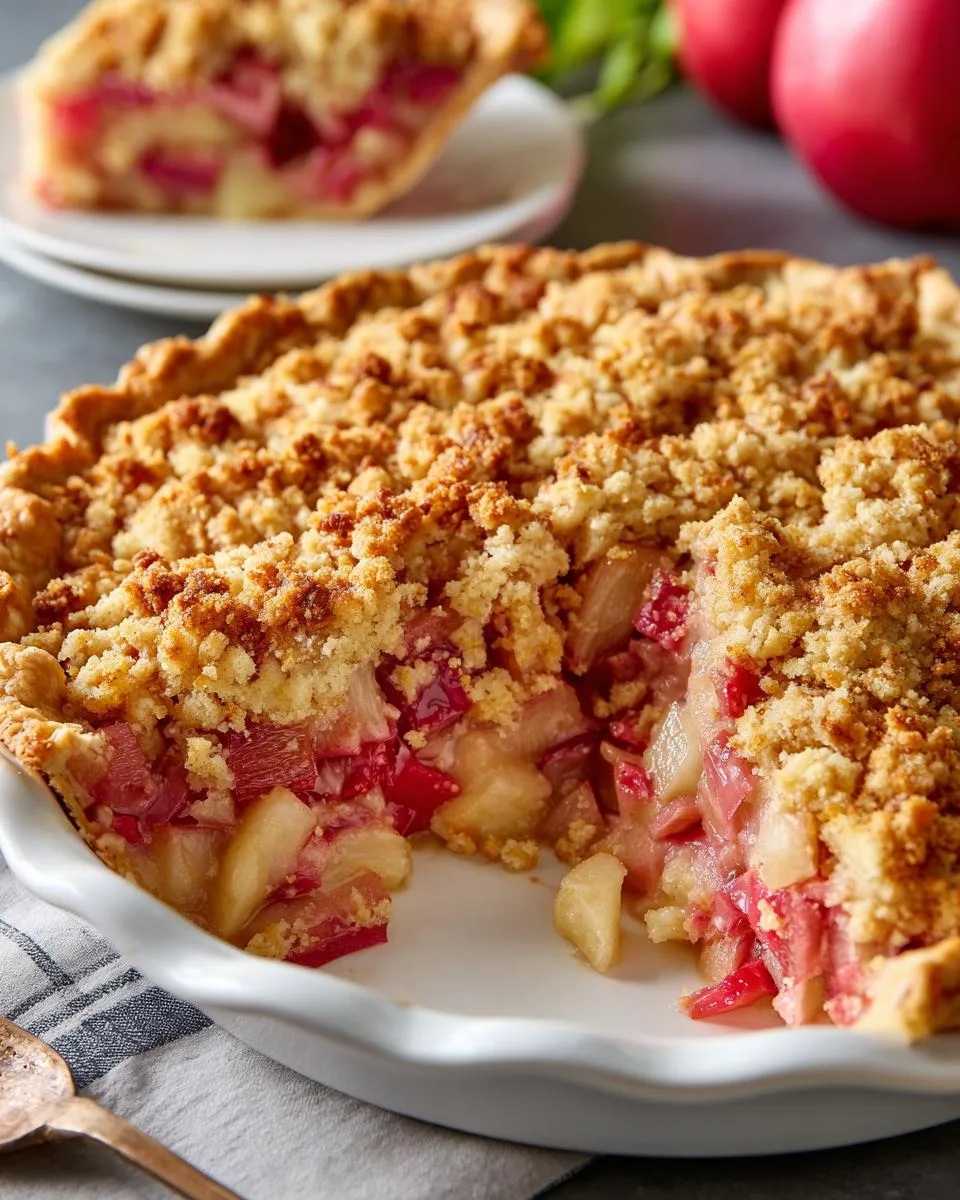
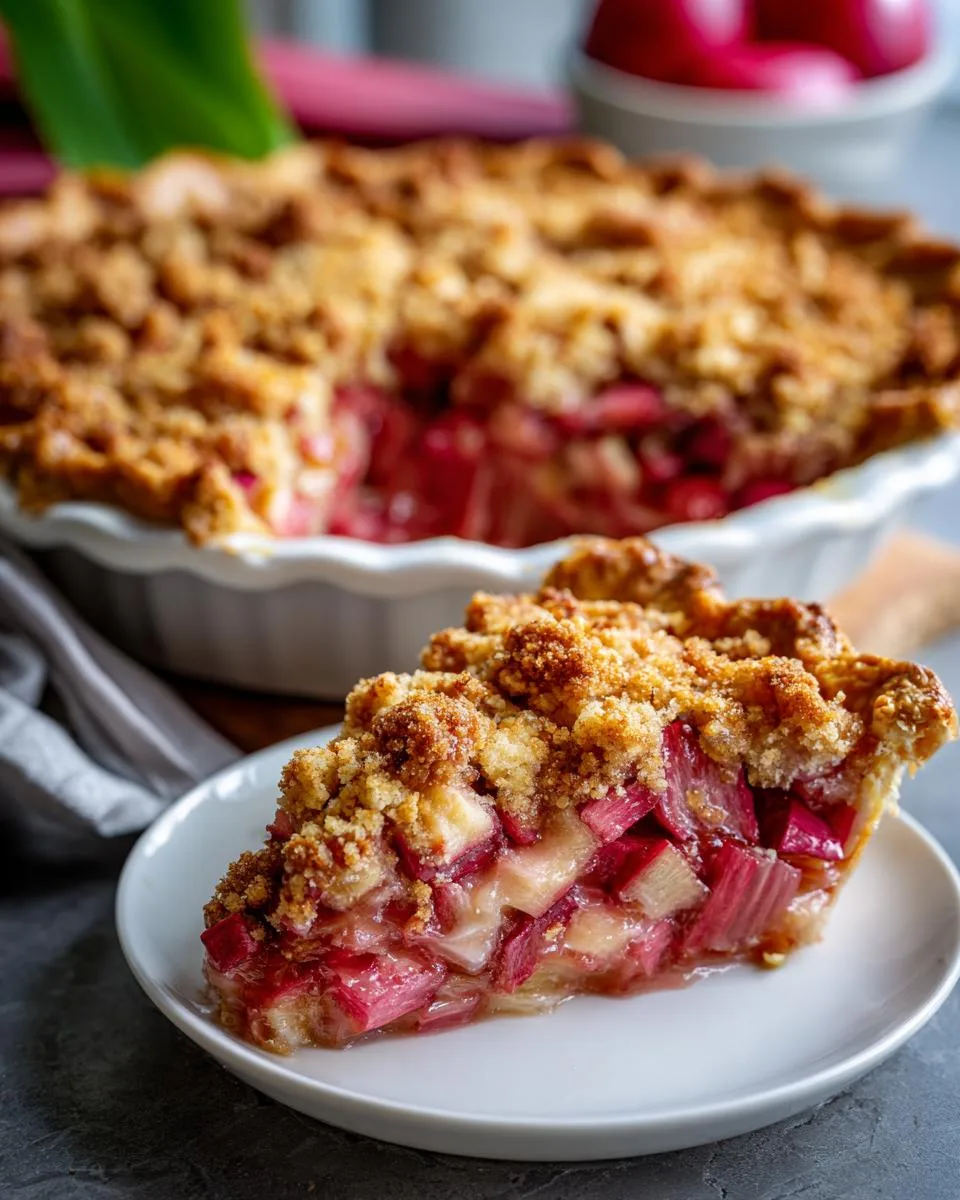
What makes this pie special? That magical combination of velvety sour cream filling and buttery crumb topping that turns humble rhubarb into something extraordinary. The contrast between the soft fruit layer below and the crisp golden crumbs on top is pure nostalgia in every forkful. I can still picture Grandma pulling her pie from the oven – the whole house would smell like sweet-tart heaven.
This isn’t some fussy modern dessert. It’s honest, old-fashioned baking that lets the rhubarb shine. No complicated techniques – just good ingredients treated right. And trust me, once you try that first bite cooled to perfection, you’ll understand why this recipe became my family’s favorite spring tradition. If you love classic baking, check out more of my favorite recipes!
Let me tell you why this pie has stolen hearts for generations – it’s not just dessert, it’s pure comfort in a crust! First off, that creamy sour cream filling balances the rhubarb’s natural tartness so perfectly you’ll keep going back for one more bite. The crumb topping? Absolute magic – crisp, buttery, and just sweet enough to complement without overpowering.
Here’s what makes it special:
- The filling sets up velvety smooth – no runny mess here when cooled properly
- Fresh rhubarb keeps its bright flavor without turning mushy
- Simple prep – no fancy equipment needed, just bowls and a whisk
- That gorgeous golden crumble top makes it look as good as it tastes
Seriously, once you taste that first slice (maybe with a scoop of vanilla ice cream melting over top), you’ll understand why this recipe never goes out of style.
Ingredients for Old Fashioned Rhubarb Pie
Here’s the beautiful simplicity of this pie – just a handful of ingredients you probably already have! But let me tell you, choosing the right ones makes all the difference. First, that rhubarb – you’ll need about 4 cups of fresh, chopped rhubarb (no need to peel, just wash and chop into half-inch pieces). Trust me, fresh is best here – that bright positively sings in the finished pie!
For the creamy magic:
- 1 large egg (room temperature blends smoother)
- 1 ½ cups white sugar
- 1 cup full-fat sour cream (none of that light stuff!)
- ⅓ cup all-purpose flour
And for that irresistible crumbly crown:
- ½ cup all-purpose flour
- ½ cup packed brown sugar (pack it in there good)
- ¼ cup melted butter (salted or unsalted both work)
Oh, and don’t forget – one unbaked 9-inch pie crust. Homemade is lovely, but honestly? A good store-bought one works just fine when you’re in a pinch!
How to Make Old Fashioned Rhubarb Pie
Okay, let’s get baking! This pie comes together beautifully if you follow these simple steps. Don’t let the two-stage baking fool you – it’s easier than it sounds, and that crispy golden topping is worth every second. Just promise me you’ll resist cutting into it while it’s hot – patience makes perfect with this pie!
Step 1: Prep the Crust and Rhubarb
First, crank that oven to 450°F – trust me, starting hot is the secret to a crisp bottom crust. Gently unfold your pie crust into a 9-inch pan (no tearing disasters, please!) and crimp the edges pretty if you’re feeling fancy. Now grab that chopped rhubarb – no peeling needed, just toss it evenly across the crust. I like to pat it down gently so there aren’t any big gaps.
Step 2: Make the Creamy Filling
Here comes the magic! Grab a medium bowl and whisk together the egg, white sugar, sour cream, and ⅓ cup flour until it’s silky smooth. No lumps allowed! This creamy mixture will bubble up around the rhubarb as it bakes, creating that dreamy custard-like layer. Pour it slowly over the rhubarb – watch how it seeps into all those nooks and crannies!
Step 3: Add the Crumbly Topping
Time for the crowning glory! In a small bowl, mix ½ cup flour with packed brown sugar. Drizzle in the melted butter and stir with a fork until you’ve got crumbly, pebble-sized bits. Sprinkle this over the filling evenly – I like to use my fingers to break up any big clumps. The topping will crisp up into golden perfection in the oven!
Step 4: Bake and Cool Properly
Pop the pie in your preheated oven for 15 minutes – this initial blast helps set the crust. Then reduce heat to 350°F (don’t peek!) and bake another 40 minutes. The pie’s done when the edges puff up and the topping turns golden brown – the center should still jiggle slightly. Here’s the hard part: let it cool completely on a rack, about 2 hours. I know, I know – but this patience pays off with perfectly set slices!
Print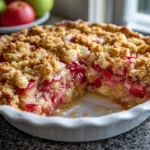
Irresistible Old Fashioned Rhubarb Pie Recipe in 4 Simple Steps
- Prep Time: 15 minutes
- Cook Time: 55 minutes
- Total Time: 1 hour 10 minutes
- Yield: 8 servings 1x
- Category: Dessert
- Method: Baking
- Cuisine: American
- Diet: Vegetarian
Description
A classic old-fashioned rhubarb pie with a creamy filling and crumbly topping.
Ingredients
- 1 (9-inch) unbaked pie crust
- 4 cups chopped fresh rhubarb
- 1 large egg
- 1 ½ cups white sugar
- 1 cup sour cream
- ⅓ cup all-purpose flour
- ½ cup all-purpose flour
- ½ cup brown sugar
- ¼ cup butter, melted
Instructions
- Preheat the oven to 450 degrees F (220 degrees C).
- Arrange pie crust in a 9-inch pie pan. Spread rhubarb in an even layer in the bottom of the crust.
- Whisk egg, white sugar, sour cream, and 1/3 cup of flour together in a medium bowl until smooth. Pour over rhubarb.
- Mix 1/2 cup of flour and brown sugar together in a small bowl; stir in melted butter until mixture is crumbly. Sprinkle over top of the pie.
- Bake for 15 minutes in the preheated oven, then reduce the heat to 350 degrees F (175 degrees C). Continue to bake until the edges have puffed, and the topping is golden, about 40 minutes. The center may still be slightly jiggly.
- Cool completely before slicing and serving.
Notes
- Prevent a runny pie by cooling it completely before slicing.
- Rhubarb does not need to be peeled—just wash and chop.
- The pie is done when the edges puff and the topping turns golden.
- Cooling ensures the filling sets properly.
Nutrition
- Serving Size: 1 slice
- Calories: 350
- Sugar: 35g
- Sodium: 150mg
- Fat: 15g
- Saturated Fat: 8g
- Unsaturated Fat: 6g
- Trans Fat: 0g
- Carbohydrates: 50g
- Fiber: 2g
- Protein: 4g
- Cholesterol: 45mg
Expert Tips for Perfect Old Fashioned Rhubarb Pie
After making this pie more times than I can count, I’ve learned a few tricks that guarantee perfection every time. First – and I can’t stress this enough – let that pie cool completely! Cutting into it warm is tempting, but waiting ensures the filling sets up beautifully thick. Second, use only fresh rhubarb – frozen just doesn’t give the same bright flavor or perfect texture.
Watch that topping like a hawk in the last 10 minutes of baking – you want it golden brown, not burnt. And here’s my secret: if the edges start browning too fast, just tent them with foil. Simple touches make all the difference between good and great! You can see some of my other baking secrets over on Facebook.
Common Questions About Old Fashioned Rhubarb Pie
I’ve gotten so many questions about this recipe over the years – let me share the answers that’ll help you bake with confidence!
How do I prevent a runny rhubarb pie?
Two words: cool completely. That sour cream filling needs time to set up properly – rushing this step is the number one cause of runny pies. Also, make sure you’re using the full ⅓ cup flour in the filling – it acts as the perfect thickener.
Do I need to peel rhubarb?
Not at all! Just give those stalks a good wash and chop away. The skin adds lovely color and texture. Grandma never peeled hers, and neither do I – saves time and keeps all that vibrant flavor!
How do I know when the pie is done?
Look for puffed edges and a golden brown topping. The center should still have a slight jiggle when you gently shake the pan – it’ll firm up as it cools. A toothpick inserted near the edge should come out clean.
Why must I cool the pie completely?
Patience makes perfect here! Cooling allows the filling to set properly – that wait ensures neat slices instead of soupy ones. Trust me, it’s worth resisting temptation for those first two hours!
Serving and Storing Old Fashioned Rhubarb Pie
Oh, let me tell you how we serve this beauty in my house – slightly warm with a big scoop of vanilla ice cream melting over that crisp topping! The cold creaminess against the tart-sweet pie? Absolute perfection. Leftovers (ha – as if!) keep beautifully covered in the fridge for up to 3 days. Just pop a slice in the oven at 300°F for 10 minutes to bring back that fresh-from-the-oven magic.
Nutritional Information
Just so you know what you’re biting into, here’s the nutritional breakdown per slice (based on 8 servings from a 9-inch pie). Remember, these are estimates – Grandma never measured, and neither do I most days! Each glorious slice packs about 350 calories, with 15g fat (8g saturated), 50g carbs, and 4g protein. That sweet-tart rhubarb goodness comes with 35g sugar – but hey, it’s pie! Worth every delicious bite if you ask me.
Share Your Rhubarb Pie Experience
I’d love to hear how your pie turns out! Did your family go wild for it like mine always does? Drop me a note about your baking adventure – every pie tells its own delicious story.