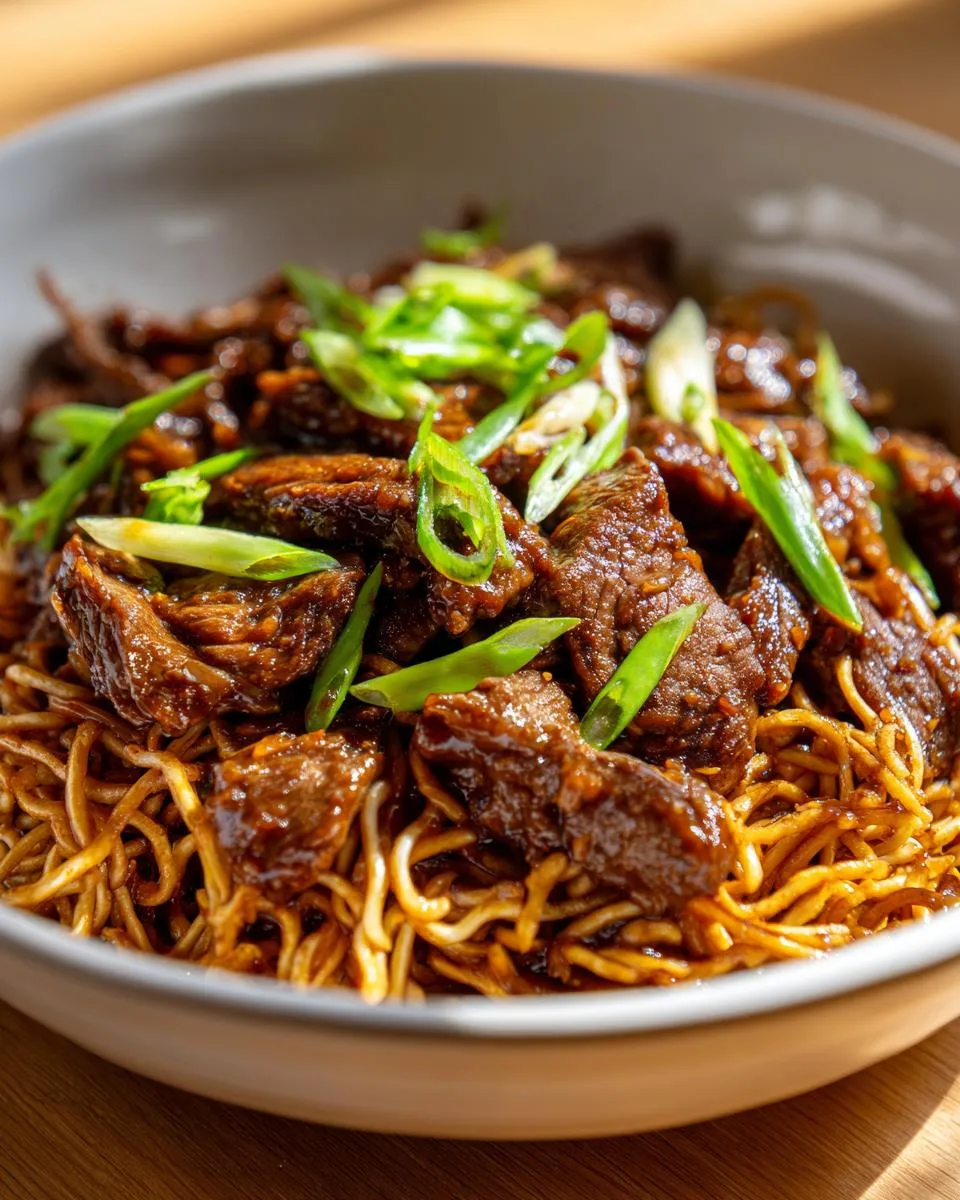
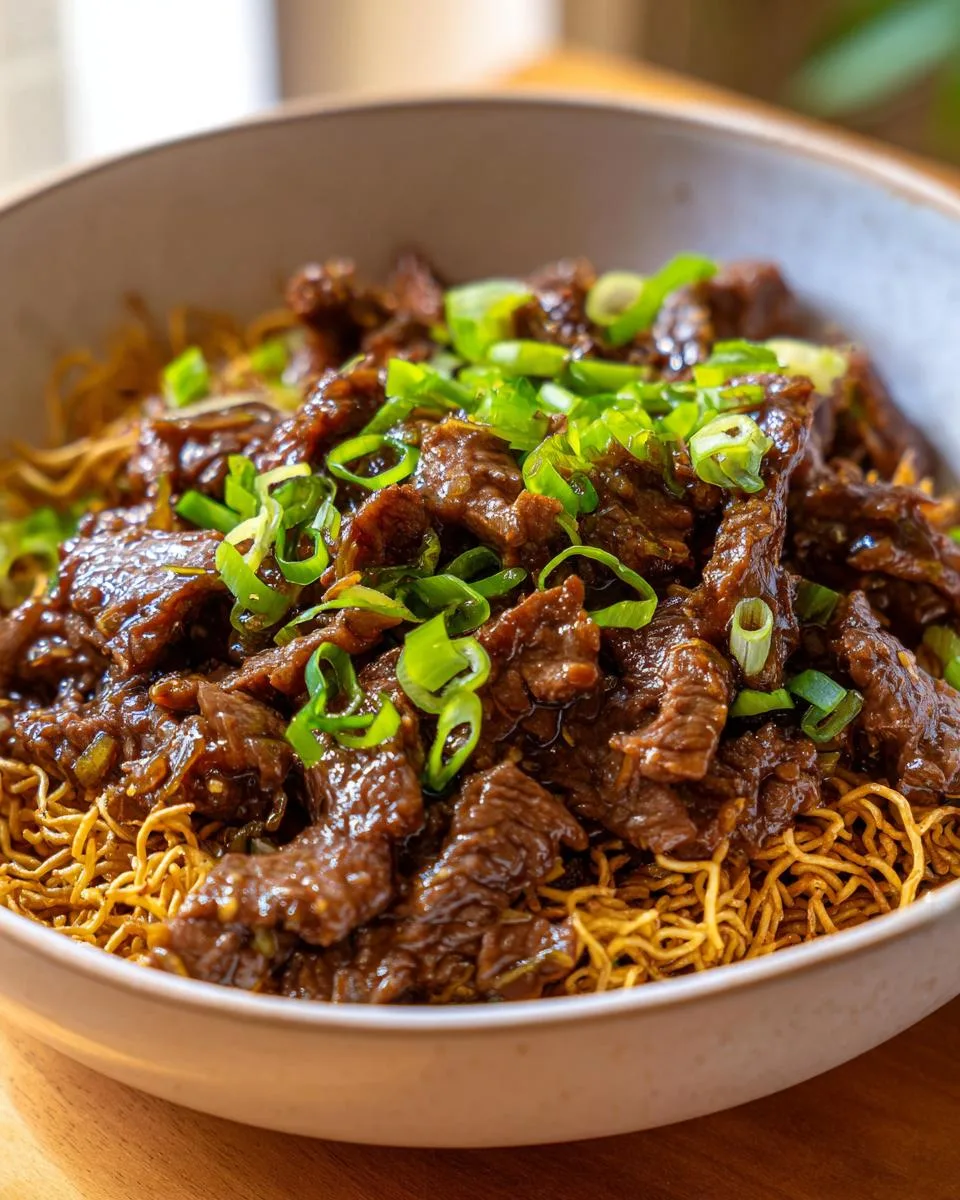
You know that moment when the waiter sets down a sizzling plate of Mongolian beef at your favorite Chinese restaurant? That perfect balance of tender beef, sweet-savory sauce, and just a hint of heat? I’ve spent years trying to recreate that magic at home, and let me tell you—this recipe hits all the right notes. My version gives you restaurant-style Mongolian beef in about 30 minutes flat, with that signature glossy caramelized coating we all love. The first time I made this, my husband actually thought I’d ordered takeout (that’s when I knew I’d nailed it).
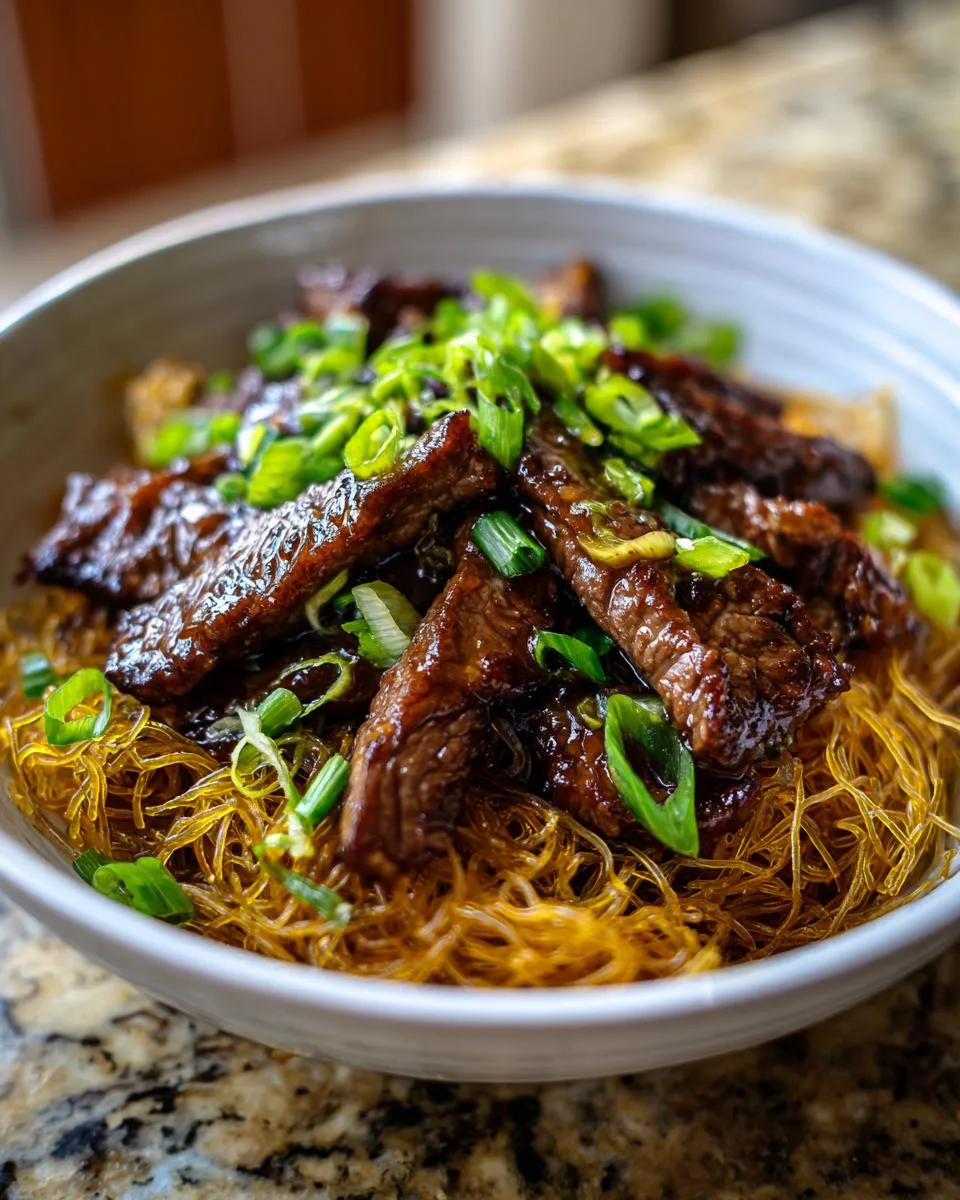
Table of Contents
Table of Contents
Why You’ll Love This Restaurant Style Mongolian Beef
First off, let’s be real—this isn’t just another stir-fry recipe. Here’s why it’utesl be your new weeknight hero:
- Quicker than takeout: From fridge to table in 30 minutes (and no soggy container syndrome!)
- Crazy-tender beef: That baking soda trick? Game-changer. Your flank steak will practically melt.
- Better flavor depth: Most recipes skimp on the caramelization—we go full glossy-coating mode like the best restaurants do.
- Customizable heat: My husband likes it fiery (extra black pepper!), my kids prefer it sweet—both versions work perfectly.
Pro tip: Double the sauce if you’re rice-obsessed like me. You’ll thank yourself later.
Ingredients for Restaurant Style Mongolian Beef
Here’s your shopping list for that perfect glossy, tender Mongolian beef—I’ve grouped everything so you can spot what you need at a glance. Trust me, each ingredient plays a specific role in creating that authentic restaurant taste!
The Beef & Marinade
- 1 pound beef flank steak – sliced between ⅛ to ¼ inch thick (this thickness is KEY for quick cooking)
- 2 tablespoons water – helps tenderize the meat
- 2 teaspoons Shaoxing rice wine – adds subtle depth (dry sherry works in a pinch)
- ½ teaspoon Kosher salt – use slightly less if you’re using fine table salt
- ¼ teaspoon baking soda – our secret weapon for ultra-tender beef!
The Coating & Aromatics
- 2 tablespoons cornstarch – creates that light crisp exterior
- 1 tablespoon neutral oil – keeps the beef from clumping
- 1 teaspoon cracked black pepper – adjust to your heat preference
- 1 tablespoon minced garlic (about 2 cloves) – because garlic makes everything better
- ½ large yellow onion, sliced – sweet caramelized bites
- 1 bunch green onion – cut into 2-inch pieces (separate whites and greens)
The Sauce & Optional Extras
- 3 tablespoons granulated sugar – for that signature caramelized glaze
- 2 tablespoons regular soy sauce – not low-sodium here, we want flavor!
- 1 ounce medium-thickness rice vermicelli (optional) – for crispy texture contrast
- Oil as needed – for frying noodles and stir-frying
Pro tip: Measure everything before you start cooking—once that wok gets hot, things move FAST!
How to Make Restaurant Style Mongolian Beef
Preparing the Beef
Here’s where we set the stage for that melt-in-your-mouth texture. First, pat your flank steak dry—this helps the marinade stick better. Slice against the grain into thin strips (I aim for the width of a pencil). Too thick and it’ll be chewy; too thin risks overcooking.
Toss the beef with water, Shaoxing wine, salt, and baking soda – that last one’s our MVP for tenderness. Mix until the liquid mostly disappears (about 1 minute). Now sprinkle cornstarch over it like fairy dust, coating every piece evenly. Finish with a drizzle of oil to prevent clumping. Let it sit 15 minutes minimum—or up to overnight for maximum flavor penetration.
Cooking the Restaurant Style Mongolian Beef Beef
Heat your wok or skillet screaming hot—you want that sizzle when beef hits the pan! Add enough oil to coat the wok to lightly coat the bottom (about 1 tablespoon). Working in batches to avoid crowding, sear the beef until golden brown (1-2 minutes per side). Don’t stir too much – let it develop that crust! Transfer to a plate.
In the same pan, sauté garlic and stir garlic, onions, and white parts of green onions until fragrant (about 30 seconds – don’t let garlic burn!). Return the beef to the pan, toss everything together, then add black pepper and Shaoxing wine. The The wine will deglaze those tasty browned bits!
Now the magic happens next – sprinkle sugar evenly over everything, followed by soy sauce. Stir-fry for another minute until the sauce turns glossy and clings to the beef. Toss in green onion greens just until they wilt (10 seconds max). Done!
Optional Crispy Vermicelli
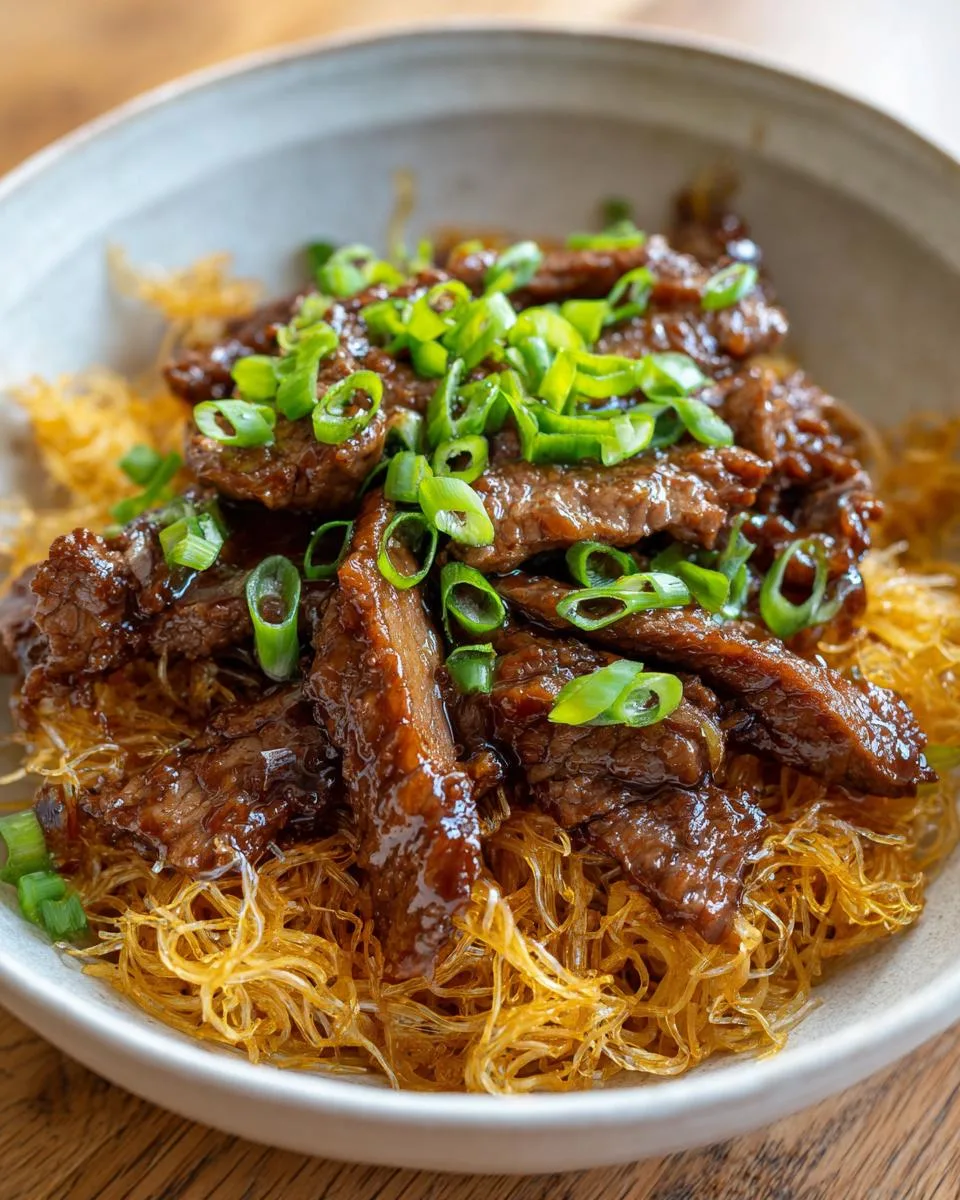
If you’re going for that textural contrast, heat about 1 inch of oil to 350°F (a breadcrumb should sizzles immediately when ready). Drop dry rice noodles in small handfuls – they’ll puff up like fireworks in 30 seconds! Fish them out with a slotted spoon the second they turn light golden (15-20 seconds). Drain on paper towels – they crisp up as they cool.
Arrange noodles on a plate and pile the beef right on top. The crispy strands soaking up that sauce? Absolute heaven.
Print
Unbelievably Tender Restaurant Style Mongolian Beef in 30 Minutes
- Prep Time: 15 minutes
- Cook Time: 15 minutes
- Total Time: 30 minutes
- Yield: 4 servings 1x
- Category: Main Dish
- Method: Stir-fry
- Cuisine: Chinese
- Diet: Low Lactose
Description
A quick and easy recipe for restaurant-style Mongolian beef with tender slices of flank steak, savory sauce, and optional crispy rice vermicelli.
Ingredients
- 1 pound beef flank steak, thinly sliced (between ⅛ to ¼ inch thick)
- 2 tablespoons water
- 2 teaspoons Shaoxing rice wine
- ½ teaspoon Kosher salt (a little less if using fine salt)
- ¼ teaspoon baking soda
- 2 tablespoons cornstarch
- 1 tablespoon neutral oil
- 1 teaspoon cracked black pepper (more or less to taste)
- 1 tablespoon Shaoxing rice wine
- 3 tablespoons granulated sugar
- 2 tablespoons regular soy sauce
- 1 tablespoon minced garlic (about 2 cloves)
- ½ large yellow onion, sliced
- 1 bunch green onion, cut into 2-inch pieces (separate white and green parts)
- 1 ounce medium-thickness rice vermicelli (optional)
- Oil as needed for cooking
Instructions
- Marinate the beef: Combine sliced flank steak, water, Shaoxing wine, salt, and baking soda in a bowl. Mix until beef absorbs most liquid.
- Add cornstarch and mix until coated. Stir in oil. Marinate for 10-15 minutes or overnight.
- (Optional) Fry vermicelli: Heat oil to 350°F. Fry dry rice noodles until puffy (30 sec-1 min). Drain on paper towels.
- Cook beef: Heat oil in a wok. Sear marinated beef until golden brown. Remove and set aside.
- Stir-fry garlic, onions, and white parts of green onions in remaining oil until onions soften.
- Return beef to pan. Add black pepper and drizzle with Shaoxing wine. Stir-fry for 30 sec-1 min.
- Add sugar and soy sauce. Stir-fry until beef is coated and slightly caramelized.
- Add green onion parts. Sauté briefly.
- Serve over fried vermicelli.
Notes
- Flank steak works best for tenderness.
- Baking soda helps tenderize the beef.
- Fry vermicelli in small batches for crispiness.
- Adjust sugar and soy sauce to taste.
Nutrition
- Serving Size: 1 serving
- Calories: 320
- Sugar: 12g
- Sodium: 800mg
- Fat: 14g
- Saturated Fat: 4g
- Unsaturated Fat: 8g
- Trans Fat: 0g
- Carbohydrates: 22g
- Fiber: 2g
- Protein: 25g
- Cholesterol: 60mg
Expert Tips for Perfect Restaurant Style Mongolian Beef
After making this dish at least fifty times (yes, I’m obsessed), here are my hard-won secrets for Mongolian beef that rivals your favorite takeout spot:
- Flank steak is non-negotiable: That beautiful grain structure makes it perfect for thin slicing. Skip chewier cuts like chuck – your jaw will thank you.
- Baking soda works magic: Just ¼ teaspoon transforms tough meat into tender bites. But don’t overdo it – too much creates a weird metallic taste.
- Control your caramelization: If the sugar burns before the beef cooks, your heat’s too high. Medium-high gives that perfect glossy coat without scorching.
- Work in batches: Crowding the pan steams the beef instead of searing it. Patience = crispy edges!
- Taste as you go: Prefer it sweeter? Add an extra tablespoon of sugar. More savory? Dash of extra soy sauce. Make it yours!
Pro tip: That leftover sauce? Reduce it slightly and drizzle over steamed veggies – zero waste, maximum flavor!
Serving Suggestions
Now for the fun part – how to serve your restaurant-style Mongolian beef like a pro! I’ve tested every possible combo, and these are the absolute best ways to enjoy that sweet-savory goodness.
Over steamed rice: My go-to move – the fluffy grains soak up that glossy sauce perfectly. Jasmine rice adds floral notes, while short-grain gives a stickier texture. Pro tip: Wet your hands slightly when shaping rice into bowls for that picture-perfect dome.
With crispy vermicelli: That contrast between tender beef and crunchy noodles? Pure magic. Break some unfried noodles over top too for extra texture play.
With quick-steamed veggies: Toss broccoli or snap peas in the last minute of cooking – they stay crisp-tender and balance the richness. My kids love sugar snap peas for their natural sweetness.
Garnishes matter: A sprinkle of toasted sesame seeds adds nuttiness, while thinly sliced red chili gives a pop of color (and heat!). Sometimes I’ll add cilantro sprigs for freshness.
Weeknight shortcut: Serve with store-bought potstickers and cucumber slices for an instant “Chinese takeout at home” feast. The first time I did this, my family gave me a standing ovation – okay, maybe just enthusiastic fork-clinking, but same energy!
Storing and Reheating
Here’s the good news – this Mongolian beef keeps beautifully! Store leftovers in an airtight container in the fridge for up to 3 days. When reheating, skip the microwave (it makes the beef rubbery). Instead, toss it in a hot skillet with a splash of water to revive that glossy sauce. The crispy noodles won’t stay crispy, but the flavor? Still absolutely killer.
FAQs About Restaurant Style Mongolian Beef
What’s the best cut of beef for Mongolian beef?
Flank steak is absolutely essential – its long muscle fibers make perfect for thin slicing against the grain. I’ve tried sirloin and skirt steak too, but nothing gives that perfect tender-chewy balance like good ol’ flank.
How do you get the beef so tender?
Three magic words: baking soda marinade. That ¼ teaspoon works like a science experiment on the meat proteins (in the best way possible). Combined with the cornstarch coating, it creates that signature restaurant-style tenderness we all crave.
Why isn’t my Mongolian beef crispy?
Two likely culprits: 1) Your pan wasn’t hot enough (wait until oil shimmers before adding beef), or 2) You overcrowded the pan. Give those slices space to sear properly – I cook mine in two batches.
What gives the sauce its signature flavor?
The dynamic duo of soy sauce and sugar caramelizing together creates that glossy, sticky-sweet coating. Some recipes use hoisin or oyster sauce, but our version sticks to the classics for pure, clean flavors.
Nutritional Information
Okay, let’s talk numbers – but keep in mind these are estimates based on standard ingredients. Your exact counts might vary depending on brands or if you tweak the recipe (extra sauce, I’m looking at you!). Here’s the breakdown per serving:
- Calories: 320 – Not bad for a restaurant-worthy dish!
- Protein:Ñ25g – Thanks to that generous pound of flank steak
- Carbs: 22g – Mostly from the sugar and cornstarch
- Sugar: 12g – That’s what gives us that beautiful caramelization
- Fat: 14g (4g saturated) – Mostly from the beef and cooking oil
- Sodium: 800mg – The soy sauce packs flavor, but you can use reduced-sodium if needed
- Fiber: 2g – From the onions and green onions
Dietary note: This recipe is naturally low in lactose – just skip the optional vermicelli if you’re avoiding gluten. And remember, these values don’t include rice or noodles you might serve it with!
Rate This Recipe
Alright, friend – now it’s your turn! Did this Mongolian beef hit all those restaurant-quality notes for you? Was the beef as tender as promised? Did you go wild with extra black pepper (no judgment here)? Drop your thoughts in the comments below – I read every single one and love hearing how you made the recipe your own.
And hey, if you snapped a photo of your glossy, caramelized masterpiece, tag me on Instagram – nothing makes me happier than seeing your kitchen wins! Whether you’re a stir-fry newbie or a wok warrior, your feedback helps make these recipes even better. You can also find more of my cooking adventures over on Facebook.