You know those nights when dinner needs to happen now, but you’re fresh out of inspiration? That was me last Tuesday—starving, cranky, and staring into the abyss of my fridge. Then I spotted the half-used pack of ground beef and my last few slices of cheddar. Fifteen minutes later? Magic. The sizzle of onions hitting the pan, the way the cheese oozes perfectly when you press the sandwich just right—this Ultimate Cheesy Ground Beef Melt saved my sanity (and my stomach).
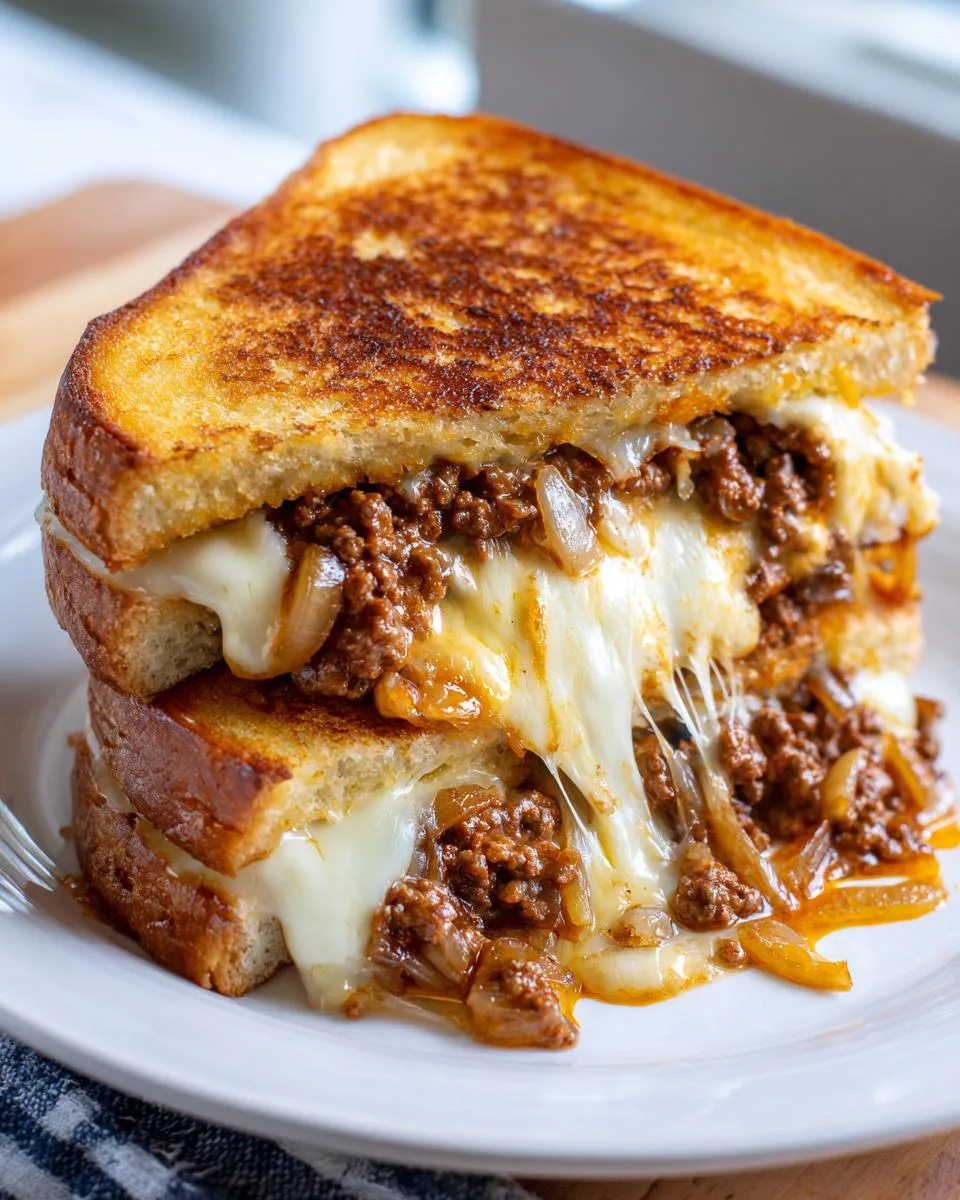
Table of Contents
Table of Contents
Why You’ll Love This Ultimate Cheesy Ground Beef Melt
This isn’t just another sandwich. It’s my go-to rescue recipe when time’s tight but flavor can’t be compromised. The beef gets all golden and crisp at the edges, the onions turn sweet and jammy, and that cheese—oh, that cheese!—melts into every nook. My kids call it “cheeseburger toast” and fight over the last bite. Best part? You probably have everything you need already: basic pantry spices, whatever bread’s lying around, and that trusty skillet. No fancy techniques, no waiting—just pure, cheesy comfort in under 25 minutes.
Fair warning: One bite and you’ll be hooked. I’ve lost count of how many times I’ve whipped this up for surprise guests, after-school snacks, or those “I can’t even” weeknights. It’s the kind of recipe that feels like a secret weapon—until you inevitably blab about it to everyone, like I’m doing right now. Like I’m doing right now.
Let me tell you why this melt is about to become your new weeknight hero. It’s the kind of recipe that checks all the boxes without even trying:
- Faster than takeout: Seriously—from skillet to plate in under 25 minutes. (I’ve timed it while starving.)
- Flavor bomb: That crispy-edged beef mixed with caramelized onions? Pure magic against basic sandwich syndrome.
- No-fail flexible: Use whatever bread and cheese you’ve got. No cheddar? Swiss works. No sourdough? Wheat toast saves the day.
- Kid-approved: My picky eater inhales this. (Pro tip: Let them assemble their own—suddenly it’s “fun food.”)
- Leftover genius: Extra taco meat? Bolognese? Toss it between bread with cheese. Boom—whole new meal.
Trust me, once you taste that first gooey, beefy bite? You’ll get it.
Ingredients for Ultimate Cheesy Ground Beef Melt
Here’s the beautiful part—this melt needs nothing fancy. Just honest, hearty ingredients that work their magic together:
- 1 pound ground beef (80/20 blend): That bit of fat keeps things juicy. Leaner blends can dry out.
- 1 onion, finely chopped: Yellow onions work great here—they sweeten up so nicely in the pan.
- 2 cloves garlic, minced: Because everything’s better with garlic. (Use a press if you’re lazy like me.)
- Salt & pepper: Season like you mean it—about ½ tsp salt and ¼ tsp pepper does the trick.
- 4 slices bread: Sourdough’s my favorite for crunch, but Texas toast makes it extra indulgent. Stale bread? Even better—toasts up perfectly.
- 4 slices cheese: Cheddar’s classic, but American melts like a dream. Swiss or pepper jack? Go wild.
- Butter, softened: Not margarine. Trust me on this—real butter makes that golden crust irresistible.
- Optional jazz: Pickles for tang, mustard for kick, or a dash of Worcestershire in the beef. Your call.
See? Nothing weird. Just good stuff that probably lives in your kitchen right now.

Equipment You’ll Need
No fancy gadgets required here—just the basics you likely already own:
- Heavy skillet: Cast iron or non-stick both work. (This is where that perfect golden crust happens!)
- Spatula: For flipping without cheese casualties. A thin metal one slides under like a dream.
- Cutting board & sharp knife: For chopping onions fast. Bonus if it’s the board you already dirtied.
That’s it! No stand mixers, no special presses—just simple tools doing delicious work.
How to Make the Ultimate Cheesy Ground Beef Melt
Alright, let’s get cooking! This melt comes together so fast, you’ll want to prep everything before you start. Here’s exactly how I make mine—with all the little tricks I’ve learned after making this about a hundred times.
Sauté the Aromatics
First, grab your skillet and warm it over medium heat. No oil needed yet—just toss in those chopped onions. Let them sizzle for about 2 minutes until they start looking translucent, stirring occasionally. Now add the minced garlic. (Careful—garlic burns fast!) You’ll know it’s ready when the whole kitchen smells amazing, about 1-2 more minutes. That sweet onion-garlic combo? That’s your flavor foundation right there.
Brown the Ground Beef
Crank the heat up to medium-high and add your ground beef. Use your spatula to break it up into small crumbles—I like mine somewhere between taco meat and burger texture. Sprinkle with salt and pepper. (Pro tip: Season from about 12 inches above the pan for even distribution—my grandma’s trick!) Keep stirring until there’s zero pink left, about 5-6 minutes. You want those little crispy browned bits—that’s where the magic is!
Assemble the Melt
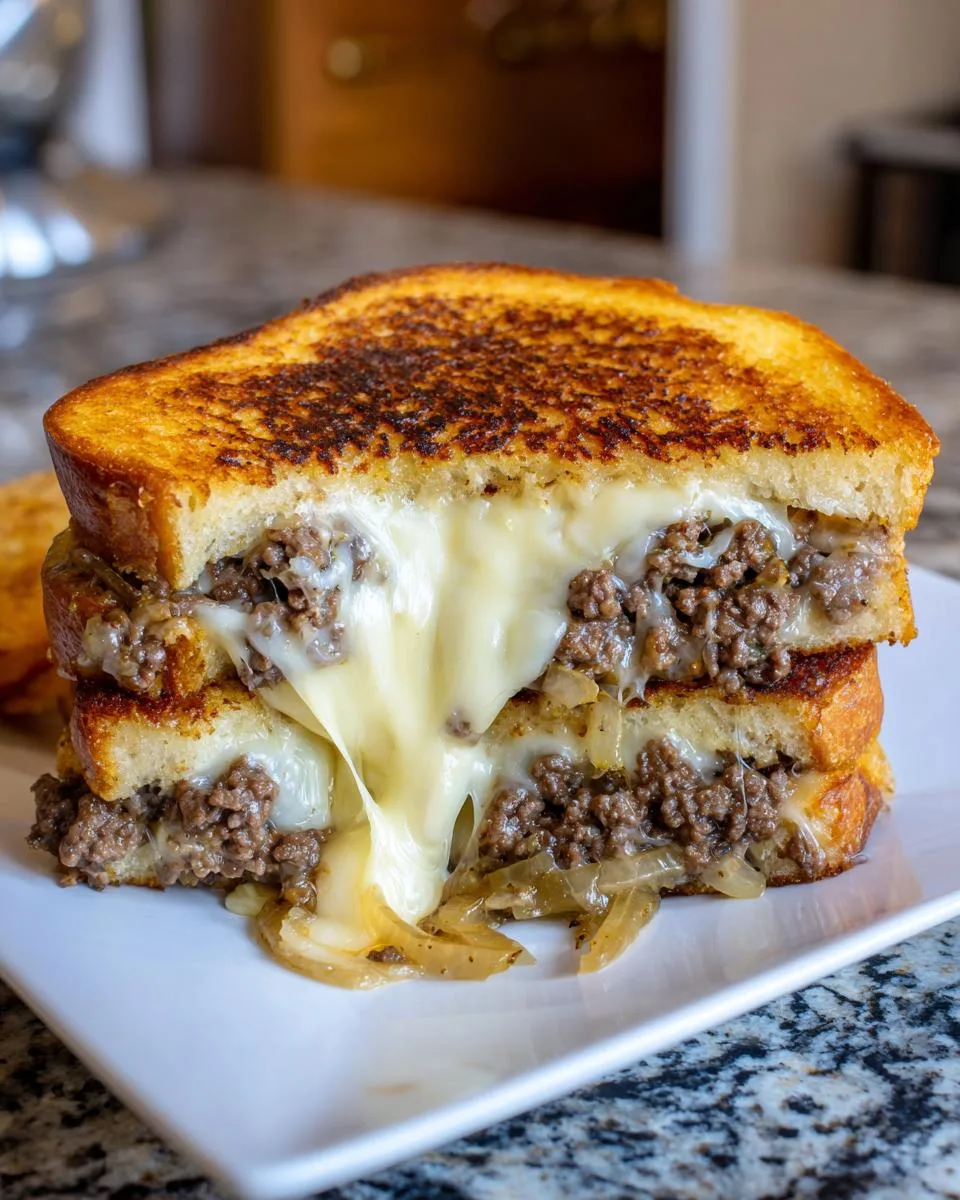
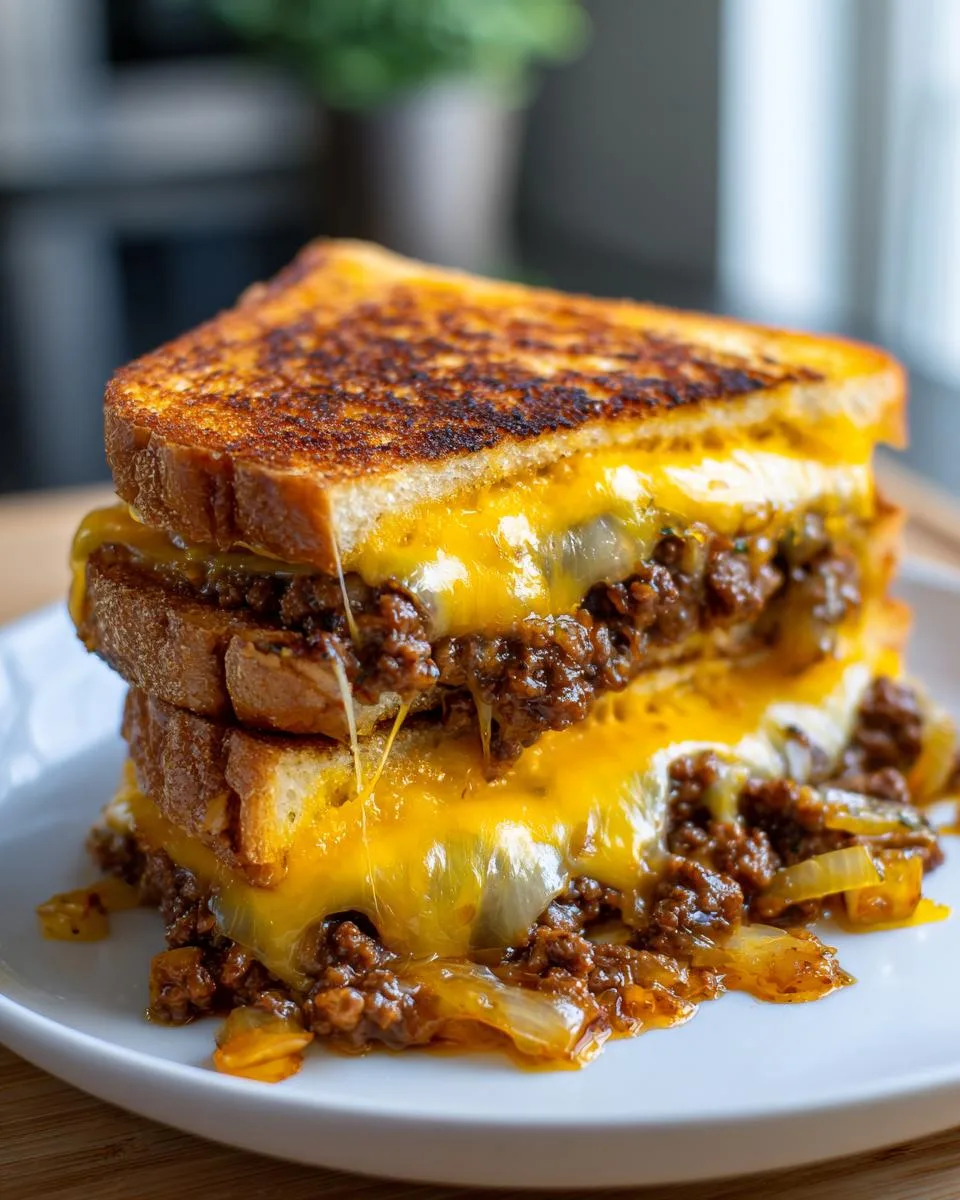
While the beef’s cooking, butter one side of each bread slice. Not a wimpy spread—really coat it for maximum golden crunch. On the unbuttered side, pile that glorious beef mixture, then top with cheese. (Overhang is good—those crispy cheese edges are the best part!) Cap it with another slice, buttered side facing out. Repeat for melt #2. Your hands will get messy. Embrace it.
Grill to Perfection
Wipe out your skillet and return it to medium heat. Gently lay your sandwiches in the pan. Now, the secret: place a smaller pan or lid on top to lightly press them. This helps everything meld together. After 3 minutes, peek underneath—golden brown? Flip! Grill another 3 minutes until the cheese is oozing out the sides. (If it’s browning too fast, lower the heat.) Listen for that satisfying sizzle—that’s your dinner calling!
Print
3-Ingredient Ultimate Cheesy Ground Beef Melt That Hits the Spot
- Prep Time: 10 minutes
- Cook Time: 15 minutes
- Total Time: 25 minutes
- Yield: 2 servings 1x
- Category: Sandwich
- Method: Grilling
- Cuisine: American
- Diet: Low Lactose
Description
A quick and delicious cheesy ground beef melt sandwich, perfect for lunch or dinner.
Ingredients
- 1 pound ground beef
- 1 onion, chopped
- 2 cloves garlic, minced
- Salt and pepper, to taste
- 4 slices of your favorite cheese (cheddar, mozzarella, or American)
- 4 slices of bread (your choice)
- Butter, for spreading
- Optional toppings: sliced pickles, mustard, or ketchup
Instructions
- Sauté Aromatics: In a skillet over medium heat, add chopped onion and minced garlic. Cook until softened and fragrant, about 3-4 minutes.
- Brown the Beef: Increase the heat to medium-high and add the ground beef. Season it with salt and pepper. Cook until browned and fully cooked.
- Prepare the Bread: While the beef is cooking, spread butter on one side of each slice of bread.
- Assemble the Sandwich: On the unbuttered side, layer the beef mixture and top it with cheese. Place another slice of bread on top, buttered side facing out.
- Grill the Sandwich: Heat a pan over medium heat. Carefully place the assembled sandwich in the skillet. Grill each side for about 3-4 minutes until the bread is golden brown and the cheese has melted.
- Serve and Enjoy: Once ready, slice the melts in half and serve them hot with your choice of mustard, ketchup, or sliced pickles.
Notes
- You can use any cheese you prefer.
- Add extra toppings like lettuce or tomatoes for more freshness.
- For a crispier melt, press the sandwich lightly while grilling.
Nutrition
- Serving Size: 1 sandwich
- Calories: 450
- Sugar: 3g
- Sodium: 650mg
- Fat: 25g
- Saturated Fat: 12g
- Unsaturated Fat: 10g
- Trans Fat: 0.5g
- Carbohydrates: 30g
- Fiber: 2g
- Protein: 28g
- Cholesterol: 90mg
Tips for the Best Ultimate Cheesy Ground Beef Melt
Want to take your melt from good to legendary? Here are my hard-earned tricks after many, many cheesy experiments:
- Grate your own cheese: Pre-shredded stuff has anti-caking agents that make it melt weird. A block of cheddar grated fresh? That’s liquid gold right there.
- Let it rest: I know it’s tempting, but wait 1 minute before slicing. This lets the cheese set slightly so it doesn’t all ooze out when you cut in.
- Press lightly: No need to smash it flat—just enough pressure to help the bread and filling become best friends.
- Low & slow for melty cheese: If your bread’s browning too fast before the cheese melts, just turn down the heat a smidge.
- Season in layers: A pinch of salt on the onions, another on the beef—it builds flavor like you wouldn’t believe.
Trust me, these little tweaks make all the difference between a good sandwich and a “holy cow, what is this sorcery?” moment.
Variations and Substitutions
The beauty of this melt? It’s basically a flavor playground. Here’s how I mix it up depending on what’s in my fridge or who’s coming to dinner:
- Meat swap: Ground turkey works great (add a splash of olive oil for moisture). Leftover taco meat? Chili? Even pulled pork—toss it in there!
- Spice it up: Toss in diced jalapeños with the onions, or stir a pinch of cayenne into the beef. My husband swears by sriracha mayo spread on the bread.
- Bread freedom: Gluten-free? Use your favorite GF loaf. Croissants make it fancy, English muffins turn it into breakfast.
- Cheese experiments: Blue cheese crumbles for grown-up nights, pepper jack for kick, or go wild with brie and caramelized onions.
- Veggie boost: Sneak in chopped mushrooms with the beef, or top with arugula after grilling for fresh crunch.
The rule? If it tastes good to you, it’ll taste good melted between bread. No wrong answers here.
Serving Suggestions
This melt shines bright all on its own, but here’s how I love to jazz up the plate (when I’m feeling fancy between bites):
- Classic diner style: A handful of dill pickles and ridged potato chips for that perfect salty-crunchy contrast.
- Summer cookout vibes: Creamy coleslaw piled right on the side—the cool crunch cuts through all that cheesy richness.
- Midnight snack mode: Straight from the pan, no sides, standing over the stove. No judgment here.
Pro tip: Keep napkins handy—this is gloriously messy eating at its finest.
Storage and Reheating
Leftovers? (As if!) But if you somehow resist eating both melts immediately, here’s how to keep the magic alive: Wrap tightly in foil and refrigerate for up to 2 days. When ready, reheat in a dry skillet over medium-low—no microwave sogginess here! Just 2-3 minutes per side brings back that glorious crunch and melty center. (Secret weapon: a lid helps the cheese get gooey again without burning.)
Nutritional Information
Here’s the scoop—your exact numbers will dance a bit depending on your bread, cheese, and beef choices. But for my classic version (80/20 beef on sourdough with cheddar), each hearty melt comes in around:
- 450 calories (worth every single one)
- 28g protein to keep you full
- 25g fat (hey, that’s where the flavor lives!)
- 30g carbs for energy
Not a diet food, but pure comfort—and sometimes that’s exactly what your soul (and stomach) needs.
Frequently Asked Questions
Got questions about this melt? I’ve got answers—plus a few extra tips I’ve picked up along the way:
Can I freeze this Ultimate Cheesy Ground Beef Melt?
Absolutely! Let it cool completely, then wrap tightly in foil or plastic wrap. Freeze for up to 1 month. To reheat, skip the microwave—pop it straight into a 350°F oven (still wrapped in foil) for about 15 minutes, then unwrap and crisp up in a skillet for 2 minutes per side. The cheese might weep a little, but the flavor stays fantastic.
What’s the best cheese for beef melts?
My top picks? American cheese melts like a dream (don’t knock it till you try it), sharp cheddar brings bold flavor, and pepper jack adds a nice kick. Pro tip: Mix cheeses! I often do half cheddar for taste and half American for that perfect ooze factor.
How do I prevent soggy bread?
Three tricks: 1) Let the beef mixture cool slightly before assembling (steam = sogginess), 2) Butter the bread all the way to the edges to create a moisture barrier, and 3) Don’t skimp on the grill time—that golden crust locks in the crunch.
What’s the difference between this and a patty melt?
Great question! A classic patty melt uses a formed beef patty (like a burger) with Swiss cheese on rye. Our version is quicker—crumbled beef means faster cooking, and any bread/cheese works. Think of it as patty melt’s laid-back cousin who shows up in sweatpants but still brings amazing flavor.
Can I make this with leftover ground beef?
Oh heck yes—that’s half the magic! Leftover taco meat? Chili? Even pulled pork—toss it in there! Just warm it up first so your cheese melts properly. Bonus: The flavors often taste even better the next day!
Final Thoughts
Listen, if you take one thing from this recipe, let it be this: the Ultimate Cheesy Ground Beef Melt is your new kitchen superhero. It’s the answer to “What’s for dinner?” when you’re staring at ground beef like it’s a math problem. It’s the solution to hangry kids (or spouses) who need food now. And honestly? It might just become your secret weapon for those nights when cooking feels like too much—but takeout sounds too expensive.
So here’s your mission: Make it this week. Use whatever bread’s going stale in your pantry. Raid the cheese drawer. And when that first melty, beefy bite hits your tongue? Come back and tell me about it! Rate the recipe, leave a comment with your wildest variation (I’m still dreaming about that brie-caramelized onion combo someone mentioned), or just brag about your perfect golden crust. Because recipes like this? They’re meant to be shared, messed with, and most importantly—devoured.