Halloween baking has a way of turning any kitchen into a little workshop of fun. Witch Hat Cookies are one of those recipes that bring out the child in everyone—simple, colorful, and full of charm. They’re the kind of treat that looks impressive but doesn’t take hours to make.

Table of Contents
Table of Contents
Why You’ll Love Witch Hat Cookies
A Halloween Classic Made Simple
Witch Hat Cookies shine because they’re both festive and approachable. The combination of soft peanut butter cookies topped with melting chocolate wafers and candy kisses makes them a seasonal favorite that’s ready in under an hour. If you’re hosting a Halloween party or want something quick for the kids after school, these cookies deliver. They don’t require advanced decorating skills, so even little hands can get involved. The rolling of the dough balls, dipping in sugar, and topping with chocolate create a hands-on experience that kids actually enjoy. They’ll be proud to show off their edible witch hats.
Their bite-sized convenience is what makes them even better. Unlike a large cake or pie, these cookies are easy to grab from the table, which means less mess and stress during parties. Pairing them with other themed desserts like Halloween Cream Cheese Swirl Brownies turns your dessert spread into a centerpiece without extra effort.
Nostalgic Yet Creative
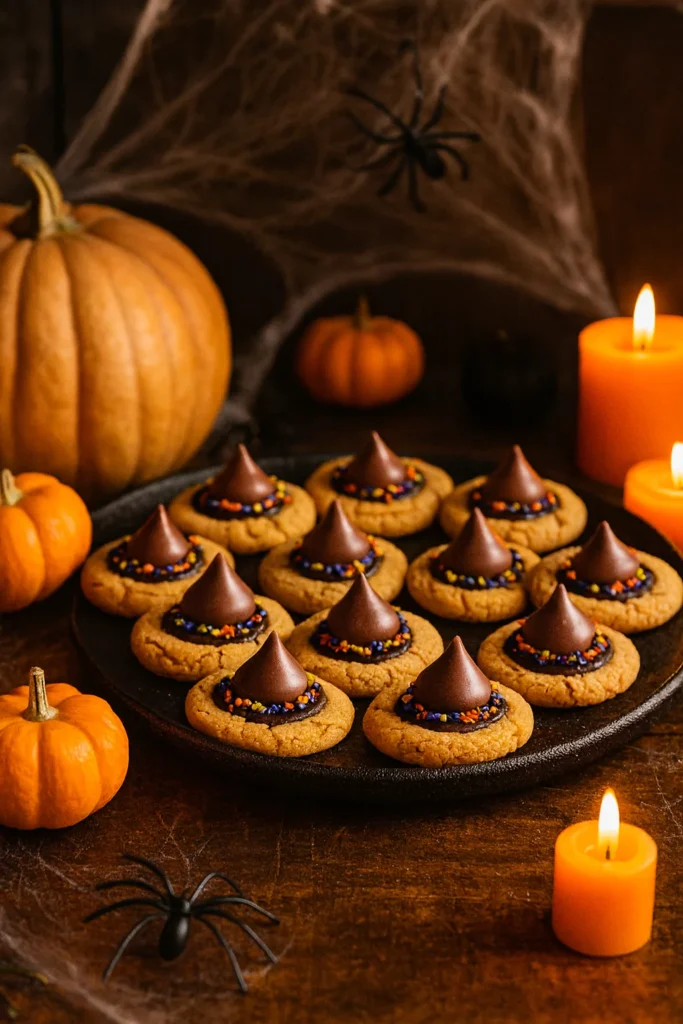
Part of the magic of Witch Hat Cookies is the nostalgia they bring. Growing up, many of us remember baking simple cookies with our parents or grandparents. This recipe adds a playful twist, transforming a basic cookie into something festive. The frosting colors—orange, purple, and green—let you customize each batch, and the sprinkles add just the right finishing touch. Kids love being part of the decorating process, and adults can have fun too, creating hats that match a party theme or Halloween décor. They aren’t just cookies—they’re little pieces of creativity served on a plate.
Print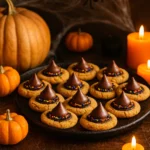
Witch Hat Cookies – Ultimate Halloween Fun Recipe
- Prep Time: 20 minutes
- Cook Time: 10 minutes
- Total Time: 30 minutes
- Yield: 30 cookies 1x
- Category: Dessert, Halloween
- Method: Baking
- Cuisine: American
- Diet: Vegetarian
Description
Fun and festive Witch Hat Cookies made with peanut butter cookies, chocolate wafers, candy kisses, and colorful frosting.
Ingredients
1 ¾ cup (218 g) all-purpose flour
1 teaspoon baking soda
¼ teaspoon salt
½ cup (100 g) granulated sugar, plus more for rolling
½ cup (100 g) light brown sugar
½ cup (128 g) creamy peanut butter
½ cup (113 g) unsalted butter, room temp
1 large egg
1 teaspoon vanilla extract
30 chocolate melting wafers
30 chocolate kisses, unwrapped
Frosting: ½ cup butter, 1 ¼ cups confectioners’ sugar, 1 teaspoon vanilla, pinch salt, 1–2 tbsp heavy cream, gel food coloring, sprinkles
Instructions
1. Preheat oven to 375ºF and line baking sheets.
2. Whisk flour, baking soda, and salt.
3. Beat sugars, butter, and peanut butter until fluffy.
4. Add egg and vanilla, then mix in dry ingredients.
5. Scoop dough, roll in sugar, and bake 10 minutes.
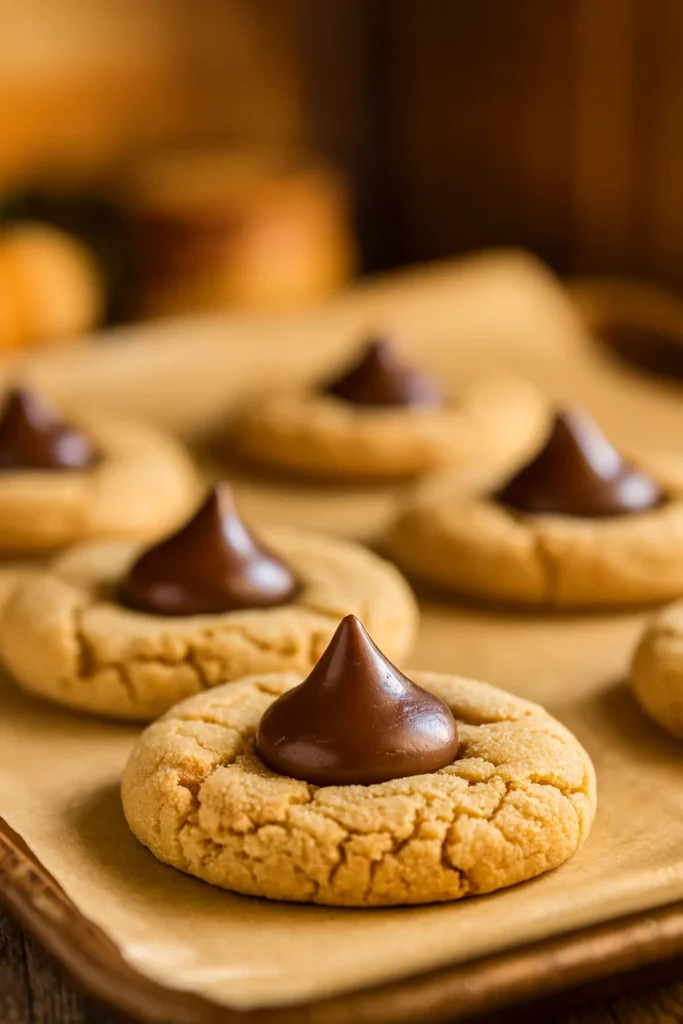
6. Top with chocolate wafers, spread slightly, and cool.
7. Make frosting and tint with food coloring.
8. Pipe frosting on wafers, press candy kisses on top.
9. Decorate with sprinkles and serve.
Notes
Store cookies in airtight container up to 4 days. Freeze undecorated cookies up to 2 months for make-ahead.
Nutrition
- Serving Size: 1 cookie
- Calories: 160
- Sugar: 14g
- Sodium: 95mg
- Fat: 8g
- Saturated Fat: 4g
- Unsaturated Fat: 3g
- Trans Fat: 0g
- Carbohydrates: 20g
- Fiber: 1g
- Protein: 2g
- Cholesterol: 15mg
Ingredients and Tools You’ll Need
Every great recipe begins with the right ingredients and tools, and Witch Hat Cookies are no exception. Luckily, you don’t need anything fancy—just pantry basics, a few kitchen tools, and a little creativity with frosting colors. With these essentials, you’ll be ready to bake a batch of cookies that look magical but taste even better.

Pantry Staples Turned Magical
The beauty of Witch Hat Cookies is how they transform everyday pantry items into something festive. Flour, sugar, peanut butter, and butter make the foundation of the cookie dough, creating a soft and chewy bite. The addition of chocolate wafers and candy kisses takes these cookies to the next level, forming the iconic witch hat shape. If you’re short on time, you can swap the homemade dough with store-bought cookie dough. It works as a convenient shortcut and still delivers that seasonal charm.
You can even adapt the recipe to fit dietary needs. Gluten-free flour blends work surprisingly well, and sunflower butter makes a nut-free alternative. Keeping it simple means you can make these cookies fit your family’s preferences. For inspiration, try looking at how classics like Halloween Sugar Cookies use the same basic staples to create festive results.
Baking Tools That Make It Easy
You don’t need a professional kitchen setup for these cookies, but a few tools make the process smoother. A stand mixer or hand mixer helps cream the butter, peanut butter, and sugars until light and fluffy. Parchment-lined baking sheets keep cookies from sticking and make cleanup a breeze. A set of piping bags with round tips allows for neat frosting lines when attaching the chocolate kisses and adding a pop of color.
Optional tools like a small cookie scoop ensure uniform cookie sizes, but even a spoon works fine. The idea is to keep it approachable—just like whipping up a loaf of Chocolate Chip Pumpkin Bread, it’s about using what you already have and enjoying the process.
Step-by-Step Guide to Making Witch Hat Cookies
Baking Witch Hat Cookies is as enjoyable as eating them. The steps are straightforward, and with a little attention to detail, you’ll have cookies that look festive and taste delicious. From mixing the dough to adding those signature chocolate “hats,” here’s how to make them perfectly every time.
Baking the Perfect Cookie Base
The foundation of Witch Hat Cookies is the peanut butter cookie base. Start by whisking together flour, baking soda, and salt in a bowl. In a separate mixing bowl, beat together butter, peanut butter, and sugars until fluffy, then add the egg and vanilla. Slowly blend in the dry ingredients until the dough comes together.
Divide the dough into tablespoon-sized sections, form them into balls, and sprinkle them with powdered sugar. Placing them on parchment-lined sheets ensures even baking. Bake until the edges are lightly golden, usually about 10 minutes. Once out of the oven, press a chocolate wafer onto each cookie while still warm. The heat helps the wafer melt slightly, creating a smooth base for the candy kiss.
Just like when making Halloween Witch Finger Cookies, precision at this stage makes the results look impressively spooky.
Decorating Your Witch Hats
The real fun comes with decorating. Whip up a quick frosting, tint it with orange, purple, and green gel coloring, and pipe a small circle onto the bottom of each candy kiss before pressing it onto the wafer. This step creates the brim of the witch hat, and the frosting peeking out adds both color and structure.
Sprinkles or edible glitter give each cookie a magical finish. Don’t worry about perfection—the charm of Witch Hat Cookies lies in their playful look. For a full witch-themed spread, pair them with Wicked Witch Cupcakes, and you’ll have a dessert table that’s both festive and unforgettable.
Serving, Storing, and Variations
Once your Witch Hat Cookies are baked and decorated, the fun isn’t over yet. How you serve and store them makes just as much of an impact as the baking itself. With a little planning, you can keep them fresh, party-ready, and even prepare extras for later.
How to Serve Them at Parties
Witch Hat Cookies aren’t just delicious—they’re also eye-catching. Arrange them on a black or orange platter for a dramatic effect, or stack them on a tiered dessert tray for easy access. Since they’re bite-sized, guests can grab one without needing plates or forks, which makes them perfect for Halloween parties.
You can also build a themed dessert spread by combining them with spooky treats like Eyeball Brownies. The mix of colors, shapes, and playful designs adds variety while keeping everything festive. To really impress, pair your cookies with a Halloween punch or serve alongside a savory snack for balance.
Storage, Freezing, and Flavor Twists
The best part about Witch Hat Cookies is their flexibility. Store leftovers in an airtight container at room temperature for up to four days, or refrigerate them to extend freshness. If you’d like to prepare in advance, bake the cookies and freeze them plain, then decorate closer to your event. Frosting and sprinkles hold up best when added just before serving.
There are plenty of ways to get creative with flavors too. Swap peanut butter for almond or sunflower butter, or use a chocolate cookie base instead. For a gluten-free option, try a flour blend designed for baking. And if you’d like to add balance to your spread, a savory bite like Crescent Roll Mummy Dogs pairs perfectly with the sweetness of these cookies.
Frequently Asked Questions About Witch Hat Cookies
How do you make Witch Hat Cookies from scratch?
Making Witch Hat Cookies from scratch starts with a simple peanut butter cookie dough. Once baked, press a chocolate wafer onto each cookie, then top it with a candy kiss secured by colorful frosting. Add sprinkles for a festive finish, and you’ve got homemade witch hats ready to serve.
Can I use store-bought cookie dough for Witch Hat Cookies?
Yes, store-bought dough works perfectly if you’re short on time. Simply roll the dough into balls, bake, and then decorate as directed. While homemade dough gives you more flavor options, premade dough makes this recipe fast and accessible.
How long do Witch Hat Cookies stay fresh?
When stored in an airtight container at room temperature, Witch Hat Cookies stay fresh for about four days. For longer storage, refrigerate them for up to a week. Always let them come to room temperature before serving to bring back their soft, chewy texture.
Can Witch Hat Cookies be frozen for later?
Absolutely. Bake the cookies without decorations, then freeze them in a sealed container for up to two months. When ready to serve, thaw them and add frosting, candy kisses, and sprinkles for a freshly decorated look.
Conclusion
Witch Hat Cookies bring together everything we love about Halloween baking—simplicity, creativity, and a touch of magic. They’re easy enough for kids to help with yet festive enough to impress at any party. Whether you make them for a school event, a Halloween gathering, or just an afternoon treat, these cookies will quickly become a seasonal favorite. So grab your frosting bags, gather the sprinkles, and whip up a batch that’s as fun to make as it is to eat.
For More recipes, Follow me on Facebook!


